
User`s guide


Cisco ATA 186 Configuration Guide
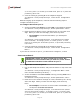
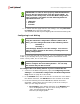
IMPORTANT: In order to work properly with the Net2Phone
service, the ATA 186 must be using the G.723 CODEC. To
verify the codec being used, access the Web Configuration
page (see below) and make sure the following fields are
populated with zero (0):
LBRCodec
RxCodec
TxCodec
3. To refresh the Web page with the new settings, click the [Click here
to reload] link at the top of the page.
You should now be able to place outgoing calls and receive incoming calls.
Configuring Local Dialing
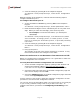
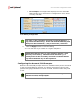
IMPORTANT: In order to make changes to the ATA186 after
using the automatic configuration method (either IVR or
Web), you must change two fields to the following values:
UseTFTP: 0
ToConfig
: 1
Click the Apply button to save the settings. You can now
make any other changes to the device, including the local
dialing configuration.
If you are using the ATA 186 outside the US, you can configure the ATA 186
to dial as you normally do in your country (without international access
codes, country codes, etc. for local calls).
NOTE: If you are using the ATA 186 in the US, you do not
need to configure the local dialing feature. You can skip
this section and just dial as usual.
To configure the local dialing feature if you are outside the US:
1. Connect to the Web Configuration page (see Configuring Account
Settings in the Automatic Configuration via Web Configuration
Page section on page 11 in this Guide).
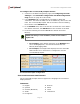
2. In the DialPlan field, click in the text box to insert the cursor before
the default characters, but DO NOT erase the contents of the field.
3. Insert the following characters BEFORE the default characters:
Pn011xxx| (where xxx is the local country code of the country in
which you are using the device).
• For example, if the default characters of the DialPlan field
were “abcdefghijklmno” and your local country code was
“555,” the field should look like this:
Pn011555|abcdefghijklmno.
Page 15