
Specifications


24 Input/Output Controller Replacement Instructions
Removing and Replacing the Input/Output Controller
Removing the Input/Output Controller
To remove an I/O controller from a Cisco 7200 series router or Cisco uBR7200 series router,
complete the following steps:
Note Before removing the I/O controller, save the router’s configuration to a TFTP file server. (See
the “Copying the Configuration File to a TFTP Server” section on page 17.)
Step 1 Power down the router and disconnect the input power cable. (See the “Powering Down
the Router and Disconnecting Input Power” section on page 19.)
Step 2 Attach an ESD-preventive wrist strap between you and an unfinished chassis surface.
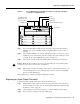
Step 3 Disconnect the cables from the I/O controller’s console, auxiliary, and Fast Ethernet (if
present) ports. (For a Cisco 7200 series router, see Figure 14. For a Cisco uBR7200 series
router, see Figure 15.)
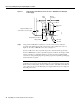
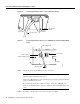
Figure 14 Cisco 7200 Series Input/Output Controller Ports, Handle, and Captive Screws
2
MII
EN
RJ45
EN
RJ45
LINK
1O PWR
OK
RJ-45
CPU RESET
FAST ETHERNET INPUT/OUTPUT CONTROLLER
ENABLED
PCMCIA
EJECT
SLOT 0
SLOT 1
FE MII
ETHERNET-10BFL
EN
RX
0
1
2
3
4
TX
RX
TX
RX
TX
RX
TX
RX
TX
ETHERNET 10BT
ENABLED
0
2
1
3
LINK
0
1
2
3
ENABLED
MII
LINK
RJ45
FAST ETHERNET
0
0
4
1
3
5
6
FAST SERIAL
EN
TD
TC
RD
RC
LB
CD
TD
TC
RD
RC
LB
CD
TD
TC
RD
RC
LB
CD
TD
TC
RD
RC
LB
CD
TOKEN RING
0
1
2
3
Cisco 7200
Series
H6537
Auxiliary
port
Handle
Console
port
Captive
installation
screw
PC Card slots
I/O controller
Optional Fast Ethernet port
(MII receptacle and RJ-45 receptacle)