ASA 8.
Conventions Refer to the Cisco Technical Tips Conventions for more information on document conventions. Background Information Access lists are primarily used to control the traffic flow through the firewall. You can allow or deny specific types of traffic with access lists. Every access list contains a number of access list entries (ACEs) that control the traffic flow from a specific source to a specific destination.
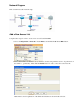
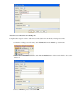
Network Diagram This document uses this network setup: Add a New Access List Complete these steps in order to create a new access list with ASDM: 1. Choose Configuration > Firewall > Access Rules, and click the Add Access Rule button. 2. Choose the interface to which this access list has to bound, along with the action to be performed on the traffic i.e., permit/deny. Then click the Details button in order to select the source network.
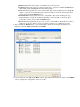
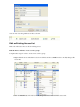
♦ InterfaceDetermines the interface to which this access list is bound. ♦ ActionDetermines the action type of the new rule. Two options are available. Permit allows all matching traffic and Deny blocks all matching traffic. ♦ SourceThis field specifies the source of the traffic. This can be anything among a Single IP address, a network, an interface IP address of the firewall or a network object group. These can be selected with the Details button.
Add an access rule before an existing one: Complete these steps in order to add an access rule just before an already existing access rule: 1. Select the existing access list entry, and click Insert from the Add drop−down menu 2. Choose the Source and Destination, and click the Details button of the Service field to choose the Protocol. 3. Choose HTTP the protocol, and click OK.
4. You are returned to the Insert Access Rule window. The Service field is filled with tcp/http as the selected protocol. Click OK in order to complete the configuration of the new access list entry. You can now observe the new access rule shown just before the already existing entry for the Inside−Network.
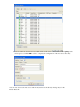
Note: The order of the access rules is very important. While processing each packet to filter, the ASA examines if the packet matches any of the access rule criterion in a sequential order and if a match happens, it implements the action of that access rule. When an access rule is matched, it does not proceed to further access rules and verify them again. Add an Access Rule after an existing one: Complete these steps in order to create an access rule just after an already existing access rule. 1.
You can view that the newly configured access rule sits just after the already configured one. Create a Standard Access List Complete these steps in order to create a standard access list with the ASDM GUI. 1. Choose Configuration > Firewall > Advanced > Standard ACL > Add, and click Add ACL. 2. Give a number in the range allowed for the standard access list, and click OK. 3. Right−click the access list, and choose Add ACE in order to add an access rule to this access list. 4.
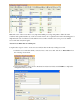
Create a Global Access Rule Complete these steps in order to create an extended access list that contains global access rules. 1. Choose Configuration > Firewall > Advanced > ACL Manager > Add, and click Add ACL button. 2. Specify a name for the access list, and click OK. 3. Right−click the access list, and choose Add ACE in order to add an access rule to this access list. 4.
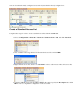
You can now view the global access rule, as shown. Edit an Existing Access List This section discusses how to edit an existing access. Edit the Protocol field to create a service group: Complete these steps in order to create a new service−group. 1. Right−click the access rule that needs to be modified, and choose Edit in order to modify that specific access rule. 2. Click the Details button in order to modify the protocol associated with this access rule.
3. You can select any protocol other than HTTP if required. If there is only a single protocol to be selected, then there is no need to create the service group. It is useful to create a service group when there is a requirement to identify numerous non−adjacent protocols to be matched by this access rule. Choose Add > TCP service group in order to create a new TCP service group. Note: In the same way, you can also create a new UDP service group or ICMP group and etc. 4.
5. The newly created service group can be viewed under the tab TCP service groups. Click OK button to return to the Edit Access Rule window.
6. You can see that the Service field is populated with the newly created service group. Click OK in order to complete the edit. 7. Hover your mouse over that specific service group in order to view all the associated protocols. Edit the Source/Destination fields to create a Network object group: Object groups are used to simplify the creation and maintenance of access lists.
2. Fill in the Name, IP Address and Netmask fields, and click OK. 3. The newly created network object can be seen in the list of the objects. Click OK. 4. Choose Configuration > Firewall > Objects > Network Objects/Groups > Add, and click Network Object Group in order to create a new network object group. 5. The available list of all network objects can be found on the left pane of the window.
6. Click OK after you add all the members in to group. You can now view the network object group.
7. In order to modify any source/destination field of an existing access list with a network group object, right−click the specific access rule, and choose Edit. 8. The Edit Access Rule window appears. Click on the Details button of the Source field in order to modify it. 9. Select the All−Internal−Hosts network object group, and click OK button.
10. Click OK. 11. Hover your mouse over the Source field of the access rule in order to view the members of the group.
Edit the Source Port: Complete these steps in order to modify the source port of an access rule. 1. In order to modify the source port of an existing access rule, right−click it, and choose Edit. The Edit Access Rule window appears. 2. Click the More Options drop−down button in order to modify the Source Service field, and click OK. You can view the modified access rule, as shown.
Delete an Access List Complete these steps in order to delete an access list: 1. Before you delete an existing access list, you need to delete the access list entries (the access rules). It is not possible to delete the access list unless you first delete all of the access rules. Right−click the access rule to be deleted, and choose Delete. 2. Complete the same Delete operation on all the existing access rules, and then select the access list and choose Delete in order to delete it.
2. Select the required access list into which you need to insert this access rule. You can use Paste in the tool bar to insert the access rule. Export the Access List Information You can export the access list information to another file. Two formats are supported to export this information. 1. Comma Separated Value (CSV) format 2. HTML format Right click any of the access rules, and choose Export in order to send the access list information to a file.
Verify There is currently no verification procedure available for this configuration. Troubleshoot There is currently no specific troubleshooting information available for this configuration. Related Information • ASDM Configuration Examples and TechNotes • ASA Configuration Examples and Technotes • Technical Support & Documentation − Cisco Systems Contacts & Feedback | Help | Site Map © 2014 − 2015 Cisco Systems, Inc. All rights reserved.