
User Manual
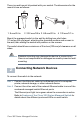
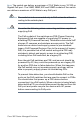
Table Of Contents
- Mounting the Cisco Switch
- Connecting Network Devices
- Configuring the Cisco 300 Series Managed Switch
- Features of the Cisco 300 Series Managed Switch
- Returning the Device to the Factory Default Settings
- Where to Go From Here
- Montaje del switch de Cisco
- Conexión de los dispositivos de red
- Configuración del Cisco 300 Series Managed Switch
- Características del switch administrado Cisco serie 300
- Cómo restablecer la configuración predeterminada de fábrica del dispositivo
- Cómo seguir
- Montage du commutateur Cisco
- Connexion des périphériques réseau
- Configuration du Commutateur administrable Cisco
- Fonctionnalités du commutateur administrable Cisco série 300
- Restauration de la configuration d'origine de l'appareil
- Pour en savoir plus
Cisco 300 Series Managed Switches 9
NOTE Details on how to change the IP address on your computer
depend upon the type of architecture and operating system you are
using. Use the computer Help and Support functionality to search for “IP
Addressing.”
STEP 3 Open a Web browser window. If you are prompted to install an
Active-X plug-in when connecting to the device, follow the
prompts to accept the plug-in.
STEP 4 Enter the switch IP address in the address bar and press Enter. For
example, http://192.168.1.254.
The Switch Login Page displays.
STEP 5 Enter the default login information:
• Username is cisco
• Default password is cisco (passwords are case sensitive)
STEP 6 If this is the first time that you have logged on with the default
username and password, the Change Password page opens. The
rules for constructing a new login and password are displayed on
the page. Enter a new administrator password and click Apply.
CAUTION Make sure that any configuration changes made are saved to
the Startup configuration before exiting from the web-based
interface by clicking on the Save icon. Exiting before you
save your configuration will result in all current changes
being lost the next time the switch is rebooted.
The Getting Started window displays. You are now ready to configure the
switch. Refer to the Cisco 300 Series Managed Switch Administration
Guide for further information.
Use the console port
To configure the switch by using the console port:
STEP 1 Connect a computer to the switch console port using the provided
serial cable.
STEP 2 Start a terminal application such as HyperTerminal on the
computer.
STEP 3 Configure the utility with the following parameters:
• 115200 bits per second (with release 1.2.5 of the firmware,
autobaud detection is enabled by default, so the switch should
detect the speed after you press Enter).