Cisco Unified Communications Express Historical Reporting Client Configuration Guide October 2007 Americas Headquarters Cisco Systems, Inc. 170 West Tasman Drive San Jose, CA 95134-1706 USA http://www.cisco.
THE SPECIFICATIONS AND INFORMATION REGARDING THE PRODUCTS IN THIS MANUAL ARE SUBJECT TO CHANGE WITHOUT NOTICE. ALL STATEMENTS, INFORMATION, AND RECOMMENDATIONS IN THIS MANUAL ARE BELIEVED TO BE ACCURATE BUT ARE PRESENTED WITHOUT WARRANTY OF ANY KIND, EXPRESS OR IMPLIED. USERS MUST TAKE FULL RESPONSIBILITY FOR THEIR APPLICATION OF ANY PRODUCTS.
CH A P T E R 1 Introduction to the Cisco Unified Communications Express Historical Reporting Client The Cisco Unified Communications Express Historical Reporting Client (also referred to as Cisco UCE Historical Reporting Client) is a software system that provides information about past call activities of a Cisco Unified Communications Express (Cisco UCE) system.
Chapter 1 Introduction to the Cisco Unified Communications Express Historical Reporting Client • Generating Historical Reports, page 5-1 • Scheduling Historical Reports, page 6-1 Cisco Unified Communications Express Historical Reporting Client Configuration Guide 1-2 OL-14986-01
CH A P T E R 2 Installation and Configuration The following topics describe how to install and configure the Cisco Unified Communications Express Historical Reporting Client (Cisco UCE).
Chapter 2 Installation and Configuration Installing Cisco UCE Historical Reports The Scheduler unloads and will not execute schedules. If the Cisco UCE Historical Reporting Client or Cisco UCE Historical Reporting Client Scheduler are running, the following message is displayed in the Cisco UCE Historical Reporting Client Setup dialog box: “Please ensure that the CUCE Historical Reporting Client and CUCE Historical Reporting Client Scheduler are stopped before proceeding.” Step 2 Click OK.
Chapter 2 Installation and Configuration Setting User Permissions to Cisco UCE Historical Reports The upgrade/reinstall is complete. b. To uninstall the Cisco UCE Historical Reporting Client, choose Uninstall Version and click Next. The “Confirm Uninstall” dialog box appears. – Click OK. After a pause, the message “Maintenance Complete” appears. – Click Finish. The uninstall is complete. Step 4 If you are installing In the Cisco Historical Reporting Client Setup dialog box, click Next.
Chapter 2 Installation and Configuration Configuring Cisco UCE Historical Reporting Client To set up the user to have “ViewHistoricalReports” privilege, perform the following steps. Step 1 Access the Cisco Unified Communications Express Administration software and set up the user. (If the user is a member of the “Administrator” group they will automatically have “ViewHistoricalReports” privilege.) Step 2 Set privilege “ViewHistoricalReports” for the user.
Chapter 2 Installation and Configuration Configuring Cisco UCE Historical Reporting Client Note Step 2 If you edit the configuration files and make changes that are not recognized by the system, the system may be corrupted. Make changes to parameters as desired. For example, you can change “NumOfLogFiles = 10” to “NumOfLogFiles = 11.” Commented lines in the configuration files start with a semi-colon ( ; ).
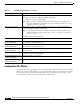
Chapter 2 Installation and Configuration Configuring Cisco UCE Historical Reporting Client Table 2-1 hrcConfig.ini file: Parameters (continued) Parameter (continued) Description and Default Value (continued) MaxSizeOfLogFiles Maximum size of the log file. When the current log file reaches this size in KB, a new log file is created by the Cisco UCE Historical Reporting Client. • Note database (under [SCH]) 1 (Integer) or greater. (Default: 1000.
Chapter 2 Installation and Configuration Configuring Cisco UCE Historical Reporting Client Table 2-2 SCH.ini File: Parameters Parameter Explanation database Database containing schedule information in the following directory: Cisco Unified Communications Express Historical Reports \Scheduler. If you change this parameter, you must also change the database parameter in the hrcConfig.ini configuration file to the same value.
Chapter 2 Installation and Configuration Configuring Cisco UCE Historical Reporting Client Cisco Unified Communications Express Historical Reporting Client Configuration Guide 2-8 OL-14986-01
CH A P T E R 3 Main Window The Main Window of the Cisco Unified Communications Express (Cisco UCE) Historical Reports Client consists of the following options: • Menu Bar, page 3-2 • Toolbar, page 3-3 • Reporting Task Pane, page 3-4 • General and Detailed Tabs, page 3-4 • Schedule, View, Reset, Help Buttons, page 3-5 Each of these options are explained in Table 3-1. Table 3-1 Main Window Options: Descriptions Option Description Menu Bar Options for File, View, Settings, and Help.
Chapter 3 Main Window Menu Bar Menu Bar The Menu Bar, which is situated at the top of the main window, consists of options including: File, Edit, Tools, Debug. The following sections show the menu bar options in the main window of Cisco UCE Historical Reports: • File Menu, page 3-2 • View Menu, page 3-2 • Settings Menu, page 3-3 • Help Menu, page 3-3 File Menu The File Menu allows you to open, or save current report settings files. Table 3-2 lists the options that you can use in the File Menu.
Chapter 3 Main Window Toolbar Settings Menu The Settings Menu allows you to log in as a different user to a different server, or to access the Reports Scheduler. Use the Reports Scheduler to add, change, or delete schedules. Table 3-4 lists the options that you can use from the Settings Menu. Table 3-4 Settings Menu: Descriptions Option Description Login Log in as a different user or log in to a different server. See Settings > Login in the Menu Bar.
Chapter 3 Main Window Reporting Task Pane Table 3-6 Basic Toolbar: Descriptions (continued) Option Description Login Log in as a different user or log in to a different server. See Settings > Login in the Menu Bar. Scheduler List schedules stored in the Reports Scheduler. See the “Viewing and Deleting Schedules” section on page 6-9. Equivalent to Settings > Scheduler in the Menu Bar. Help Access the online help system.
Chapter 3 Main Window Schedule, View, Reset, Help Buttons Table 3-9 Detailed Tab: Descriptions Option Description Sort Report By Specify settings including the report type, date, and time range. See the “General Report Settings” section on page 5-1. Filter Parameter Specify settings including the report type, schedule, and export file type. See Chapter 6, “Scheduling Historical Reports.” Parameter Setting area Available panel contains parameter settings based on the filter parameter.
Chapter 3 Main Window Schedule, View, Reset, Help Buttons Cisco Unified Communications Express Historical Reporting Client Configuration Guide 3-6 OL-14986-01
CH A P T E R 4 Report Descriptions Table 4-1 lists the reports that can be created by the Cisco UCE Historical Reporting Client. Table 4-1 Report Description: Fields Report Description Abandoned Call Detail Activity Report Detailed information about each abandoned call during the specified report period. Application Performance Analysis Report Summary information about calls received by each application.
Chapter 4 Report Descriptions Call Custom Variables Report Table 4-2 Abandoned Call Detail Activity Report: Fields (continued) Field Description Call ANI Telephone number of the originator of Y—Displays the report in order of the caller. the telephone number that the caller is calling from. (automatic number identification) Call Abandon Time Date and time that the call was abandoned. Sort Capability Y—Displays the report in order of the date and time that the call was abandoned.
Chapter 4 Report Descriptions Called Number Summary Activity Report Called Number Summary Activity Report The Called Number Summary Activity Report shows information about each number dialed by an inside or outside caller. This report includes information for calls to IVR applications. The Called Number Summary Activity Report can include these charts: • Total Calls by Called Number—Displays the total number of calls to each number.
Chapter 4 Report Descriptions Application Performance Analysis Report Table 4-6 lists the information found in the Application Performance Analysis Reports fields for each application. Table 4-6 Application Performance Analysis Reports: Fields Field Description Sort Capability Application ID Identification number that the system assigned to the application. Y—Displays the report in order of the identification number that the system assigned to each application.
Chapter 4 Report Descriptions Traffic Analysis Report Traffic Analysis Report The Traffic Analysis Report shows information about incoming calls to the system and can include the charts listed in Table 4-7. Table 4-7 Traffic Analysis Reports: Descriptions Chart Name Description Total Incoming Calls by Date Displays the total number of calls received by the system for each day in the report range.
Chapter 4 Report Descriptions Traffic Analysis Report Cisco Unified Communications Express Historical Reporting Client Configuration Guide 4-6 OL-14986-01
CH A P T E R 5 Generating Historical Reports To generate a report using the Cisco Unified Communications Express (Cisco UCE) Historical Reporting Client, follow these steps: 1. Choose General Report Settings, including the name of the report, whether to include charts, and the date and time range for which you want information. 2. Choose Detailed Report Settings, including a sort method and a filter parameter. 3. Use the Report Viewer to view, print, or save (export) the report.
Chapter 5 Generating Historical Reports Detailed Report Settings Step 1 In the Reporting Task area of the main window, choose the Generate and View Historical Reporting Client radio button. The window displays tabs for general and detailed report settings. Step 2 Click the General tab. The General Report Settings area appears. Step 3 From the Report Type drop-down list, choose a report.
Chapter 5 Generating Historical Reports Detailed Report Settings Specifying a Filter Parameter Use a filter parameter to reduce the amount of information presented in a report. For example, if you are generating a Custom Variables Report, you can use a filter parameter to include information for specific agents only. Note Some reports do not have a filter parameter available: the Parameter Setting area displays “No Parameter Detailed Settings Available.
Chapter 5 Generating Historical Reports Saving and Loading Report Settings Saving and Loading Report Settings If you generate specific reports frequently, you may find that it is convenient to save the general and detailed report settings that you choose for these reports. You can recall these settings and make adjustments to them each time that you generate the report. Save report settings in a Report Settings file.
Chapter 5 Generating Historical Reports Saving and Loading Report Settings The Cisco UCE Historical Reporting Client saves the Report Settings file. Loading Report Settings To reuse previously saved report settings, click Load Existing Report Settings in the Reporting Tasks area of the main window. To load report settings from the main window: Note Step 1 You cannot load report settings from a file containing settings for a report for which you do not have access.
Chapter 5 Generating Historical Reports Report Viewer If you load and make changes to a Report Settings file without saving the file, and you then try to choose a new report type or exit Cisco Unified Communications Express Historical Reports, the computer displays a dialog box asking if you first want to save the changes that you made to the Report Settings file. Click Yes to save the changes in the original Report Settings file or click No to continue without saving the changes.
Chapter 5 Generating Historical Reports Report Viewer Step 1 In the main window of Cisco Unified Communications Express Historical Reports, choose the report settings that you want. Step 2 Click View. The report generates and appears in the Report Viewer window. Some reports can take a few minutes to generate and another few minutes to load into the Report Viewer window.
Chapter 5 Generating Historical Reports Report Viewer Moving Through Reports: Descriptions Table 5-3 Move Action Move forward one page Click the Go To Next Page tool. Move backward one page Click the Go To Previous Page tool. Move to the last page Click the Go To Last Page tool. Move to the first page Click the Go To First Page tool. Move to a specific page Select the number that appears in the Page Number field, enter the page number that you want, and then press Enter.
Chapter 5 Generating Historical Reports Report Viewer When you view a report, you can display information for any particular item in its group. For example, in the Call Custom Variables Report, you can display information for any single variable. You display group information using the Group Tree. For many reports, you can also display group information directly from the charts that appear with the reports.
Chapter 5 Generating Historical Reports Report Viewer Printing Reports You can print a report while viewing any part of the report. If you are viewing information in a Group Information Pane, only the Information Pane information is printed. The report is printed on the default printer that has been designated for your computer. To print a report: Step 1 In the main window, choose the report settings that you want, and click View. The report appears in the Report Viewer window.
Chapter 5 Generating Historical Reports Report Viewer Step 3 Click the Format drop-down list, and then choose the format in which you want to save the report. A series of dialog boxes appear. The specific dialog boxes depend on the format that you chose. Step 4 Set the desired exporting options and specify the name and location for the export file by enter information in the dialog boxes that appear.
Chapter 5 Generating Historical Reports Report Viewer Cisco Unified Communications Express Historical Reporting Client Configuration Guide 5-12 OL-14986-01
CH A P T E R 6 Scheduling Historical Reports When you schedule a historical report, you are instructing the Cisco UCE Historical Reporting Client to automatically generate the report at some time in the future. Although you can schedule a report to generate once, the report scheduling function is particularly useful for preparing reports that you require regularly.
Chapter 6 Scheduling Historical Reports Scheduling Recommendations Table 6-1 Scheduled Historical Reports: Descriptions Schedule Type Recurrence Options Daily A daily report always contains data from 12:00 midnight (0000) to 11:59:59 p.m. (1159:59) for the day • Every weekday (Monday to Friday) before the report runs. For example, a daily report that • Every n days (for example, every 3 days) runs on Tuesday contains data for the preceding Note A report that is scheduled to recur every Monday.
Chapter 6 Scheduling Historical Reports General Settings for Scheduled Reports • Executes schedules at their scheduled times, based on the time and date of the Cisco UCE Historical Reporting Client computer and marks their status in the database as Cached so that modification or deletion of these schedules cannot occur. New lists of schedules cycle through each hour, ensuring that any updates to the Scheduler database by the Cisco UCE Historical Reporting Client are available to the Scheduler.
Chapter 6 Scheduling Historical Reports General Settings for Scheduled Reports • Whether to print the report or export it to a file You can return the report settings you choose for a scheduled report to their default values at any time by clicking Reset in the Cisco UCE Historical Reports main window. If you have saved report settings in a Report Settings file, you can load the Report Settings file and use it as a basis for a scheduled report.
Chapter 6 Scheduling Historical Reports General Settings for Scheduled Reports Procedure Step 1 In the Cisco UCE Historical Reports main window, click the Schedule Future Reports, Including Repeat Reports radio button. Step 2 Click the General tab, if it is not selected already. Step 3 Check the Include Charts in Report check box. If you do not want to include charts, uncheck this check box. You can choose whether to print or export the report, and choose detailed report settings.
Chapter 6 Scheduling Historical Reports General Settings for Scheduled Reports Exporting a Scheduled Report The Cisco UCE Historical Reporting Client saves scheduled reports in files. You can view, print, and manipulate the data in these files with other programs. Unless you have changed the defaultExportPath parameter in the hrcConfig.
Chapter 6 Scheduling Historical Reports Detailed Settings for Scheduled Reports Detailed Settings for Scheduled Reports When you use detailed report settings, you can cause scheduled reports to include only specific information or to display information in a particular order. Detailed report settings include a sorting method and a filter parameter. Detailed settings are optional. If you do not choose a detailed setting, the report contains all relevant information presented in a default order.
Chapter 6 Scheduling Historical Reports Selecting Schedule Settings Table 6-2 Scheduling Settings for Historical Reports: Fields If You Want the Schedule to Execute This Often Click Then Every day Daily Click Every button, and then enter 1 in the Every n Day(s) field. Every specific number of days (for example, every 3 days) Daily Click Every button, and then enter the number of days in the Every n Day(s) field. Every weekday (Monday to Friday) Daily Click Every weekday.
Chapter 6 Scheduling Historical Reports Saving a Schedule Step 6 Click OK to save your schedule settings. Related Topics • Information in Scheduled Reports, page 6-1 • General Settings for Scheduled Reports, page 6-3 • Detailed Settings for Scheduled Reports, page 6-7 • Saving a Schedule, page 6-9 Saving a Schedule After choosing general, detailed, and schedule settings, you are ready to save the scheduling information.
Chapter 6 Scheduling Historical Reports Viewing and Deleting Schedules Table 6-3 Viewing and Deleting Schedules: Descriptions Column Description Report Name Name of the scheduled report Date Created Date and time that the schedule was created Recurrence Type How often the schedule executes Export Type Printer, or format of the export file Apps Server IP address or host name of the Cisco UCE server Schedule Description Detailed description of the schedule To expand a column if you cannot s
Chapter 6 Scheduling Historical Reports Handling Missed Schedules If you decide not to delete the schedule, click Cancel instead. Handling Missed Schedules In order for a schedule to execute: • The Cisco UCE server, (or its standby server, if deployed) must be running. • At least one server on which the Database component is installed must be running. • The Scheduler must be running on the Cisco UCE Historical Reporting Client computer.
Chapter 6 Scheduling Historical Reports Handling Missed Schedules Cisco Unified Communications Express Historical Reporting Client Configuration Guide 6-12 OL-14986-01