
Quick Setup Guide


6-9
Cisco Unified Communications Express Historical Reporting Client Configuration Guide
OL-14986-01
Chapter 6 Scheduling Historical Reports
Saving a Schedule
Step 6 Click OK to save your schedule settings.
Related Topics
• Information in Scheduled Reports, page 6-1
• General Settings for Scheduled Reports, page 6-3
• Detailed Settings for Scheduled Reports, page 6-7
• Saving a Schedule, page 6-9
Saving a Schedule
After choosing general, detailed, and schedule settings, you are ready to save the scheduling
information. When you save scheduling information, the system stores the information you have
specified as a schedule in the Scheduler database.
To save a schedule, follow these steps:
Procedure
Step 1 In the Cisco UCE Historical Reports main window, click Schedule.
The Report Scheduled Successfully dialog box appears.
Step 2 Click OK.
Related Topics
• Information in Scheduled Reports, page 6-1
• General Settings for Scheduled Reports, page 6-3
• Detailed Settings for Scheduled Reports, page 6-7
• Selecting Schedule Settings, page 6-7
• Viewing and Deleting Schedules, page 6-9
Viewing and Deleting Schedules
To see a list of schedules that you created and that are stored in the Scheduler, choose
Settings > Scheduler from the Cisco UCE Historical Reports main window, or click the Scheduler
tool. The Scheduled Reports window appears.
To exit the Scheduled Reports window, click Close.
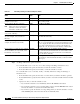
The Scheduled Reports window lists each stored schedule that you created when you were logged into
the Cisco UCE Historical Reports system using the current login information. This window displays
each schedule on a row and arranges information about each schedule in the columns shown in Table 6-3.