
Installation guide

7
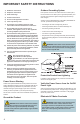
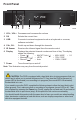
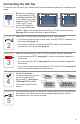
1 VOL-, VOL+ Decreases and increases the volume
2 OK Selects the current item
3 USB Connects to external equipment such as a keyboard or a mouse,
software controlled
4 CH+, CH- Scrolls up and down through the channels
5 IR Sensor Receives the infrared signal from the remote control
6 Display Displays the selected channel number and time of day. The display
shows the following:
• Power (
) • MoCA™ Link ( ) • 480i / 480P • 5.1
• Message (
) • HDTV • 720i / 720P
• Record (
) • Auto • 1080i / 1080P
7 Power Turns the set-top on and off
Note: This illustration may vary from the actual product.
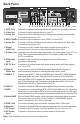
Front Panel
CAUTION: The DVR is equipped with a hard disk drive to store programs that you
record and to allow you to rewind and pause live TV. Any time the DVR is powered on
(power LED is illuminated) or a recording is in progress (the record LED is illuminated)
the hard disk is in use.
If you need to move the DVR, complete the following steps to allow the hard disk to shut
down properly. First, make sure that no recording is in progress (record LED is off). Then,
turn off power by pressing the Power key. Finally, unplug the unit and wait 10 seconds for
the hard disk drive to spin down (stop). At this point the unit can be moved safely.
You should handle this product with the same level of care you would use when handling
other electronics containing a hard disk drive, such as a laptop computers or other hard
disk drive equipped devices.
CHS 435HDC
OK
Power
T14393
5
7
3
1
4
2
6