
Operating instructions


WARNING: Electric shock hazard! Unplug all electronic
devices before connecting or disconnecting any device cables to
the 4250HD.
Heed Warnings
Adhere to all warnings on the product and in the operating instructions.
Read, Retain, and Follow These Instructions
Read all of the instructions before you operate this product. Follow all
operating instructions that accompany this product. Retain the instructions
for future use. Give particular attention to all safety precautions.
Comply With Warnings
Avoid electric shock. Comply with all warnings and cautions in the
operating instructions, as well as those that are affixed to this product.
Power Warnings
Providing a Power Source
A label on this product indicates the correct power source for this product.
Operate this product only from an electrical outlet with the voltage and
frequency indicated on the product label.
If you are uncertain of the type of power supply to your home or business,
consult your cable service provider or your local power company.
Grounding This Product (U.S.A. and Canada Only)
WARNING: To avoid electric shock and fire hazard, match
the plug and outlet connections carefully, then fully insert. If the
plug and outlet do not match, or you cannot fully insert the plug,
contact an electrician to update your power outlets.
If this product is equipped with either a three-prong (grounding pin) safety
plug or a two-prong (polarized) safety plug, follow these safety guidelines
to properly ground this product:
• For a 3-prong plug (one prong on this plug is a protective grounding
pin), insert the plug into a grounded mains, 3-prong outlet.
Note: This plug fits only one way. If you are unable to insert this plug
fully into the outlet, contact your electrician to replace your obsolete
outlet.
• For a 2-prong plug (a polarized plug with one wide blade and one
narrow blade), insert the plug into a polarized mains, 2-prong outlet in
which one socket is wider than the other.
Note: If you are unable to insert this plug fully into the outlet, try
reversing the plug. If the plug still fails to fit, contact an electrician
to replace your obsolete outlet.
Overloading
WARNING: Avoid electric shock and fire hazard! Do not
overload mains AC outlets and extension cords. For products that
require battery power or other power sources to operate them, refer
to the operating instructions for those products.
Do not overload electrical outlets, extension cords, or integral convenience
receptacles as this can result in a risk of fire or electric shock. For products
that require battery power or other sources to operate, refer to the operating
instructions for that product.
Preventing Power Cord Damage
Arrange all power cords so that people or pets cannot walk on the cords.
Do not place objects on the cords. Do not lean objects against the cords.
Placing objects on or leaning objects against cords can damage the cords.
Give particular attention to cords at the point at which the cord connects
to plugs, at the electrical outlets, and where the cords exit the product.
Usage Warnings
Providing Ventilation
This product has openings for ventilation that protect it from overheating.
To ensure the reliability of this product, do the following:
• Do not block or cover these openings.
• Do not place entertainment devices (such as VCRs or DVDs), lamps,
books, vases with liquids, or other objects on top of this product.
• Do not place this product in any of the following locations:
- On a bed, sofa, rug, or similar surface
- Near heat sources such as radiators, heat registers, stoves, or
other products (including amplifiers) that produce heat
- In an enclosure, such as a bookcase or rack, unless the
installation provides proper ventilation
Selecting a Proper Location
WARNING: Avoid personal injury and damage to this product!
An unstable surface may cause this product to fall.
Place this product in a location that is close enough to an electrical outlet
and where the power cord is easily accessible to be disconnected from the
wall outlet or from the rear panel of the product.
Important: The power cord is the mains power supply disconnect device.
Place this product on a stable surface. The surface must support the size
and weight of this product.
Cleaning This Product
WARNING: Avoid electric shock! Unplug this product before
cleaning.
Before cleaning this product, unplug it from the electrical outlet. Use a damp
cloth to clean this product. Do not use a liquid cleaner or an aerosol cleaner.
Do not use a magnetic/static cleaning device (dust remover) to clean this
product.
Protecting This Product From Foreign Objects and Water or
Moisture Damage
WARNING: Avoid electric shock and fire hazard! Never push
objects through the openings in this product. Foreign objects can
cause electrical shorts that can result in electric shock or fire. Do not
expose this product to rain or moisture. Do not place objects filled
with liquid, such as vases, on this product.
Never push objects of any kind into this product through openings as they
may touch dangerous voltage points or short out parts that could result in
a fire or electric shock.
Do not expose this product to liquids or moisture. Do not place this product
on a wet surface. Do not spill liquids on or near this product.
Do not use this product near water (such as a bath tub, wash bowl, sink,
or laundry tub), in a wet basement, or near a swimming pool.
Accessories Warnings
WARNING: Avoid any potential for electric shock or fire. Do
not use accessories with this product unless recommended by your
cable service provider.
Avoid any potential for electric shock or fire. Do not use accessories with
this product unless recommended by your cable service provider.
Service Warnings
Servicing This Product
WARNING: Avoid electric shock! Opening or removing the
cover may expose you to dangerous voltages. This product contains
no user-serviceable parts. Refer all servicing to qualified service
personnel.
Do not open the cover of this product. If you open the cover, your warranty
will be void. Refer all servicing to qualified personnel only. Contact your
cable service provider for instructions.
Obtaining Service for Product Damage
For damage that requires service, unplug this product from the AC outlet.
Then, contact your cable service provider or qualified service personnel to
obtain service for the following conditions:
• If there is damage to the power-supply cord or plug
• If liquid enters this product
• If you expose this product to rain or water
• If you drop this product, a heavy object falls on this product, or damage
occurs to the cover of this product
• If this product does not operate normally by following the operating
instructions
• If this product exhibits a distinct change in performance
IMPORTANT SAFETY INSTRUCTIONS
IMPORTANT SAFETY INSTRUCTIONS
Access Cable Services and Programs
Access cable services and programs by pressing the following keys on the
remote control:
• Guide— Access the on-screen guide for schedules of TV programs and
other services available from your cable service provider, such as video-
on-demand and pay-per-view programs.
• Arrows—Highlight a program in the schedule.
• INFO—Display a specific program description (either from the on-screen
guide or while viewing a program).
• SELECT—View a specific program in the guide.
Avoid Screen Burn-In!
Images such as letterbox bars or side bars, bright closed-captioning
backgrounds, station logos, or any other stationary images may cause the
HDTV screen to age unevenly and cause damage to your HDTV. Refer to the
user’s guide that came with your HDTV for more information about screen
burn-in.
Performance Tips
If the 4250HD does not perform as expected, the following tips may help.
No picture
• Verify that the power to your TV is turned on.
• If the 4250HD is plugged into a wall switch, verify the switch is in the
ON position. (Avoid plugging into a switched outlet.)
• Verify that all cables are properly connected.
• The current channel may not be available in your service package.
Try selecting another channel to see if video is available.
No color
• Verify the current TV program is broadcast in color.
• Adjust the TV color controls.
No sound
• If your setup includes a VCR or stereo, verify that you have properly
connected them to the 4250HD.
• Verify the volume is turned up.
• Verify the mute function is not on.
Automatic Software Updates
The TV screen displays a message that indicates the 4250HD is automati-
cally updating its software.
Wait for the current time to display on the front panel of the 4250HD before
continuing. When the front panel displays the time, the update is complete.
Note: If you need further assistance, contact your cable service provider.
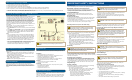
Before Installing and Using the 4250HD
1. Unplug all electronic devices before connecting the set-top.
2. Connect the set-top to the TV as shown in the diagram.
3. Connect the set-top to the coaxial cable coming from the wall.
4. Plug the set-top and the TV into an AC power source. Important: Do not press the Power key on the 4250HD yet.
5. Turn on the power to your TV, and set the input channel assigned by your cable service provider (channel 3 or 4).
6. Wait for the time to display on the LED display. Important: It takes 2 to 3 minutes for the set-top to be updated with the latest programming and service
information. When the front panel displays the time, the update is complete.
Connecting the 4250HD to an HDTV With an HDMI Connector
Important Note Regarding the HDMI Interface
Some HDTVs have a High-Definition Multimedia Interface (HDMI) connector.
The HDMI connector provides both a digital video and audio connection.
The HDMI interface will automatically configure the audio output for a format
supported by the television. Because not all TVs support a Dolby
®
Digital
input, the HDMI interface may automatically select a 2-channel stereo audio
configuration instead of Dolby Digital. When the output is configured for
2-channel audio, this configuration is carried over to the other digital audio
outputs of the 4250HD. This configuration prevents your home theater
system or Dolby Digital decoder from providing the full Dolby Digital surround
sound effect.
On the 4250HD, you may override the automatic selection of audio by the
HDMI interface by completing the following steps.
1. Press SETTINGS twice on the remote control to open the General Settings
menu.
2. Press MOVE UP or MOVE DOWN to select the option Audio: Digital Out.
3. Press MOVE RIGHT to select Dolby Digital. This setting will send Dolby
Digital audio to the HDMI, DIGITAL AUDIO OUT, and OPTICAL AUDIO
OUT connectors on the 4250HD.
Notes:
• If the TV (video/audio monitor) connected to the 4250HD using HDMI is
not Dolby Digital capable, it may not produce audio through its speakers
when the Audio: Digital Out setting on the 4250HD is set to Dolby Digital.
You can either switch the Audio: Digital Out setting back to HDMI when
you are not using the home theater or Dolby Digital decoder, or you can
connect the baseband audio outputs (OUT 1 Audio Left and Right) to
the TV.
• If you are connecting the HDMI connector to the DVI connector on your
HDTV, you need an HDMI-to-DVI adaptor. You also need a separate audio
connection for the left/right analog ports or the digital audio out,
whichever matches the input formats that your TV accepts.