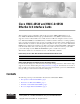
Cisco HWIC-4ESW and HWIC-D-9ESW EtherSwitch Interface Cards This document provides configuration tasks for the 4-port Cisco HWIC-4ESW and the 9-port Cisco HWIC-D-9ESW EtherSwitch high speed WAN interface cards (HWICs) hardware feature supported on Cisco 1800 (modular), Cisco 2800, and Cisco 3800 series integrated services routers. Cisco EtherSwitch HWICs are 10/100BaseT Layer 2 Ethernet switches with Layer 3 routing capability.
Cisco HWIC-4ESW and HWIC-D-9ESW EtherSwitch Interface Cards Prerequisites for EtherSwitch HWICs • Configuration Examples for EtherSwitch HWICs, page 71 • Additional References, page 81 Prerequisites for EtherSwitch HWICs The following are prerequisites to configuring EtherSwitch HWICs: • Configuration of IP routing. (Refer to the Cisco IOS IP Configuration Guide.) • Use of the Cisco IOS T Release, beginning with release 12.3(8)T4 or later for Cisco HWIC-4ESW and Cisco HWIC-D-9ESW support.
Cisco HWIC-4ESW and HWIC-D-9ESW EtherSwitch Interface Cards Information About EtherSwitch HWICs • Switched Port Analyzer, page 4 • IGMP Snooping, page 4 • Storm Control, page 4 • Intrachassis Stacking, page 4 • Fallback Bridging, page 4 VLANs For information on the concept of VLANs, refer to the material at this URL: http://www.cisco.com/univercd/cc/td/doc/product/software/ios123/123newft/123t/123t_4/gt1636nm.
Cisco HWIC-4ESW and HWIC-D-9ESW EtherSwitch Interface Cards Information About EtherSwitch HWICs Cisco Discovery Protocol For Information on the concept of the Cisco Discovery Protocol, refer to the material at this URL: http://www.cisco.com/univercd/cc/td/doc/product/software/ios123/123newft/123t/123t_4/gt1636nm.ht m#1048498 Switched Port Analyzer For Information on the concept of Switched Port Analyzer, refer to the material at this URL: http://www.cisco.
Cisco HWIC-4ESW and HWIC-D-9ESW EtherSwitch Interface Cards How to Configure EtherSwitch HWICs How to Configure EtherSwitch HWICs See the following sections for configuration tasks for the EtherSwitch HWICs. • Configuring VLANs, page 5 • Configuring VLAN Trunking Protocol, page 9 • Configuring Layer 2 Interfaces, page 11 • Configuring 802.
Cisco HWIC-4ESW and HWIC-D-9ESW EtherSwitch Interface Cards How to Configure EtherSwitch HWICs DETAILED STEPS Command Purpose Step 1 Router#vlan database Enters VLAN configuration mode. Step 2 Router(vlan)#vlan vlan_id Adds an Ethernet VLAN. Step 3 Router(vlan)#exit Updates the VLAN database, propagates it throughout the administrative domain, and returns to privileged EXEC mode. Verifying the VLAN Configuration You can verify the VLAN configuration in VLAN database mode.
Cisco HWIC-4ESW and HWIC-D-9ESW EtherSwitch Interface Cards How to Configure EtherSwitch HWICs Maximum STE Hop Count: 7 Backup CRF Mode: Disabled Translational Bridged VLAN: 1 Translational Bridged VLAN: 1002 VLAN ISL Id: 1004 Name: fddinet-default Media Type: FDDI Net VLAN 802.10 Id: 101004 State: Operational MTU: 1500 Bridge Type: SRB Bridge Number: 1 STP Type: IBM VLAN ISL Id: 1005 Name: trnet-default Media Type: Token Ring Net VLAN 802.
Cisco HWIC-4ESW and HWIC-D-9ESW EtherSwitch Interface Cards How to Configure EtherSwitch HWICs Deleting a VLAN Instance from the Database You cannot delete the default VLANs for the different media types: Ethernet VLAN 1 and FDDI or Token Ring VLANs 1002 to 1005. Beginning in privileged EXEC mode, follow these steps to delete a VLAN from the database: SUMMARY STEPS 1. vlan database 2. no vlan vlan_id 3.
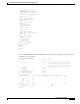
Cisco HWIC-4ESW and HWIC-D-9ESW EtherSwitch Interface Cards How to Configure EtherSwitch HWICs Enter the show vlan-switch brief command in EXEC mode, using the Cisco IOS CLI to verify that a VLAN has been deleted from the switch, as shown in the following output example: Router#show vlan-switch brief VLAN Name Status Ports ---- -------------------------------- --------- ------------------------------1 default active Fa0/1/0, Fa0/1/1, Fa0/1/2 Fa0/1/3, Fa0/1/4, Fa0/1/5 Fa0/1/6, Fa0/1/7, Fa0/1/8 300 VLAN0300
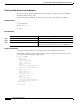
Cisco HWIC-4ESW and HWIC-D-9ESW EtherSwitch Interface Cards How to Configure EtherSwitch HWICs Command Purpose Step 3 Router(vlan)# vtp domain domain_name Defines the VTP domain name, which can be up to 32 characters long. Step 4 Router(vlan)# vtp password password_value (Optional) Sets a password, which can be from 8 to 64 characters long, for the VTP domain. Step 5 Router(vlan)# exit Exits VLAN configuration mode.
Cisco HWIC-4ESW and HWIC-D-9ESW EtherSwitch Interface Cards How to Configure EtherSwitch HWICs DETAILED STEPS Command Purpose Step 1 Router# vlan database Enters VLAN configuration mode. Step 2 Router(vlan)# vtp transparent Configures VTP transparent mode. Step 3 Router(vlan)# exit Exits VLAN configuration mode.
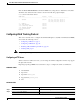
Cisco HWIC-4ESW and HWIC-D-9ESW EtherSwitch Interface Cards How to Configure EtherSwitch HWICs Configuring a Range of Interfaces Use the interface range command in global configuration mode to configure a range of interfaces. Command Purpose Router(config)#interface range {macro macro_name | FastEthernet interface-id [ - interface-id] | vlan vlan_ID} [, FastEthernet interface-id [ interface-id] | vlan vlan_ID] Select the range of interfaces to be configured. • The space before the dash is required.
Cisco HWIC-4ESW and HWIC-D-9ESW EtherSwitch Interface Cards How to Configure EtherSwitch HWICs Configuring Layer 2 Optional Interface Features • Interface Speed and Duplex Configuration Guidelines, page 13 • Configuring the Interface Speed, page 13 • Configuring the Interface Duplex Mode, page 14 • Verifying Interface Speed and Duplex Mode Configuration, page 14 • Configuring a Description for an Interface, page 15 • Configuring a Fast Ethernet Interface as a Layer 2 Trunk, page 15 • Configuri
Cisco HWIC-4ESW and HWIC-D-9ESW EtherSwitch Interface Cards How to Configure EtherSwitch HWICs Configuring the Interface Duplex Mode Beginning in global configuration mode, follow these steps to set the duplex mode of a Fast Ethernet interface. SUMMARY STEPS 1. interface fastethernet interface-id 2. duplex [auto | full | half] DETAILED STEPS Command Purpose Step 1 Router(config)#interface fastethernet interface-id Selects the interface to be configured.
Cisco HWIC-4ESW and HWIC-D-9ESW EtherSwitch Interface Cards How to Configure EtherSwitch HWICs 0 babbles, 0 late collision, 0 deferred 0 lost carrier, 0 no carrier 0 output buffer failures, 0 output buffers swapped out Router# Configuring a Description for an Interface You can add a description of an interface to help you remember its function. The description appears in the output of the following commands: show configuration, show running-config, and show interfaces.
Cisco HWIC-4ESW and HWIC-D-9ESW EtherSwitch Interface Cards How to Configure EtherSwitch HWICs Command Purpose Step 6 Router(config-if)# no shutdown Activates the interface. (Required only if you shut down the interface.) Step 7 Router(config-if)# end Exits configuration mode. Note Ports do not support Dynamic Trunk Protocol (DTP). Ensure that the neighboring switch is set to a mode that will not send DTP.
Cisco HWIC-4ESW and HWIC-D-9ESW EtherSwitch Interface Cards How to Configure EtherSwitch HWICs DETAILED STEPS Command Purpose Step 1 Router(config)#interface fastethernet interface-id Selects the interface to configure. Step 2 Router(config-if)#shutdown (Optional) Shuts down the interface to prevent traffic flow until configuration is complete. Step 3 Router(config-if)#switchport mode access Configures the interface as a Layer 2 access.
Cisco HWIC-4ESW and HWIC-D-9ESW EtherSwitch Interface Cards How to Configure EtherSwitch HWICs Configuring 802.1x Authentication This section describes how to configure 802.1x port-based authentication on an EtherSwitch HWIC: • Understanding the Default 802.1x Configuration, page 18 • Enabling 802.
Cisco HWIC-4ESW and HWIC-D-9ESW EtherSwitch Interface Cards How to Configure EtherSwitch HWICs Table 1 Default 802.1x Configuration (continued) Feature Default Setting Client timeout period 30 seconds (when relaying a request from the authentication server to the client, the amount of time the switch waits for a response before retransmitting the request to the client). This setting is not configurable.
Cisco HWIC-4ESW and HWIC-D-9ESW EtherSwitch Interface Cards How to Configure EtherSwitch HWICs 7. show dot1x 8. copy running-config startup-config DETAILED STEPS Command Purpose Step 1 configure terminal Enters global configuration mode. Step 2 aaa new-model Enables AAA. Step 3 aaa authentication dot1x {default | listname} method1 [method2...] Creates an 802.1x authentication method list.
Cisco HWIC-4ESW and HWIC-D-9ESW EtherSwitch Interface Cards How to Configure EtherSwitch HWICs Beginning in privileged EXEC mode, follow these steps to configure the RADIUS server parameters on the switch. This procedure is required. SUMMARY STEPS 1. configure terminal 2. radius-server host {hostname | ip-address} auth-port port-number key string 3. end 4. show running-config 5.
Cisco HWIC-4ESW and HWIC-D-9ESW EtherSwitch Interface Cards How to Configure EtherSwitch HWICs Enabling Periodic Reauthentication You can enable periodic 802.1x client reauthentication and specify how often it occurs. If you do not specify a time period before enabling reauthentication, the number of seconds between reauthentication attempts is 3600 seconds. Automatic 802.1x client reauthentication is a global setting and cannot be set for clients connected to individual ports.
Cisco HWIC-4ESW and HWIC-D-9ESW EtherSwitch Interface Cards How to Configure EtherSwitch HWICs Beginning in privileged EXEC mode, follow these steps to change the quiet period: SUMMARY STEPS 1. configure terminal 2. dot1x timeout quiet-period seconds 3. end 4. show dot1x 5. copy running-config startup-config DETAILED STEPS Command Purpose Step 1 configure terminal Enters global configuration mode.
Cisco HWIC-4ESW and HWIC-D-9ESW EtherSwitch Interface Cards How to Configure EtherSwitch HWICs DETAILED STEPS Command Purpose Step 1 configure terminal Enters global configuration mode. Step 2 dot1x timeout tx-period seconds Sets the number of seconds that the switch waits for a response to an EAP-request/identity frame from the client before retransmitting the request. The range is 1 to 65535 seconds; the default is 30. Step 3 end Returns to privileged EXEC mode.
Cisco HWIC-4ESW and HWIC-D-9ESW EtherSwitch Interface Cards How to Configure EtherSwitch HWICs Command Purpose Step 4 show dot1x Verifies your entries. Step 5 copy running-config startup-config (Optional) Saves your entries in the configuration file. To return to the default retransmission number, use the no dot1x max-req global configuration command. Enabling Multiple Hosts You can attach multiple hosts to a single 802.1x-enabled port.
Cisco HWIC-4ESW and HWIC-D-9ESW EtherSwitch Interface Cards How to Configure EtherSwitch HWICs Resetting the 802.1x Configuration to the Default Values You can reset the 802.1x configuration to the default values with a single command. Beginning in privileged EXEC mode, follow these steps to reset the 802.1x configuration to the default values: SUMMARY STEPS 1. configure terminal 2. dot1x default 3. end 4. show dot1x 5.
Cisco HWIC-4ESW and HWIC-D-9ESW EtherSwitch Interface Cards How to Configure EtherSwitch HWICs Enabling Spanning Tree You can enable spanning tree on a per-VLAN basis. The switch maintains a separate instance of spanning tree for each VLAN (except on VLANs on which you disable spanning tree). To enable spanning tree on a per-VLAN basis, use the following command in global configuration mode: Command Router(config)# spanning-tree vlan vlan_ID Purpose Enables spanning tree on a per-VLAN basis.
Cisco HWIC-4ESW and HWIC-D-9ESW EtherSwitch Interface Cards How to Configure EtherSwitch HWICs DETAILED STEPS Command Purpose Step 1 Router(config)# interface {{ethernet | fastethernet} interface-id Selects an interface to configure. Step 2 Router(config-if)# [no] spanning-tree port-priority port_priority Configures the port priority for an interface. The of port_priority value can be from 4 to 252 in increments of 4. Use the no form of this command to restore the defaults.
Cisco HWIC-4ESW and HWIC-D-9ESW EtherSwitch Interface Cards How to Configure EtherSwitch HWICs DETAILED STEPS Command Purpose Step 1 Router(config)# interface {{ethernet | fastethernet} interface-id Selects an interface to configure. Step 2 Router(config-if)# [no] spanning-tree cost port_cost Configures the port cost for an interface. The value of port_cost can be from 1 to 200,000,000 (1 to 65,535 in Cisco IOS Releases 12.1(2)E and earlier). Use the no form of this command to restore the defaults.
Cisco HWIC-4ESW and HWIC-D-9ESW EtherSwitch Interface Cards How to Configure EtherSwitch HWICs Number of transitions to forwarding state: 1 BPDU: sent 0, received 13513 Router# Configuring the Bridge Priority of a VLAN To configure the spanning tree bridge priority of a VLAN, use the following command in global configuration mode: Command Purpose Router(config)# [no] spanning-tree vlan vlan_ID priority bridge_priority Configures the bridge priority of a VLAN.
Cisco HWIC-4ESW and HWIC-D-9ESW EtherSwitch Interface Cards How to Configure EtherSwitch HWICs Configuring the Forward-Delay Time for a VLAN To configure the forward delay for the spanning tree, use the following command in global configuration mode: Command Router(config)# [no] spanning-tree vlan vlan_ID forward-time forward_time Purpose Configures the forward time of a VLAN. The value of forward_time can be from 4 to 30 seconds. Use the no form of this command to restore the defaults.
Cisco HWIC-4ESW and HWIC-D-9ESW EtherSwitch Interface Cards How to Configure EtherSwitch HWICs Note Note We recommend that you avoid configuring the hello time, forward delay time, and maximum age time manually after configuring the switch as the root bridge. To configure the switch as the root, use the following command in global configuration mode: Command Purpose Router(config)# [no] spanning-tree vlan vlan_ID root primary [diameter hops [hello-time seconds]] Configures a switch as the root switch.
Cisco HWIC-4ESW and HWIC-D-9ESW EtherSwitch Interface Cards How to Configure EtherSwitch HWICs DETAILED STEPS Command Purpose Enters global configuration mode. Step 1 Router# configure terminal Step 2 Router(config)# [no] mac-address-table secure fastethernet interface-id [vlan ] Secures the MAC address traffic on the port. Step 3 Router(config)# end Exits configuration mode.
Cisco HWIC-4ESW and HWIC-D-9ESW EtherSwitch Interface Cards How to Configure EtherSwitch HWICs 0007.ebc8.018b 000b.bf94.0006 000b.bf94.0038 000b.bf94.0039 000b.bf94.0008 000b.bf94.0038 000b.bf94.0008 000b.bf94.0038 000b.bf94.0008 000b.bf94.
Cisco HWIC-4ESW and HWIC-D-9ESW EtherSwitch Interface Cards How to Configure EtherSwitch HWICs Enabling Cisco Discovery Protocol To enable Cisco Discovery Protocol (CDP) globally, use the following command in global configuration mode: Command Purpose Router(config)# cdp run Enables CDP globally.
Cisco HWIC-4ESW and HWIC-D-9ESW EtherSwitch Interface Cards How to Configure EtherSwitch HWICs Monitoring and Maintaining CDP To monitor and maintain CDP on your device, use one or more of the following commands in privileged EXEC mode: Command Purpose Router# clear cdp counters Resets the traffic counters to zero. Router# clear cdp table Deletes the CDP table of information about neighbors.
Cisco HWIC-4ESW and HWIC-D-9ESW EtherSwitch Interface Cards How to Configure EtherSwitch HWICs The following example shows how to configure the SPAN session to monitor bidirectional traffic from source interface Fast Ethernet 0/3/1: Router(config)# monitor session 1 source interface fastethernet 0/3/1 Configuring SPAN Destinations To configure the destination for a SPAN session, use the following command in global configuration mode: Command Purpose Router(config)# monitor session 1 {destination {interf
Cisco HWIC-4ESW and HWIC-D-9ESW EtherSwitch Interface Cards How to Configure EtherSwitch HWICs DETAILED STEPS Command Purpose Step 1 Router# configure terminal Enters global configuration mode. Step 2 Router(config)# interface fastethernet interface-id Selects a particular Fast Ethernet interface for configuration. Step 3 Router(config-if)# power inline auto/never Configures the port to supply inline power automatically to a Cisco IP phone.
Cisco HWIC-4ESW and HWIC-D-9ESW EtherSwitch Interface Cards How to Configure EtherSwitch HWICs Configuring IP Multicast Layer 3 Switching These sections describe how to configure IP multicast Layer 3 switching: • Enabling IP Multicast Routing Globally, page 39 • Enabling IP Protocol-Independent Multicast (PIM) on Layer 3 Interfaces, page 39 • Verifying IP Multicast Layer 3 Hardware Switching Summary, page 40 • Verifying the IP Multicast Routing Table, page 41 Enabling IP Multicast Routing Globally
Cisco HWIC-4ESW and HWIC-D-9ESW EtherSwitch Interface Cards How to Configure EtherSwitch HWICs DETAILED STEPS Command Purpose Step 1 Router(config)# interface vlan vlan-id Selects the interface to be configured. Step 2 Router(config-if)# ip pim {dense-mode | sparse-mode | sparse-dense-mode} Enables IP PIM on a Layer 3 interface.
Cisco HWIC-4ESW and HWIC-D-9ESW EtherSwitch Interface Cards How to Configure EtherSwitch HWICs Note Step 3 A negative counter means that the outgoing interface list of the corresponding entry is NULL, and this indicates that this flow is still active. Router# show ip interface vlan 1 Vlan1 is up, line protocol is up Internet address is 10.0.0.1/24 Broadcast address is 255.255.255.
Cisco HWIC-4ESW and HWIC-D-9ESW EtherSwitch Interface Cards How to Configure EtherSwitch HWICs (*, 224.10.10.10), 00:09:21/00:02:56, RP 0.0.0.0, flags:DC Incoming interface:Null, RPF nbr 0.0.0.0 Outgoing interface list: Vlan1, Forward/Sparse-Dense, 00:09:21/00:00:00, H Router# Note The RPF-MFD flag indicates that the flow is completely hardware switched. The H flag indicates that the flow is hardware-switched on the outgoing interface.
Cisco HWIC-4ESW and HWIC-D-9ESW EtherSwitch Interface Cards How to Configure EtherSwitch HWICs Command Purpose Step 4 show ip igmp snooping Displays snooping configuration. Step 5 copy running-config startup-config (Optional) Saves your configuration to the startup configuration. To globally disable IGMP snooping on all VLAN interfaces, use the no ip igmp snooping global command. Beginning in privileged EXEC mode, follow these steps to enable IGMP snooping on a VLAN interface. SUMMARY STEPS 1.
Cisco HWIC-4ESW and HWIC-D-9ESW EtherSwitch Interface Cards How to Configure EtherSwitch HWICs Beginning in privileged EXEC mode, follow these steps to enable IGMP Immediate-Leave processing. SUMMARY STEPS 1. configure terminal 2. ip igmp snooping vlan vlan-id immediate-leave 3. end DETAILED STEPS Command Purpose Step 1 configure terminal Enters global configuration mode. Step 2 ip igmp snooping vlan vlan-id immediate-leave Enables IGMP Immediate-Leave processing on the VLAN interface.
Cisco HWIC-4ESW and HWIC-D-9ESW EtherSwitch Interface Cards How to Configure EtherSwitch HWICs Step 4 Step 5 Command Purpose show mac-address-table multicast [vlan vlan-id] [user | igmp-snooping] [count] Displays MAC address table entries for a VLAN. copy running-config startup-config • vlan-id is the multicast group VLAN ID. • user displays only the user-configured multicast entries. • igmp-snooping displays entries learned via IGMP snooping.
Cisco HWIC-4ESW and HWIC-D-9ESW EtherSwitch Interface Cards How to Configure EtherSwitch HWICs Configuring Per-Port Storm-Control You can use these techniques to block the forwarding of unnecessary flooded traffic.
Cisco HWIC-4ESW and HWIC-D-9ESW EtherSwitch Interface Cards How to Configure EtherSwitch HWICs Disabling Per-Port Storm-Control Beginning in privileged EXEC mode, follow these steps to disable per-port storm-control. SUMMARY STEPS 1. configure terminal 2. interface interface-id 3. no storm-control {broadcast | multicast | unicast} level 4. no storm-control action shutdown 5. end 6.
Cisco HWIC-4ESW and HWIC-D-9ESW EtherSwitch Interface Cards How to Configure EtherSwitch HWICs 4. exit 5. interface fastethernet partner-interface-id 6. no shutdown 7. end DETAILED STEPS Command Purpose Step 1 Router(config)#interface fastethernet interface-id Selects the interface to configure. Step 2 Router(config-if)#no shutdown Activates the interface. (Required only if you shut down the interface.
Cisco HWIC-4ESW and HWIC-D-9ESW EtherSwitch Interface Cards How to Configure EtherSwitch HWICs Understanding the Default Fallback Bridging Configuration Table 2 shows the default fallback bridging configuration. Table 2 Default Fallback Bridging Configuration Feature Default Setting Bridge groups None are defined or assigned to an interface. No VLAN-bridge STP is defined. Switch forwards frames for stations that it has dynamically learned Enabled.
Cisco HWIC-4ESW and HWIC-D-9ESW EtherSwitch Interface Cards How to Configure EtherSwitch HWICs DETAILED STEPS Command Purpose Step 1 configure terminal Enters global configuration mode. Step 2 no ip routing Disables ip routing. Step 3 bridge bridge-group protocol vlan-bridge Assigns a bridge group number, and specify the VLAN-bridge spanning-tree protocol to run in the bridge group. The ibm and dec keywords are not supported. For bridge-group, specify the bridge group number.
Cisco HWIC-4ESW and HWIC-D-9ESW EtherSwitch Interface Cards How to Configure EtherSwitch HWICs Preventing the Forwarding of Dynamically Learned Stations By default, the switch forwards any frames for stations that it has dynamically learned. By disabling this activity, the switch only forwards frames whose addresses have been statically configured into the forwarding cache.
Cisco HWIC-4ESW and HWIC-D-9ESW EtherSwitch Interface Cards How to Configure EtherSwitch HWICs Beginning in privileged EXEC mode, follow these steps to configure the aging time. SUMMARY STEPS 1. configure terminal 2. bridge bridge-group aging-time seconds 3. end 4. show running-config 5. copy running-config startup-config DETAILED STEPS Command Purpose Step 1 configure terminal Enters global configuration mode.
Cisco HWIC-4ESW and HWIC-D-9ESW EtherSwitch Interface Cards How to Configure EtherSwitch HWICs DETAILED STEPS Command Purpose Step 1 configure terminal Enters global configuration mode. Step 2 bridge bridge-group address mac-address {forward | discard} [interface-id] Specifies the MAC address to discard or forward. • For bridge-group, specify the bridge group number. The range is 1 to 255. • For address mac-address, specify the MAC-layer destination address to be filtered.
Cisco HWIC-4ESW and HWIC-D-9ESW EtherSwitch Interface Cards How to Configure EtherSwitch HWICs Changing the Switch Priority You can globally configure the priority of an individual switch when two switches tie for position as the root switch, or you can configure the likelihood that a switch will be selected as the root switch. This priority is determined by default; however, you can change it. Beginning in privileged EXEC mode, follow these steps to change the switch priority. SUMMARY STEPS 1.
Cisco HWIC-4ESW and HWIC-D-9ESW EtherSwitch Interface Cards How to Configure EtherSwitch HWICs 4. end 5. show running-config 6. copy running-config startup-config DETAILED STEPS Command Purpose Step 1 configure terminal Enters global configuration mode. Step 2 interface interface-id Enters interface configuration mode, and specifies the interface to set the priority. Step 3 bridge-group bridge-group priority number Changes the priority of an interface.
Cisco HWIC-4ESW and HWIC-D-9ESW EtherSwitch Interface Cards How to Configure EtherSwitch HWICs DETAILED STEPS Command Purpose Step 1 configure terminal Enters global configuration mode. Step 2 interface interface-id Enters interface configuration mode, and specify the interface to set the path cost. Step 3 bridge-group bridge-group path-cost cost Assigns the path cost of an interface. • For bridge-group, specify the bridge group number. The range is 1 to 255.
Cisco HWIC-4ESW and HWIC-D-9ESW EtherSwitch Interface Cards How to Configure EtherSwitch HWICs DETAILED STEPS Command Purpose Step 1 configure terminal Enters global configuration mode. Step 2 bridge bridge-group hello-time seconds Specifies the interval between hello BPDUs. • For bridge-group, specify the bridge group number. The range is 1 to 255. • For seconds, enter a number from 1 to 10. The default is 2 seconds. Step 3 end Returns to privileged EXEC mode.
Cisco HWIC-4ESW and HWIC-D-9ESW EtherSwitch Interface Cards How to Configure EtherSwitch HWICs To return to the default setting, use the no bridge bridge-group forward-time seconds global configuration command. Changing the Maximum-Idle Interval If a switch does not hear BPDUs from the root switch within a specified interval, it recomputes the spanning-tree topology. Beginning in privileged EXEC mode, follow these steps to change the maximum-idle interval (maximum aging time). SUMMARY STEPS 1.
Cisco HWIC-4ESW and HWIC-D-9ESW EtherSwitch Interface Cards How to Configure EtherSwitch HWICs 3. bridge-group bridge-group spanning-disabled 4. end 5. show running-config 6. copy running-config startup-config DETAILED STEPS Command Purpose Step 1 configure terminal Enters global configuration mode. Step 2 interface interface-id Enters interface configuration mode, and specify the interface ID. Step 3 bridge-group bridge-group spanning-disabled Disables spanning tree on the interface.
Cisco HWIC-4ESW and HWIC-D-9ESW EtherSwitch Interface Cards How to Configure EtherSwitch HWICs Note Refer to the Cisco AVVID QoS Design Guide for more information on how to implement end-to-end QoS as you deploy Cisco AVVID solutions. Beginning in global configuration mode, follow these steps to automatically configure Cisco IP phones to send voice traffic on the voice VLAN ID (VVID) on a per-port basis (see the “Voice Traffic and VVID” section on page 60). SUMMARY STEPS 1. enable 2.
Cisco HWIC-4ESW and HWIC-D-9ESW EtherSwitch Interface Cards How to Configure EtherSwitch HWICs • Network managers should ensure that existing subnets have enough available IP addresses for the new Cisco IP phones, each of which requires a unique IP address. • Administering a network with a mix of IP phones and workstations on the same subnet might pose a challenge.
Cisco HWIC-4ESW and HWIC-D-9ESW EtherSwitch Interface Cards How to Configure EtherSwitch HWICs • Managing the ARP Table, page 66 • Managing the MAC Address Tables, page 66 • Removing Dynamic Addresses, page 68 • Adding Secure Addresses, page 68 • Configuring Static Addresses, page 69 • Clearing all MAC Address Tables, page 71 Adding Trap Managers A trap manager is a management station that receives and processes traps.
Cisco HWIC-4ESW and HWIC-D-9ESW EtherSwitch Interface Cards How to Configure EtherSwitch HWICs Assigning IP Information to the Switch You can use a BOOTP server to automatically assign IP information to the switch; however, the BOOTP server must be set up in advance with a database of physical MAC addresses and corresponding IP addresses, subnet masks, and default gateway addresses. In addition, the switch must be able to access the BOOTP server through one of its ports.
Cisco HWIC-4ESW and HWIC-D-9ESW EtherSwitch Interface Cards How to Configure EtherSwitch HWICs Beginning in global configuration mode, follow these steps to remove an IP address. SUMMARY STEPS 1. interface vlan 1 2. no ip address 3. end DETAILED STEPS Command Purpose Step 1 Router(config)# interface vlan 1 Enters interface configuration mode, and enters the VLAN to which the IP information is assigned. VLAN 1 is the management VLAN, but you can configure any VLAN from IDs 1 to 1001.
Cisco HWIC-4ESW and HWIC-D-9ESW EtherSwitch Interface Cards How to Configure EtherSwitch HWICs Enabling the DNS If your network devices require connectivity with devices in networks for which you do not control name assignment, you can assign device names that uniquely identify your devices within the entire internetwork. The Internet’s global naming scheme, the DNS, accomplishes this task. This service is enabled by default.
Cisco HWIC-4ESW and HWIC-D-9ESW EtherSwitch Interface Cards How to Configure EtherSwitch HWICs Managing the ARP Table To communicate with a device (on Ethernet, for example), the software first must determine the 48-bit MAC or local data link address of that device. The process of determining the local data link address from an IP address is called address resolution. The Address Resolution Protocol (ARP) associates a host IP address with the corresponding media or MAC addresses and VLAN ID.
Cisco HWIC-4ESW and HWIC-D-9ESW EtherSwitch Interface Cards How to Configure EtherSwitch HWICs Each VLAN maintains its own logical address table. A known address in one VLAN is unknown in another until it is learned or statically associated with a port in the other VLAN. An address can be secure in one VLAN and dynamic in another. Addresses that are statically entered in one VLAN must be static addresses in all other VLANs.
Cisco HWIC-4ESW and HWIC-D-9ESW EtherSwitch Interface Cards How to Configure EtherSwitch HWICs Removing Dynamic Addresses Beginning in privileged EXEC mode, follow these steps to remove a dynamic address entry. SUMMARY STEPS 1. configure terminal 2. no mac-address-table dynamic hw-addr 3. end DETAILED STEPS Command Purpose Step 1 Router# configure terminal Enters global configuration mode.
Cisco HWIC-4ESW and HWIC-D-9ESW EtherSwitch Interface Cards How to Configure EtherSwitch HWICs DETAILED STEPS Command Purpose Step 1 Router# configure terminal Enters global configuration mode. Step 2 Router(config)# mac-address-table secure address hw-addr interface interface-id vlan vlan-id Enters the MAC address, its associated port, and the VLAN ID. Step 3 Router(config)# end Returns to privileged EXEC mode. Beginning in privileged EXEC mode, follow these steps to remove a secure address.
Cisco HWIC-4ESW and HWIC-D-9ESW EtherSwitch Interface Cards How to Configure EtherSwitch HWICs Beginning in privileged EXEC mode, follow these steps to add a static address. SUMMARY STEPS 1. configure terminal 2. mac-address-table static hw-addr [interface] interface-id [vlan] vlan-id 3. end DETAILED STEPS Command Purpose Step 1 Router# configure terminal Enters global configuration mode.
Cisco HWIC-4ESW and HWIC-D-9ESW EtherSwitch Interface Cards Configuration Examples for EtherSwitch HWICs Clearing all MAC Address Tables To remove all addresses, use the clear mac-address command in privileged EXEC mode: Command Purpose Router# clear mac-address-table Enters to clear all MAC address tables.
Cisco HWIC-4ESW and HWIC-D-9ESW EtherSwitch Interface Cards Configuration Examples for EtherSwitch HWICs Range Macro Definition Example The following example shows an interface-range macro named enet_list being defined to select Fast Ethernet interfaces 0/1/0 through 0/1/3: Router(config)#define interface-range enet_list fastethernet 0/1/0 - 0/1/3 Router(config)# The following example shows how to change to the interface-range configuration mode using the interface-range macro enet_list: Router(config)#in
Cisco HWIC-4ESW and HWIC-D-9ESW EtherSwitch Interface Cards Configuration Examples for EtherSwitch HWICs Note In practice, the command switchport stacking-partner interface FastEthernet 0/partner-slot/partner-port needs to be executed for only one of the stacked ports. The other port will be automatically configured as a stacking port by the Cisco IOS software. The command no shutdown, however, must be executed for both of the stacked ports.
Cisco HWIC-4ESW and HWIC-D-9ESW EtherSwitch Interface Cards Configuration Examples for EtherSwitch HWICs Router(vlan)# exit APPLY completed. Exiting....
Cisco HWIC-4ESW and HWIC-D-9ESW EtherSwitch Interface Cards Configuration Examples for EtherSwitch HWICs Spanning-Tree Port Cost Example The following example shows how to change the spanning-tree port cost of a Fast Ethernet interface: Router# configure terminal Router(config)# interface fastethernet 0/3/2 Router(config-if)# spanning-tree cost 18 Router(config-if)# end Router# Router#show run interface fastethernet0/3/2 Building configuration...
Cisco HWIC-4ESW and HWIC-D-9ESW EtherSwitch Interface Cards Configuration Examples for EtherSwitch HWICs Forward-Delay Time for a VLAN Example The following example shows the forward delay time for VLAN 20 being configured to 21 seconds: Router# configure terminal Router(config)# spanning-tree vlan 20 forward-time 21 Router(config)# end Router# Maximum Aging Time for a VLAN Example The following example configures the maximum aging time for VLAN 20 to 36 seconds: Router# configure terminal Router(config)#
Cisco HWIC-4ESW and HWIC-D-9ESW EtherSwitch Interface Cards Configuration Examples for EtherSwitch HWICs Switched Port Analyzer (SPAN) Source: Examples • SPAN Source Configuration Example, page 77 • SPAN Destination Configuration Example, page 77 • Removing Sources or Destinations from a SPAN Session Example, page 77 SPAN Source Configuration Example The following example shows SPAN session 1 being configured to monitor bidirectional traffic from source interface Fast Ethernet 0/1/1: Router(config)#
Cisco HWIC-4ESW and HWIC-D-9ESW EtherSwitch Interface Cards Configuration Examples for EtherSwitch HWICs ! interface Vlan1 ip address 192.168.4.90 255.255.255.0 ip pim sparse-mode end Router#sh run int vlan 2 Building configuration... Current configuration :82 bytes ! interface Vlan2 ip address 192.168.5.90 255.255.255.0 ip pim sparse-mode end Router# Router# sh ip igmp group IGMP Connected Group Membership Group Address Interface 239.255.255.255 Vlan1 224.0.1.40 Vlan2 224.5.5.5 Vlan1 224.5.5.5 Vlan2 224.
Cisco HWIC-4ESW and HWIC-D-9ESW EtherSwitch Interface Cards Configuration Examples for EtherSwitch HWICs (*, 224.6.6.6), 01:06:43/00:02:18, RP 0.0.0.0, flags:DC Incoming interface:Null, RPF nbr 0.0.0.
Cisco HWIC-4ESW and HWIC-D-9ESW EtherSwitch Interface Cards Configuration Examples for EtherSwitch HWICs interface Vlan 150 description voice vlan ip address 10.150.1.1 255.255.255.0 ip helper-address 172.20.73.14 (See Note below) interface Vlan 50 description data vlan ip address 10.50.1.1 255.255.255.0 This configuration instructs the IP phone to generate a packet with an 802.1Q VLAN ID of 150 with an 802.1p value of 5 (default for voice bearer traffic).
Cisco HWIC-4ESW and HWIC-D-9ESW EtherSwitch Interface Cards Additional References Ethernet Ports on IP Phones with Multiple Ports Example The following example illustrates the configuration for the IP phone: interface FastEthernet0/x/x switchport voice vlan x switchport mode trunk The following example illustrates the configuration for the PC: interface FastEthernet0/x/y switchport mode access switchport access vlan y Note Using a separate subnet, and possibly a separate IP address space, may not be an
Cisco HWIC-4ESW and HWIC-D-9ESW EtherSwitch Interface Cards Additional References MIBs MIBs MIBs Link No new or modified MIBs are supported by this feature, and support for existing MIBs have not been modified by this feature. To locate and download MIBs for selected platforms, Cisco IOS releases, and feature sets, use Cisco MIB Locator found at the following URL: http://www.cisco.