Doc. No. 78-1923-09 The LightStream 2020 Release Notes for Software Release 2.0.9 These release notes describe features, enhancements, special considerations, and software upgrade procedures for software Release 2.0.9 of the LightStream 2020 enterprise ATM switch. This software base release is an upgrade to base Release 2.0.7. It subsumes upgrade 2.0.8, and it supersedes base release 2.0.7 node software and all prior releases. StreamView Network Management software is not updated in this release.
New Features and Enhancements New Features and Enhancements Release 2.0.9 contains improvements to existing functionality found in Release 2.0.
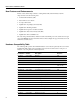
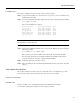
Flash Memory Image Checksum Values Part Number Previous Part Number Description Minimum Revision 73-1452-01 2124055G01 FDDI access card C 73-1441-01 2123263G01 Cell line card, 2 TSUs (for 2-port OC3AC) G 73-1442-01 2123263G02 Cell line card, 1 TSU (for 1-port OC3AC) C 73-1444-01 2123265G01 Single-mode, 2-port OC-3c access card D 73-1445-01 2123265G02 Multimode, 2-port OC3 access card C 73-1446-01 2123265G03 Single-mode, 1-port OC3 access card A 73-1447-01 2123265G04 Multimode,
Special Considerations Special Considerations for Release 2.0.9 Setting and Detecting Baud Rate on the Console or Modem Ports The TCS HUB for Release 2 switch cards no longer uses the BREAK detection mechanism (also known as the auto-baud or pseudo-auto-baud mechanism) to select the baud rate on either the console or modem port. Note Setting and detecting the baud rate applies only to the Release 2 switch card.
Special Considerations The arguments of the command are as follows: { sa | sb } Specify Switch Card A or Switch Card B. {console | modem} Specify whether the display is for the console port or the modem port. baudrate Specify that the baud rate is to be displayed. You can change the baud rate at any time. It takes effect on power-up or board reset, or (for the modem port) when the modem port is reinitialized with the TCS HUB init command.
Special Considerations • If you do not have access to the local console, then use the modem port on the redundant switch. This method requires redundant Release 2 switch cards and redundant modems and the ability to dial in to the LightStream 2020 chassis, using the other Release 2 switch card and modem. Dial in to the LightStream 2020 chassis and determine the address of this switch card (the one to which the modem is attached).
Special Considerations Frame Relay NNI Interface Limited Although limited functionality for a frame relay NNI interface is present in the Release 2.0.9 software, this is not a supported functionality. Internal Looping of Frame Relay UNI Port Looping of a Frame Relay UNI interface provides no useful diagnostic information because the UNI protocol is asymmetric. The LightStream 2020 switch supports internal looping of such a port by first converting it to an NNI interface.
Special Considerations Plan the Network Configuration Identify all OC-3 ports in your network that you want to run SDH. Step 1 List the SDH ports for each switch. Step 2 Use the long port number format cc0pp, where cc is the card number (leading 0 not required) and pp is the port number. For example, Port 1 on Card 5 of an OC-3 card is 5001. (For a detailed description of this port number format, see the LightStream 2020 CLI Reference Manual.
Special Considerations Installing a Card Every time you install a card in a slot of the system, use this procedure: Step 1 Log in to the active NP as root. (See the Software Upgrade Procedures for instructions for identifying the active NP.
Special Considerations LSCle00509 PVC Deleting one PVC hangs up MMA when hundreds of PVCs are used. If hundreds of PVCs are created on a single port, the deleting of one PVC can take a long time. The result will be an SNMP timeout to the Net Management tool that you are using to delete the PVC. The delay could be several minutes when over 100 PVCs are created on a given port. LSCle01083 HP OpenView A bug in HP OpenView limits collections to less than 20 variables.
Special Considerations LSCle00710 Checking Software No procedure is described for checking software on the standby NP. When you verify a software installation using the ckswinstall utility on a redundant-NP system, the software installation on each of the two NPs must be checked explicitly. Here are the procedures for doing so: Step 1 Run ckswinstall on the current primary NP. Step 2 Run ckswinstall on the current backup NP. bash# rsh other-np ckswinstall ...
Special Considerations LSCle00867 Disk Space You may be unable to free up sufficient disk space for a new release. When attempting to install a new release, you may be told that insufficient disk space is available on the sd0c partition. See “Special Procedure A, Freeing Up Disk Space” for instructions on deleting old releases to free up sufficient space for the new release.
Special Considerations LSCle00962 PVC The deleted PVC cannot be added in again: “Waiting to be deleted from switch.” The current implementation restriction requires that, after initiating a download, the user wait until the download completes before trying to modify the records involved in the download. Further, the user needs to reread the database after the download completes before modifying the records. LSCle01015 Config Files Fallback from swchgver does not copy config files back.
Special Considerations one download is in process, the downloads can be distinguished only by remembering the order in which they were invoked (one with a lower PID was invoked earlier, and one with a higher PID was invoked later). Even when the correct process is killed, the results can be unpredictable, because part of the configuration might have been downloaded. LSCle01164 FR FR should be upgraded to support T1.617a-1993. The Frame Relay LMI conforms to T1.
Software Upgrade Procedures LSCle01318 OC3 Port OC-3 card continuously bounced when connected to SONET MUX. When connecting an OC3 port to a SONET multiplexor, you should normally use a clocking type of external (rather than the default of internal). Use of internal clocking may prevent the port from operating correctly. LSCle01369 External SNMP External SNMP devices impact system performance. The NP software does not throttle excess traffic from external SNMP devices.
Software Upgrade Procedures Note The following procedure for software installation of Release 2.0.9 causes flash memory to be reloaded. The flash reload time depends on your system configuration. Also, you must explicitly reload switch card flash memory according to the installation procedure. Requirements for Upgrade For Release 2.0.9 to be installed, the network processor must have 32 Mb of memory. For Release 2.0.9 to be installed successfully, you must currently be running at least Release 2.0.
Software Upgrade Procedures Outline of Upgrade Procedures The following procedures are used to upgrade a network to Release 2.0.9 software: • Procedure 1, Copy New Software to the Distribution Node Use the swinstall command to copy the new software from the installation diskettes to the node being used as the software distribution node. (If swinstall reports insufficient disk space, you will be directed to perform Special Procedure A, Freeing Up Disk Space.
Software Upgrade Procedures Procedure 1, Copy New Software to the Distribution Node With this procedure you copy the new software from the distribution disk set to a local LightStream 2020 node. This local node is referred to as the distribution node. In Procedure 2, Copy New Software to Remote Nodes, you use the distribution node as the source from which to copy the software to other nodes in the network.
Software Upgrade Procedures Step 4 On a system with redundant NPs, verify that you are connected to the primary NP (the active NP): • At the bash prompt, enter the cli command to start the CLI. bash# cli • At the CLI prompt, enter the show chassis command and examine the entries for “Slot of Primary NP” and “Slot of This NP.” • Determine whether the entries for Slot of Primary NP and Slot of This NP identify the same NP number or not.
Software Upgrade Procedures When the program prompts you for a diskette, insert the first diskette (of the diskette set that you are currently installing) into the appropriate drive and press [Return]. Repeat as the program prompts you for more diskettes in the current set. Step 8 Repeat Step 7 for each diskette set, following the order given under Step 6.
Software Upgrade Procedures Enter the name of the remote node in place of remote-node. If the command succeeds, it prints the name of remote-node. Continue to Step 2. If the command fails, it prints one of the following messages: hostname: unknown host hostname: Connection timed out Permission denied. Refer to the Special Procedures, Special Procedure D, Getting rsh to Work Successfully on a Remote Node. Note If this is the first time you have upgraded, then this step is likely to fail.
Software Upgrade Procedures Step 2 Enter ‘. (backquote plus dot, that is, left single quote plus period). Step 3 At the TCS HUB prompt, use the connect command to connect to the NP in Slot 1, as follows: TCS HUB <> connect 1 The user name: prompt should appear. Log in as root. The bash prompt appears (with # indicating a root login). user name: root password: bash# You may need to enter a second [Return] after typing the connect command in order to get a prompt from the NP.
Software Upgrade Procedures • Connect to the slot of the primary NP (the active NP) by typing the following command: TCS HUB<> connect primary Substitute 1 or 2 in place of primary, using the value that you arrived at in Step 4, above. • If necessary, log in to the NP as root. Change the Running Software Version Note The swchgver program ordinarily takes about a minute to run. However, it can take as much as 2.
Software Upgrade Procedures Example Output From a Successful Upgrade The following is an example of output seen when this upgrade procedure is carried out with the console trap level set to info: bash# swchgver Checking and downloading FLASH memory for all function cards Checking and downloading files for standby network processor. Rebooting standby network processor. ....
Software Upgrade Procedures fsck /dev/sd0b (all sizes and block numbers in decimal) (file system creation time is Mon Apr 11 08:57:52 1994) checking used files recovering orphaned files making free block list making free inode list 17838 free blocks 3426 free inodes fsck /dev/sd0c (all sizes and block numbers in decimal) (file system creation time is Mon Apr 11 08:58:25 1994) checking used files recovering orphaned files making free block list making free inode list 8645 free blocks 3534 free inodes fsck /
Software Upgrade Procedures Procedure 4, Verify Switch Card Flash With this procedure you verify the version of flash memory in each node’s switch cards, and upgrade if necessary. Requirements to Perform the Procedure If the verification step that follows indicates that switch card flash needs to be upgraded, a console connection to the NP is required for performance of the upgrade.
Software Upgrade Procedures Upgrade Flash Step 3 If a new image is to be loaded into flash on a switch card, shutdown the node: bash# reboot -n This takes the node down. The following display appears: **** LynxOS [rebooted by /bin/reboot] is down **** Memory Autosizing ... (32 Meg) ... Done Clearing 32 Meg Memory... Done NP1 POST Version 0.225 Feb 21, 1995 NP1 POST Summary ---------------0 Tests Failed Network Processor bootstrap (version 1.
Software Upgrade Procedures Step 6 Load the switch card flash memory for Slot A. • For a Release 2 switch card in Slot A, enter the following command at the System Monitor prompt (the 0 in sd0b is a zero): System Monitor-> fload sa (sd0b)fware/flash_sc2.rec Reading...............(238811 bytes) Erasing............... Loading............................................................ ............................................................ ............................................................ .
Software Upgrade Procedures TCS HUB<>reset 1 • Reconnect to the same NP (the NP in slot 1 in this example): TCS HUB<> connect 1 The following display appears: Memory Autosizing ... (32 Meg) ... Done Clearing 32 Meg Memory ... Done NP1 POST Version 0.225 Feb 21, 1995 NP1 POST Summary ---------------0 Tests Failed • Press [Return] when the following prompt appears: System will boot in 5 seconds: hit to interrupt.
Software Upgrade Procedures Load Statistics Data bytes = Overhead bytes = Messages sent = S-records = System Monitor-> • 84898 42464 2654 5307 For a Release 1 switch card, enter the following command at the System Monitor prompt (the 0 in sd0b is a zero): System Monitor-> fload sb (sd0b)fware/flash_sc1.rec Reading...............
Special Procedures Reload Flash If Necessary Step 12 If the switch card has an incorrect flash checksum, load the flash again by executing the present procedure, Procedure 4, Verify Switch Card Flash. Verify flash again (Step 10 and Step 11 above). If the card still has an incorrect flash checksum after you load flash a second time, contact Cisco Customer Support at 1-800-553-NETS (6387) or 1-800-553-2447.
Special Procedures Return to the section that referred you to this procedure (“Procedure 1, Copy New Software to the Distribution Node” or “Procedure 2, Copy New Software to Remote Nodes”). Special Procedure B, Falling Back to the Prior Version Use this procedure if you wish to revert to the prior version of software: Step 1 Log in to the Primary NP as root if you have not already done so.
Special Procedures Step 3 If there is a redundant NP in this chassis, verify that the other NP is functioning as backup. Enter the following command: bash# rsh other-np /bin/true The following results are possible: • No error message bash# rsh other-np /bin/true bash# This result indicates success. The other NP is up and accessible. Return to the section that referred you to this Special Procedure (“Procedure 3, Change the Running Software Version”).
Special Procedures Step 5 The following error message may be generated: Permission denied. If this message is displayed, the rsh permissions on the backup NP are incorrect. • Log in to the backup NP as root using rsh. bash# rsh other-np login root vt100 password: . . . bash# • Verify that the file “/.rhosts” contains the line “other-np root”. If this line is missing, add it with the following command: bash# cp /.rhosts /.rhosts.bak bash# echo “other-np root” >>/.
Special Procedures Special Procedure D, Getting rsh to Work Successfully on a Remote Node Use this procedure if the rsh command reports an error message: Step 1 On the distribution node, examine the file /etc/hosts to verify that there is an entry for remote-node in it.
Special Procedures Note Be sure you enter the redirect operator twice, with no space (>>). If you enter it only once (>), you will overwrite the existing file rather than appending to it. If you make a mistake, enter the command cp /.rhosts.bak /.rhosts to recover the original file. Step 6 On the remote node, examine the file /usr/etc/hosts to verify that there is an entry for distribution-node in it.
Resolved Problems Note Do not use the dir command to verify the contents of the diskette. There is no FAT (the DOS file allocation table) on LightStream 2020 distribution diskettes, so there can be none on your backup diskettes. Consequently, if you enter dir a: or dir b:, DOS issues a read error message. If Your PC Has Two 1.44 MB Floppy Disk Drives For each LightStream 2020 software distribution diskette, do the following: Step 1 Insert the distribution diskette in the floppy disk drive.
Resolved Problems LIGle00261 Intermittent port shutdowns on LSC LSCle02690 NP does not cut over to primary switch on CLI switch cutover LSCle02739 Ping fails when data bandwidth not available — NMS assumes net down LSCle02751 Chassis IP and oblan addresses being zeroed The platform bugs listed below have been fixed in Release 2.0.8a2 and are incorporated in Release 2.0.9.