PA-4C-E 1-Port High-Performance ESCON Channel Port Adapter Installation and Configuration Product Number: PA-4C-E(=) Platforms Supported: Cisco 7200 Series Routers, including the Cisco 7200 VXR Routers Document part number: OL-3473-02 Americas Headquarters: Cisco Systems, Inc., 170 West Tasman Drive, San Jose, CA 95134-1706 USA © 2007 Cisco Systems, Inc. All rights reserved.
Preface Preface This preface describes the objectives and organization of this document and explains how to find additional information on related products and services.
Preface Related Documentation Your router, switch, or gateway and the Cisco IOS software running on it contain extensive features and functionality, which are documented in the following resources: • Cisco IOS software: For configuration information and support, refer to the modular configuration and modular command reference publications in the Cisco IOS software configuration documentation set that corresponds to the software release installed on your Cisco hardware.
Preface http://www.cisco.com/en/US/docs/general/whatsnew/whatsnew.
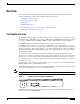
Overview Overview This section describes the HP ESCON PA, including channel attachment, the LED functions, the memory and cable requirements, and contains the following subsections: • Port Adapter Overview, page 5 • ESCON Specifications, page 7 • LEDs, page 7 • ESCON Cable, page 9 • Port Adapter Slot Locations on the Supported Platforms, page 9 • Identifying Interface Addresses, page 10 Port Adapter Overview The HP ESCON PA is a high-speed (100 bandwidth points) port adapter for Cisco 7200 seri
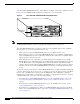
Overview You can install the HP ESCON PA in any of the available port adapter slots in a Cisco 7200 series router. Figure 2 shows an HP ESCON PA installed in port adapter slot 1 of a Cisco 7206.
Overview • For general information on HP ESCON PA microcode, refer to the “HP ESCON PA Microcode Overview” section on page 12. For specific instructions to configure the Cisco IOS software to download microcode from the router Flash memory card or SanDisk memory device, refer to the “Upgrading the HP ESCON PA Microcode from Cisco.com” section on page 33. ESCON Specifications Table 1 lists the specifications for the ESCON interfaces.
Overview Figure 3 shows the LED indicators. Figure 3 HP ESCON PA LED Indicators T ED EN S RE AD LO P EN E L 46956 IN NA NL G SI O Table 2 shows the HP ESCON PA LED indicator sequences during a cold boot. The ENABLED LED is not part of the following sequences; it remains on during the boot sequence (Figure 4).
Overview ESCON Cable The ESCON channel interface uses 62.5/125 micrometer, multimode, fiber-optic cable with male duplex connectors at each end (Figure 5). ESCON cables are not available from Cisco. Refer to the ESCON specifications in and contact your cable supplier or the vendor of your host CPU to order the correct ESCON cable.
Overview Figure 6 Port Adapter Slots in the Cisco 7206 Router Port adapter slot 6 Port adapter slot 4 Port adapter slot 2 Blank port adapter 3 2 1 0 6 TOKEN RING 5 FAST ETHERNET 4 RJ4 5 MII 0 LIN K D LE AB EN 0 1 TX 2 RX 4 TX RX 3 TX RX 2 TX RX TX EN ETHERNET-10BFL CD LB RC RD TC TD CD LB RC RD TC TD CD LB RC RD TC TD CD LB RC RD TC TD EN FAST SERIAL RX 3 3 2 2 1 0 LINK 1 0 3 EN AB LE D ETHERNET 10BT ET 45 0 D LE AB 1O O PW K R 5 R L J4
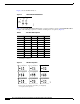
Overview Table 3 describes the interface addresses for the Cisco 7200 series routers, includingCisco 7200 VXR routers. Table 3 Identifying Interface Addresses Platform Cisco 7200 series routers and Cisco 7200 VXR routers (,7204, 7204VXR, 7206, 7206VXR) Interface Address Format Port-adapter-slot-number/interface-port-number Numbers Syntax 1 Port adapter slot—1 through 6 (depends on the number of slots in the router) 1/0 Interface port—0 1.
Preparing for Installation Preparing for Installation This section describes the general equipment, safety, and site preparation requirements for installing the HP ESCON PA. It also includes microcode overview information.
Preparing for Installation The following example is a partial display of the show microcode command output: Router# show microcode Microcode images for downloadable hardware HW Type Microcode image names -----------------------------------------ecpa default slot0:xcpa28-0 configured slot0:xcpa218-2 pcpa default slot0:xcpa28-0 Note In Cisco IOS Release 12.1(5)T or later, the filenames of all released HP ESCON PA microcode images use the conventions xcpa28-nn (for example, xcpa28-1).
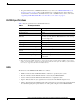
Preparing for Installation Table 4 lists the specific Cisco IOS software images that are compatible with the HP ESCON PA. Table 4 Cisco IOS Release Image Names Cisco IOS Release Image Names Release 12.1(5)T c7200-aejs-mz c7200-aejs40-mz c7200-aejs56i-mz c7200-ajs-mz c7200-ajs40-mz c7200-ajs56i-mz c7200-js-mz c7200-js40-mz c7200-js56i-mz c7200-ds-mz c7200-ds40-mz c7200-ds56i-mz Table 5 specifies the recommended minimum level of HP ESCON PA microcode for the corresponding Cisco IOS release.
Preparing for Installation Safety Guidelines This section provides safety guidelines that you should follow when working with any equipment that connects to electrical power or telephone wiring. Safety Warnings Safety warnings appear throughout this publication in procedures that, if performed incorrectly, might harm you. A warning symbol precedes each warning statement. Warning IMPORTANT SAFETY INSTRUCTIONS This warning symbol means danger. You are in a situation that could cause bodily injury.
Preparing for Installation Warnung WICHTIGE SICHERHEITSHINWEISE Dieses Warnsymbol bedeutet Gefahr. Sie befinden sich in einer Situation, die zu Verletzungen führen kann. Machen Sie sich vor der Arbeit mit Geräten mit den Gefahren elektrischer Schaltungen und den üblichen Verfahren zur Vorbeugung vor Unfällen vertraut.
Preparing for Installation Varning! VIKTIGA SÄKERHETSANVISNINGAR Denna varningssignal signalerar fara. Du befinner dig i en situation som kan leda till personskada. Innan du utför arbete på någon utrustning måste du vara medveten om farorna med elkretsar och känna till vanliga förfaranden för att förebygga olyckor. Använd det nummer som finns i slutet av varje varning för att hitta dess översättning i de översatta säkerhetsvarningar som medföljer denna anordning.
Preparing for Installation Electrical Equipment Guidelines Follow these basic guidelines when working with any electrical equipment: • Before beginning any procedures requiring access to the chassis interior, locate the emergency power-off switch for the room in which you are working. • Disconnect all power and external cables before moving a chassis. • Do not work alone when potentially hazardous conditions exist and never assume that power has been disconnected from a circuit; always check.
Preparing for Installation Class 1 laser products are not considered hazardous. The HP ESCON PA has embedded Class 3a laser LED assemblies operating at a nominal wavelength of 850 nanometer and a maximum potential output power of 1.25 milliwatts. The design of the HP ESCON PA incorporates engineering features including current limiting, which ensures that there is no human access to LED radiation greater than Class 1 under any set of operating, maintenance, or service conditions, including a single fault.
Preparing for Installation Staring into Laser Beam Warning Waarschuwing Varoitus Do not stare into the laser beam. Statement 1010 Niet in de straal staren. Älä katso säteeseen. Attention Ne pas fixer le faisceau des yeux. Warnung Nicht direkt in den Strahl blicken. Avvertenza Non fissare il raggio con gli occhi. Advarsel Aviso ¡Advertencia! Varning! Stirr ikke på strålen. Não olhe fixamente para o raio. No mirar fijamente el haz. Laserstrålning när enheten är öppen.
Removing and Installing Port Adapters Removing and Installing Port Adapters This section describes how to remove port adapters from supported platforms and also how to install new or replacement port adapters.
Removing and Installing Port Adapters Online Insertion and Removal The Cisco 7200 series routers, including Cisco 7200 VXR routers, support online insertion and removal (OIR) of all port adapters. You do not need to power down the router when removing and replacing an HP ESCON PA. Note As you disengage the module from the router or switch, OIR administratively shuts down all active interfaces in the port adapter.
Removing and Installing Port Adapters Port Adapter Removal and Installation In this section, the illustrations that follow give step-by-step instructions on how to remove and install port adapters. Although the procedures may refer to a particular type of port adapter, the steps are the same for installing and removing all types of port adapters.
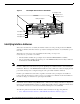
Removing and Installing Port Adapters Cisco 7200 Series Routers and Cisco 7200 VXR Routers—Removing and Installing a Port Adapter Step 1 Port adapter lever (locked position) To remove the port adapter, place the port adapter lever in the unlocked position. (See A.) The port adapter lever remains in the unlocked position.
Removing and Installing Port Adapters Attaching the HP ESCON PA to the Channel Caution We recommend that an authorized service representative or other qualified service person perform the following procedure. To prevent hardware problems with your host processor, all the channel connections must be tight. A loose connection can cause the host processor or its channel to halt. Every cable must be tightly seated in its connector.
Configuring the HP ESCON PA Configuring the HP ESCON PA To continue your port adapter installation, you must configure the HP ESCON PA interface. The instructions that follow apply to all supported platforms. Minor differences among the platforms—with Cisco IOS software commands—are noted.
Configuring the HP ESCON PA Configuring the HP ESCON PA Interface After you verify that the new HP ESCON PA is installed correctly, use the configure command to configure the new interfaces. The enabled LED (EN) goes on when the port adapter is installed correctly (Figure 3). Before you begin to configure the interface, be prepared with the following information: • Protocols and encapsulations you plan to use on the new interfaces.
Configuring the HP ESCON PA Step 2 At the prompt, enter the interface configuration mode by using the interface configuration command. The following example prepares you to configure the interface on the channel port adapter in slot 2, port 0: Router(config)# interface channel 2/0 Step 3 If IP routing is enabled on the system, you can assign an IP address and subnet mask to the interface with the ip address interface configuration, as in the following example: Router(config-if)# ip address 1.1.1.10 255.
Configuring the HP ESCON PA Step 3 Specify one of the new interfaces with the show interfaces port adapter type slot/interface command and verify that the first line of the display specifies the interface with the correct slot number. Also verify that the interface and line protocol are in the correct state: up or down. Step 4 Display the protocols configured for the entire system and specific interfaces with the show protocols command.
Configuring the HP ESCON PA X.25 software, Version 3.0.0. 4 Ethernet/IEEE 802.3 interface(s) 3 FastEthernet/IEEE 802.3 interface(s) 2 IBM channel interface(s) 125K bytes of non-volatile configuration memory. 20480K bytes of Flash PCMCIA card at slot 0 (Sector size 128K). 4096K bytes of Flash internal SIMM (Sector size 256K). Configuration register is 0x100 Using the show controllers Commands Display all the current interface processors and their interfaces using the show controllers command.
Configuring the HP ESCON PA Using the show diag Command Display the type of port adapter installed in your system using the show diag command. Note The outputs that appear in this document may not match the output you receive when running these commands. The outputs in this document are examples only.
Configuring the HP ESCON PA Data transfer rate 12 Mbytes, number of subchannels 0 Last input 00:14:09, output 00:00:58, output hang never Last clearing of "show interface" counters never Queueing strategy: fifo Output queue 0/40, 69129 drops; input queue 0/75, 0 drops 5 minute input rate 220000 bits/sec, 239 packets/sec 5 minute output rate 289000 bits/sec, 252 packets/sec 788256 packets input, 84718668 bytes, 0 no buffer Received 0 broadcasts, 0 runts, 0 giants, 0 throttles 0 input errors, 0 CRC, 0 frame,
Configuring the HP ESCON PA Upgrading Your HP ESCON PA Microcode The following sections discuss HP ESCON PA microcode configuration requirements: • How Does HP ESCON PA Microcode Ship?, page 33 • Upgrading the HP ESCON PA Microcode from Cisco.com, page 33 • Configuring the HP ESCON PA Microcode, page 34 For additional information about specific microcode requirements, refer to the “Hardware and Software Requirements” section on page 13.
Configuring the HP ESCON PA Step 4 Reconfigure the router, as necessary, to use the HP ESCON PA microcode image stored in the Flash memory card in slot 0 or slot 1, or in the SanDisk memory device in disk 0 or disk 1. Step 5 Save your running configuration to a TFTP server, Flash memory, or SanDisk memory. Step 6 Perform a microcode reload.
Configuring the HP ESCON PA 18 19 20 21 22 23 24 25 26 27 .. .. .. .. .. .. .. .. .. ..
Configuring the HP ESCON PA Step 5 To verify that the correct microcode is loaded according to the new instructions, enter the show controllers EXEC command. The display indicates the currently loaded and running microcode version for each HP ESCON PA. Step 6 To verify the contents of the configuration file, enter the show running-config EXEC command. You can also verify that the correct software image is configured to load at system restart or reload by using the show startup-config EXEC command.
Configuring the HP ESCON PA 4109312 bytes copied in 206.344 secs (19948 bytes/sec) Note In the preceding example, the exclamation points (!) appear as the file is downloaded, and the “c” characters signify calculation of the checksum, which is a verification that the file has been correctly downloaded to the Flash memory card.
Configuring the HP ESCON PA In the squeeze command display output, the displayed characters have the following meaning: • The character “e” means the Flash memory special location has been erased, which occurs before a write operation. • The character “b” means that the data that is about to be written to this special location has been temporarily copied. • The character “E” signifies that the sector that was temporarily occupied by the data has been erased.
Configuring the HP ESCON PA Expanding disk0:xcpa27-1_seg_push (15488 bytes):!!!!!!!!!!! Expanding disk0:xcpa27-1_seg_tcpip (161140 bytes):!!!!!!!!!!! Expanding disk0:xcpa27-1_seg_tn3270 (620400 bytes):!!!!!!!!!!! [OK - 2739200/5478400 bytes] 2739200 bytes copied in 68.
Configuring the HP ESCON PA This document is to be used in conjunction with the documents listed in the Preparing for Installation section. CCVP, the Cisco Logo, and the Cisco Square Bridge logo are trademarks of Cisco Systems, Inc.; Changing the Way We Work, Live, Play, and Learn is a service mark of Cisco Systems, Inc.