Quick Start Guide Cisco PIX 501 Firewall 1 Check Items Included 2 Installing the PIX 501 3 Configuring the PIX 501 4 Optional Maintenance and Upgrade Procedures
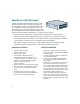
The PIX 501 delivers enterprise-class security for small CISCO PI X 501 offices and telecommuters in a reliable, plug-and-play security appliance.
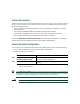
1 Check Items Included 4 3 POWER 2 1 0 PIX 501 CONSOL E 3.3V 4.
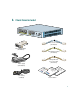
2 Installing the PIX 501 PIX 501 Computer or other network device Yellow Ethernet cable 4 3 2 1 0 PO WE R CO NS OLE 3.3 V 4.5 A Orange Ethernet cable Laptop computer DSL/Cable/ISDN modem Internet 61277 Printer Power adapter Follow these steps to connect the cables: Step 1 Place the chassis on a flat, stable surface. The chassis is not rack mountable. Step 2 Connect Port 0, the outside Ethernet port, to the public network, that is, the Internet: a.
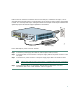
Make sure the PC interface connected to the PIX 501 inside port, numbered 1 through 4, is set to autonegotiate for best performance. If autonegotiate is not an option for the PC interface, set the speed to either 10 or 100 Mbps half duplex. Setting the interface to full duplex causes a duplex mismatch that significantly impacts the total throughput capabilities of the interface. 4 3 POWER 2 1 0 CONSOL E 3.3V 4.
3 Configuring the PIX 501 The PIX 501 comes with a factory default configuration that meets the needs of most broadband networking environments. The factory default configuration on the PIX 501 protects your inside network from any unsolicited traffic. It is configured to use DHCP on the outside interface to acquire its IP address. A default DHCP server address pool is included for hosts on the inside interface. By default, the PIX Firewall denies all inbound traffic through the outside interface.
PDM Version 2.0 and higher releases include a Startup Wizard for initial configuration. Follow these steps to use the Startup Wizard: Step 1 If you have not already done so, use an Ethernet cable to connect your PC to one of the four switched inside ports (numbered 1 through 4) on the rear panel of the PIX Firewall. Note Step 2 Ethernet1 interface in the PIX 501 is the internal interface connecting the PIX Firewall to the four switched inside ports with a fixed speed of 100 Mbps full duplex.
4 Optional Maintenance and Upgrade Procedures Upgrade to DES, 3DES/AES, or the User Licenses Note The following instructions apply to PIX Firewall Version 6.2 and higher releases. If you are not running PIX Firewall Version 6.2 or higher, refer to the Quick Start Guide for the version of software installed on your Cisco PIX Firewall. To upgrade features you did not specify at the time of purchase, you need to use an activation key.
To obtain an activation key, you need a Product Authorization Key, which you can purchase from your Cisco account representative. After obtaining the Product Authorization Key, register it on the web to obtain an activation key by performing the following steps: Step 1 Connect a web browser to one of the following websites (the URLs are case-sensitive): • Go to the following website if you are a registered user of Cisco Connection Online: http://www.cisco.com/cgi-bin/Software/FormManager/formgenerator.
Active Host Limitation The PIX 501 supports up to 32 DHCP address leases with a 10-user license, up to 128 with an optional 50-user license, and 256 with an unlimited user license.
Refer to the following website for detailed command information and configuration examples: http://www.cisco.com/univercd/cc/td/doc/product/iaabu/pix/pix_sw/v_63/cmdref/index.htm The Cisco TAC website is available to all customers who need technical assistance. To access the TAC website, go to: http://www.cisco.com/tac Alternative Ways to Access the PIX 501 4 3 61391 You can access the CLI for administration using the console port on the PIX Firewall.
For information on how to access the PIX Firewall configuration mode, refer to the “Accessing Configuration Mode” section in Chapter 1, “Getting Started” of the Cisco PIX Firewall and VPN Configuration Guide. You can also access the CLI using SSH/Telnet to the PIX Firewall. By default, SSH/Telnet access is not permitted. Use PDM or the console to configure SSH/Telnet access to the PIX Firewall.
Table 1 LED PIX 501 LEDs (continued) State Description Off No link is established. Tip VPN TUNNEL Green 100 MBPS If the LINK/ACT LED does not light up, you might be using the wrong type of cable. Try replacing the yellow (straight-through) Ethernet cable with the orange (crossover) Ethernet cable. One or more IKE/IPSec VPN tunnels are active. Off No VPN tunnels are active. The default configuration does not include a VPN.
Install a Cable Lock 4 3 POWER 2 1 0 CONSOL E 3.3V 4.5 A 61394 Cisco PIX 501 Lock slot Cable lock (not included) The PIX 501 includes a slot that accepts standard desktop cable locks to provide physical security for small portable equipment, such as a laptop computer. The cable lock is not included. Follow these steps to install a cable lock: Step 1 Follow the directions from the manufacturer for attaching the other end of the cable for securing the PIX Firewall.
International Cisco websites can be accessed from this URL: http://www.cisco.com/public/countries_languages.shtml Documentation CD-ROM Cisco documentation and additional literature are available in a Cisco Documentation CD-ROM package, which may have shipped with your product. The Documentation CD-ROM is updated regularly and may be more current than printed documentation. The CD-ROM package is available as a single unit or through an annual or quarterly subscription. Registered Cisco.
You can submit comments by using the response card (if present) behind the front cover of your document or by writing to the following address: Cisco Systems Attn: Customer Document Ordering 170 West Tasman Drive San Jose, CA 95134-9883 We appreciate your comments.
To open a case by telephone, use one of the following numbers: Asia-Pacific: +61 2 8446 7411 (Australia: 1 800 805 227) EMEA: +32 2 704 55 55 USA: 1 800 553-2447 For a complete listing of Cisco TAC contacts, go to this URL: http://www.cisco.com/warp/public/687/Directory/DirTAC.shtml TAC Case Priority Definitions To ensure that all cases are reported in a standard format, Cisco has established case priority definitions.
• Packet magazine is the Cisco quarterly publication that provides the latest networking trends, technology breakthroughs, and Cisco products and solutions to help industry professionals get the most from their networking investment. Included are networking deployment and troubleshooting tips, configuration examples, customer case studies, tutorials and training, certification information, and links to numerous in-depth online resources. You can access Packet magazine at this URL: http://www.cisco.
Corporate Headquarters Cisco Systems, Inc. 170 West Tasman Drive San Jose, CA 95134-1706 USA www.cisco.com Tel: 408 526-4000 800 553-NETS (6387) Fax: 408 526-4100 European Headquarters Cisco Systems International BV Haarlerbergpark Haarlerbergweg 13-19 1101 CH Amsterdam The Netherlands www-europe.cisco.com Tel: 31 0 20 357 1000 Fax: 31 0 20 357 1100 Americas Headquarters Cisco Systems, Inc. 170 West Tasman Drive San Jose, CA 95134-1706 USA www.cisco.