
User Manual
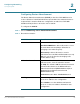
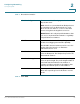

Table Of Contents
- Introduction
- Configuring Networking
- Configuring the Wireless Network
- Configuring the Firewall
- Configuring VPN
- Configuring Quality of Service (QoS)
- Administering Your Cisco RV110W
- Setting Password Complexity
- Configuring User Accounts
- Setting the Session Timeout Value
- Configuring Simple Network Management (SNMP)
- Using Diagnostic Tools
- Configuring Logging
- Configuring Bonjour
- Configuring Date and Time Settings
- Backing Up and Restoring the System
- Upgrading Firmware or Change the Language
- Restarting the Cisco RV110W
- Restoring the Factory Defaults
- Running the Setup Wizard
- Viewing the Cisco RV110W Status
- Using Cisco QuickVPN
- Where to Go From Here

Configuring Networking
Configuring IPv6
Cisco RV110W Administration Guide 51
2
STEP 3 Click Save.
Configuring IPv6 Address Pools
You can define the IPv6 delegation prefix for a range of IPv6 addresses to be
served by the Cisco RV110W DHCPv6 server.
Using a delegation prefix, you can automate the process of informing other
networking equipment on the LAN of DHCP information specific for the assigned
prefix.
To configure IPv6 Address Pools:
STEP 1 Choose Networking > IPv6 > IPv6 LAN Configuration.
STEP 2 In the IPv6 Address Pools Table, click Add Row.
Server Preference Enter the server preference level of this DHCP
server.
DHCP advertise messages with the highest server
preference value to a LAN host are preferred over
other DHCP server advertise messages.
The default is 255.
Static DNS 1 Enter the IPv6 address of the primary DNS server
on the ISP IPv6 network.
Static DNS 2 Enter the IPv6 address of the secondary DNS
server on the ISP IPv6 network.
Client Lease Time Enter the client lease time.
Enter the duration (in seconds) for which IPv6
addresses are leased to endpoints on the LAN.