
User Manual
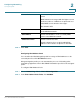
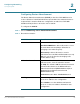
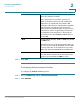

Table Of Contents
- Introduction
- Configuring Networking
- Configuring the Wireless Network
- Configuring the Firewall
- Configuring VPN
- Configuring Quality of Service (QoS)
- Administering Your Cisco RV110W
- Setting Password Complexity
- Configuring User Accounts
- Setting the Session Timeout Value
- Configuring Simple Network Management (SNMP)
- Using Diagnostic Tools
- Configuring Logging
- Configuring Bonjour
- Configuring Date and Time Settings
- Backing Up and Restoring the System
- Upgrading Firmware or Change the Language
- Restarting the Cisco RV110W
- Restoring the Factory Defaults
- Running the Setup Wizard
- Viewing the Cisco RV110W Status
- Using Cisco QuickVPN
- Where to Go From Here

Configuring Networking
Configuring IPv6
Cisco RV110W Administration Guide 53
2
STEP 3 Enter this information:
STEP 4 Click Save.
To edit the settings of a route, select the route and click Edit. To delete a selected
route, click Delete. Click Save to apply changes.
Name Enter the route name.
Destination Enter the IPv6 address of the destination host or
network for this route.
Prefix Length Enter the number of prefix bits in the IPv6 address
that define the destination subnet.
Gateway Enter the IPv6 address of the gateway through
which the destination host or network can be
reached.
Interface Choose the interface for the route from the
drop-down menu: LAN, WAN, or 6to4.
Metric Enter the priority of the route by choosing a value
between 2 and 15. If multiple routes to the same
destination exist, the route with the lowest metric is
used.
Active Check to make the route active.
When you add a route in an inactive state, it gets
listed in the routing table, but is not used by the
Cisco RV110W. You can always activate the route
later.
This feature is useful if the network that the route
connects to is not available when you added the
route. When the network becomes available, you
can enable the route.