Quick Start Guide Cisco 250 Series Smart Switches
Welcome Thank you for choosing the Cisco 250 Series Smart Switch. These switches are designed to be operational right out-of-the-box as a standard switch. In the default configuration, it forwards packets between the connecting devices after powered up.
• Computer with Internet Explorer (version 9.0, 10.0, 11.0), or Firefox (version 36.0, 37.0, or higher), or Chrome (version 40,41,42 or higher) for using the web-based interface. 2 Mounting the Cisco 250 Series Smart Switches There are three ways to install the switch: • Place the switch on a flat surface. To place the switch on a desktop, install the four rubber feet (included) on the bottom of the switch. • Mount the switch in a standard rack (1 rack unit high). • Mount on a wall.
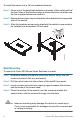
To install the switch into a 19-inch standard chassis: STEP 1 Place one of the supplied brackets on the side of the switch so that the four holes of the brackets align to the screw holes, and then use the four supplied screws to secure it. STEP 2 Repeat the previous step to attach the other bracket to the opposite side of the switch. STEP 3 After the brackets are securely attached, the switch is now ready to 400925 be installed into a standard 19-inch rack.
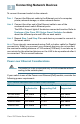
3 Connecting Network Devices To connect the smart switch to the network: STEP 1 Connect the Ethernet cable to the Ethernet port of a computer, printer, network storage, or other network device. STEP 2 Connect the other end of the Ethernet cable to one of the numbered smart switch Ethernet ports. The LED of the port lights if the device connected is active. Refer to Features of the Cisco 250 Series Smart Switches for details about the different ports and LEDs on each switch.
CAUTION 6 Consider the following when connecting switches capable of supplying PoE: The PoE models of the switches are PSE (Power Sourcing Equipment) that are capable of supplying DC power to attaching PD (Powered Devices). These devices include VoIP phones, IP cameras, and wireless access points. The PoE switches can detect and supply power to pre-standard legacy PoE Powered Devices.
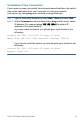
Configuring the Cisco 250 Series Smart Switches 5 4 Before You Begin Verify the managing computer requirements in the product release notes. Configuring Your Switch Using the Web-based Interface To access the switch by using the web-based interface, you must know the IP address the switch is using. The switch uses the factory default IP address of 192.168.1.254, with a subnet of /24. When the switch is using the factory default IP address, the System LED flashes continuously.
STEP 4 Open a Web browser window. If you are prompted to install an ActiveX plug-in when connecting to the device, follow the prompts to accept the plug-in. STEP 5 Enter the switch IP address in the address bar and press Enter. For example, http://192.168.1.254. The Switch Login Page displays. STEP 6 Enter the default login information: • Username is cisco • Default password is cisco (passwords are case sensitive) STEP 7 Click Log In.
Troubleshoot Your Connection If you cannot access your switch from the web-based interface, the switch may not be reachable from your computer. You can test network connections by using ping on a computer running Windows: STEP 1 Open a command window by using Start > Run and enter cmd. STEP 2 At the Command window prompt enter ping and the smart switch IP address. For example ping 192.168.1.254 (the default IP address of the smart switch).
Possible Causes and Resolutions The Switch is not Powering on • Verify the power cord is plugged firmly into the switch and into the power outlet. • Verify that the power outlet is active. • Verify that the computer is on. • Replace the power adapter, before replacing the switch, if the situation continues. Bad Ethernet connection • Check the LEDs for proper indications. • Check the connectors of the Ethernet cable to ensure that they are firmly plugged into the switch and your computer.
5 Features of the Cisco 250 Series Smart Switches This section describes the exterior of the smart switches including ports, LEDs, and connections. Not all models have all of the features described. Ports USB Port—The USB port connects the switch to a USB device so that you can save and restore the configuration files, firmware images, and SYSLOG files through the connected USB device.
100M LED (if present)—(Green) Located on the right of the port. The LED lights steady when another device is connected to the port, is powered on, and a 100 Mbps link is established between the devices. When the LED is off, the connection speed is under 100 Mbps or nothing is cabled to the port. Gigabit LED (if present)—(Green) Located on the right of the port. The LED lights steady when another device is connected to the port, is powered on, and a 1000 Mbps link is established between the devices.
6 Returning the Switch to the Factory Default Settings To use the Reset button to reboot or reset the smart switch, do the following: • To reboot the smart switch, press the Reset button for less than 10 seconds. • To restore the smart switch configuration to the factory default settings: 1. Disconnect the smart switch from the network or disable all DHCP servers on your network. 2. With the power on, press and hold the Reset button for more than 10 seconds. WARNING This is a class A product.
7 Where to Go From Here Support Cisco Support Community www.cisco.com/go/smallbizsupport Cisco Support and Resources www.cisco.com/go/smallbizhelp Phone Support Contacts www.cisco.com/en/US/support/ tsd_cisco_small_business _support_center_contacts.html Cisco Firmware Downloads www.cisco.com/go/smallbizfirmware Select a link to download firmware for Cisco Products. No login is required.
Cisco 250 Series Smart Switches 15
Americas Headquarters Cisco Systems, Inc. www.cisco.com Cisco has more than 200 offices worldwide. Addresses, phone numbers, and fax numbers are listed on the Cisco website at www.cisco.com/go/offices. 78-100762-01 Cisco and the Cisco logo are trademarks or registered trademarks of Cisco and/or its affiliates in the U.S. and other countries. To view a list of Cisco trademarks, go to this URL: www.cisco.com/go/trademarks. Third-party trademarks mentioned are the property of their respective owners.