Quick Start Guide Cisco Small Business 300 Series Managed Switches
Welcome Thank you for choosing the Cisco Small Business 300 Series Managed Switch, a Cisco Small Business network communications device. This device is designed to be operational right out of the box as a standard bridge. In the default configuration, it will forward packets between connecting devices after power up.
NOTE Some switches have a higher temperature rating. The SG30010SFP, SG300-52P and SG300-52MP are rated at 113 degrees Fahrenheit (45 degrees Centigrade), and the SG300-28MP, and SF30024MP are rated at 122 degrees Fahrenheit (50 degrees Centigrade). Reduced Air Flow—Both side panels must be unobstructed to prevent overheating. Mechanical Overloading—The device should be level, stable, and secure to prevent it from sliding or shifting out of position.
For stability, load the rack from the bottom to the top, with the heaviest devices on the bottom. A top-heavy rack is likely to be unstable and may tip over. CAUTION Wall Mounting Only the 8-port models of the switch can be wall-mounted. NOTE The switch should be mounted so that the ports face up or down. Do not mount the switch with the ports to the side. There is a wall-mount kit packed with your switch. The dimensions for the mount kit are as follows: 1 3 2 196243 4 1 8 mm/0.4 in 2 22.2 mm/0.
2 Connecting Network Devices To connect the switch to the network: STEP 1 Connect the Ethernet cable to the Ethernet port of a computer, printer, network storage, or other network device. STEP 2 Connect the other end of the network Ethernet cable to one of the numbered managed switch Ethernet ports. The Ethernet port light turns green when the connection is active.
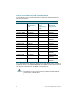
Power over Ethernet (PoE) Considerations If your switch is one of the PoE models, consider the following table for specific information: 300 Series Switches with Power Over Ethernet Model Power Dedicated to PoE Number of Ports Supporting PoE PoE Standard Supported SF302-08P 62 Watts 8 802.3af SF302-08MP 124 Watts 8 802.3af SF300-24P 180 Watts 24 802.3af SF300-24MP 375 Watts 24 802.3af and 802.3at SF300-48P 375 Watts 48 802.3af SG300-10P 62 Watts 8 802.
CAUTION Consider the following when connecting switches capable of supplying PoE: The PoE models of the switches are PSE (Power Sourcing Equipment) that are capable of supplying DC power to attaching PD (Powered Devices). These devices include VoIP phones, IP cameras, and wireless access points. The PoE switches can detect and supply power to pre-standard legacy PoE Powered Devices.
Configuring the Cisco Small Business Managed Switch 3 Before You Begin Verify the managing computer requirements in the product release notes. The switch can be accessed and managed by two different methods; over your IP network using the web-based interface, or by the Command Line Interface (CLI) through the console port. Using the console port requires advanced user skills.
NOTE Details on how to change the IP address on your computer depend upon the type of architecture and operating system you are using. Use the computer Help and Support functionality to search for “IP Addressing.” STEP 3 Open a Web browser window. If you are prompted to install an Active-X plug-in when connecting to the device, follow the prompts to accept the plug-in. STEP 4 Enter the switch IP address in the address bar and press Enter. For example, http://192.168.1.254. The Switch Login Page displays.
• 8 data bits • no parity • 1 stop bit • no flow control STEP 4 Enter a user name and password. User names and passwords are both case sensitive and alpha-numeric. The default username is cisco, and the default password is cisco. STEP 5 If this is the first time that you have logged on with the default username and password, the following message appears: Please change your password from the default settings. Please change the password for better protection of your network.
Troubleshoot Your Connection If you cannot access your switch from the web-based interface, the switch may not be reachable from your computer. You can test network connections by using ping on a computer running Windows: STEP 1 Open a command window by using Start > Run and enter cmd. STEP 2 At the Command window prompt enter ping and the managed switch IP address. For example ping 192.168.1.254 (the default static IP address of the managed switch).
Unusually long access time: Due to the standard spanning tree loop detection logic, adding new connections may take 30 to 60 seconds for the affected interfaces and/or LAN to become operational. 4 Features of the Cisco Small Business 300 Series Managed Switch This section describes the exterior of the managed switches including ports, LEDs, and connections. Front Panel Ports The ports and LEDs are located on the front panel of the switch.
disabled. Combo ports are indicated by the presence of a bar on the panel that connects them, as shown in the following example: • The LEDs of the corresponding RJ-45 port light to respond to the SFP interface traffic. NOTE SG300-10SFP ports 1—8 are dedicated SFP ports. Their LED status and indication are the same as on the RJ-45 ports. Front Panel LEDs System LED—(Green) Lights steady when the switch is powered on, and flashes when booting, performing self tests, and acquiring an IP address.
Back Panel The power port and console port are located on the back panel of the managed switch. Power—The Power port is where you will connect the switch to power. Depending on the model of switch you are using, this may be a power cord or a power adaptor. Console—The Console port is where you can connect a serial cable to a computers serial port for configuration using a terminal emulation program.
6 Where to Go From Here Support Cisco Small Business Support Community www.cisco.com/go/smallbizsupport Cisco Small Business Support and Resources www.cisco.com/go/smallbizhelp Cisco Small Business Support Center (SBSC) Contacts www.cisco.com/go/sbsc Cisco Small Business Firmware Downloads www.cisco.com/go/smallbizfirmware Select a link to download firmware for Cisco Small Business Products. No login is required. Product Documentation 300 Series Managed Switches www.cisco.
Americas Headquarters Cisco Systems, Inc. 170 West Tasman Drive San Jose, CA 95134-1706 USA www.cisco.com Small Business Support US: 1-866-606-1866 Small Business Support Global Contact Numbers Cisco and the Cisco logo are trademarks or registered trademarks of Cisco and/or its affiliates in the U.S. and other countries. To view a list of Cisco trademarks, go to this URL: www.cisco.com/go/trademarks. Third-party trademarks mentioned are the property of their respective owners.