Cisco SPA 500 Series IP Phones Cisco SPA 500 Series IP Phones Cisco Small Business Pro User Guide SPA 500 Series IP Phones Models 502G, 504G, 508G, and 509G SPA 500 Series IP Phone Advanced User Guide 1|Page
Table of Contents Getting Started ...................................................................................................................................................................... 4 Understanding Your Phone’s Lines and Buttons ............................................................................................... 4 Phone Components ....................................................................................................................................................
To pick up a call ringing at an extension in your group: ..................................................................................14 Placing a Three-Way Conference Call.......................................................................................................................14 Conferencing a Held Call with an Active Call ....................................................................................................14 Using the Phone Directories ...................................
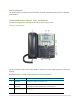
Getting Started This guide provides an overview of this document and basic information about your Cisco SPA 500 Series IP Phone. Understanding Your Phone’s Lines and Buttons Use the following graphic and table to identify the parts of your phone. Phone Components Figure 1 Phone Components The photo above shows the Cisco SPA 509G to illustrate the Cisco Small Business Pro IP Phone features. Numbered objects in the photo are explained in the following table.
3 LCD Screen Displays date and time, phone station name, line extensions, and softkey options. 4 Line keys Indicates phone line status. (Not available on the Cisco SPA 502G.) When lit: Green: Line is idle. Red (steady): Line is active or in use. Red (blinking): Line is on hold. Orange: Line is unregistered (cannot be used). These keys can also be programmed by your phone system administrator to perform functions such as speed dial, call pickup, or monitoring an extension.
Softkey Buttons The softkey buttons on your phone display may vary depending on your phone model and the phone system setup. Press the Right Arrow or Left Arrow keys on the navigation button to view additional softkey buttons. Below is a partial listing of softkey buttons that may be available on your phone. You may not have all of these softkey buttons on your phone, and you may have additional buttons that are not listed here.
Button Function resume Resumes a call that is on hold. save Saves your changes. select Selects the highlighted item on the LCD screen. xfer Performs a call transfer. xferLx Transfers an active line on the phone to a called number. y/n Enters a submenu and when pressed, toggles between Yes or No to enable or disable an option. Using Keypad Shortcuts When using the phone menus, you can use the keypad to enter the number shown next to the menu or sub-menu item on the LCD screen.
Figure 2 Cisco SPA 500s Attendant Module The Cisco SPA 500S is a 32-button attendant console for the Cisco SPA 500 Series IP Phone, providing 32 three-color (red, green, and amber) programmable LEDS, with support for Broadsoft Busy Lamp Field and Line Monitoring. The Cisco SPA 500S attaches to the IP phone with the attachment arm provided (not shown). It obtains power directly from the IP phone and does not require a separate power supply.
Using Basic Phone Functions Using the Speakerphone To use the speakerphone, press the Speaker button (the handset can be either on or off hook). Using the Headset with Your IP Phone NOTE: Steps to use your headset with the IP phone may vary. Consult the user documentation for your headset for more information. To use a wired headset, press the Headset button on your phone and dial the number to place a call, or press the headset button to answer a ringing call.
Choosing Your Preferred Audio Device This option designates the headset or speaker phone as the preferred audio device when the handset is not used. To choose your preferred audio device: STEP 1. STEP 2. STEP 3. STEP 4. STEP 5. Press the Setup button. Select Preferences. Choose Preferred Audio Device and press edit. Press option to view your choices. When the option you want is displayed, press ok. Press save.
Down navigation button and press the Resume softkey (Cisco SPA 502G). Using Dial Assistance If dial assistance is enabled, when placing calls, you’ll see a list of matching recently dialed or received phone numbers on the screen after you begin dialing. If you want to choose one of these numbers: STEP 1. STEP 2. Use the navigation button to scroll down and highlight a phone number on the LCD screen. Press dial to complete the call. Putting a Call on Hold To put a call on hold, press the Hold button.
Performing an Attended Transfer Cisco SPA 502G, SPA 504G, SPA 508G, SPA 509G: STEP 1. STEP 2. STEP 3. • • During an active call, press xfer. The call is placed on hold and a new line is opened to dial the number. Either: Enter the number to which you want to transfer the call and then press dial or wait a few seconds. Press dir and either choose a number from the personal directory then press dial. If you hang up before the second call rings, the transfer fails and the first call is disconnected.
Viewing and Returning Missed Calls The LCD screen on your IP phone notifies you if a call came in that was unanswered. To return a missed call: • • If the LCD screen shows a missed call, press the lcr softkey to return the last missed call. Press the miss softkey to view a list of missed calls, select a call, and press dial. If the LCD screen does not show a missed call, you can return a call from the Missed Call list: a. Press the Setup button. b. Select Call History. c. Select Missed Calls. d.
Turning Call Waiting On and Off Call waiting alerts you when you are on a call by ringing your phone and displaying a status message that another call is ringing. If you turn call waiting off, incoming calls do not ring your phone if you are on another call, and the caller hears a busy signal or message. Using the Setup button: STEP 1. STEP 2. STEP 3. STEP 4. STEP 5. STEP 6. Press the Setup button. Select Preferences. Choose Call Waiting and press edit. Press the y/n softkey to turn call waiting on or off.
Using the Phone Directories Your IP phones provide several different types of phone directories, depending on the phone model and what the system administrator has set up for the company. In general, the phones provide the following types of directories: • Personal Directory—The personal directory provides a place for you to store and view frequently dialed numbers. You can also dial numbers from the directory.
Accessing Voicemail To access voicemail, press the Messages button on your phone. Ivey will configure your phone with the correct voicemail number so that pressing the Messages button automatically dials your voicemail system. Using Advanced Phone Features Enabling Dial Assistance If you enable dial assistance, when you place calls, the LCD will display phone numbers based on the best-matched entries in the Directory and Call History lists. To enable dial assistance: STEP 1. Press the Setup button. STEP 2.
Monitoring Another Phone from Your Phone Ivey can configure your phone so that you can monitor other user’s phones with the use of the Cisco SPA 500s Module. If this feature is required you must add the SPA 500s Expansion Module. Line buttons on the SPA 500s Expansion module can be used to display the status of another user’s phone for example, if one of your SPA 500s buttons is configured to display Bob’s phone line, the LED color will show you the status of his phone line: • • • • • Green: Line is idle.
To specify the amount of time before the screen saver turns on if your phone is idle: STEP 1. STEP 2. STEP 3. STEP 4. In Screen Saver Mode, choose Screen Saver Wait Time and press edit. Enter the time, in seconds, to wait before the screen saver starts. Press ok. Press save. To change your screen saver picture: STEP 1. STEP 2. • • • • • In Screen Saver Mode, choose Screen Saver Icon and press edit. Press option multiple times to display the choices available until the one you want is displayed.
STEP 1. STEP 2. STEP 3. Press the Setup button. Scroll to Reboot and press select. Press ok.