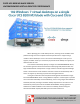
CISCO UCS B200 M3 BLADE SERVER: UNCOMPROMISED VIRTUAL DESKTOP PERFORMANCE u When deploying your virtual desktop solution, choosing server hardware that is powerful enough across the compute and memory dimensions to support a large number of virtual desktops is crucial. The more virtual desktops per server you can support, the fewer servers you need to buy to provide virtual desktops to support your desired number of users.
MORE VDI SESSIONS ARE BETTER Choosing the right combination of hardware and software for your virtual desktop solution can significantly affect your bottom line. A robust hypervisor, top-of-the-line virtual desktop software, and a server built on powerful processors with an expansive memory footprint all work together to ensure you can meet the needs of your employees without your spending money, space, and time on additional hardware.
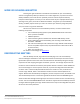
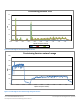
Response times for virtual desktops on a single Cisco UCS B200 M3 Blade Server (VSImax=182) 6,000 Response time (ms) 5,000 Login VSImax = 182 Dynamic VSImax = 4,152 Baseline = 921 4,000 3,000 2,000 1,000 0 6 19 29 39 49 59 69 79 89 99 109 119 130 141 151 162 173 184 Number of users Average Response VSI Index Average Figure 1: Average virtual desktop response times at various numbers of virtual desktops on the Cisco UCS B200 M3 Blade Server.
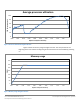
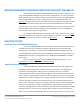
Average processor utilization CPU Percentage used 100 80 60 40 20 0 0:00 0:10 0:20 0:30 0:40 0:50 1:00 1:10 1:20 1:30 Elapsed time (hours:minutes) Figure 2: Processor utilization throughout the test. Figure 3 shows the memory usage throughout the test. The steep increase at the beginning of the chart reflects the beginning of the test with the 191 virtual desktops powering on.
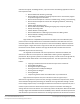
Figure 4 shows the fabric usage throughout the test. The peak usage was due to virtual desktop receiving streaming VHDs via Citrix Provisioning Services at boot up. Total fabric usage 700 600 Mbps 500 400 300 200 100 0 0:00 0:10 0:20 0:30 0:40 0:50 1:00 1:10 1:20 1:30 Elapsed time (hours:minutes) Storage (vHBA) Network Total Figure 4: Fabric usage throughout the test. Figure 5 shows the IOPS recorded throughout the test.
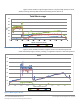
Provisioning Services IOPS 50 40 OPS 30 20 10 0 0:00 0:10 0:20 0:30 0:40 0:50 1:00 1:10 1:20 1:30 Elapsed time (hours:minutes) Read Write Total Figure 6: Provisioning Services IOPS throughout the test. Provisioning Services network usage 600 500 Mbps 400 300 200 100 0 0:00 0:10 0:20 0:30 0:40 0:50 1:00 1:10 1:20 1:30 Elapsed time (hours:minutes) Figure 7: Provisioning Services network usage throughout the test.
GREATER BANDWIDTH HEADROOM PROVIDES EXCELLENT SCALABILITY Although the Cisco UCS offers scalable bandwidth to each Cisco UCS 5108 Chassis, up to a fully redundant 80 Gb/s (160 Gb/s in an active-active configuration), in our testing we used a single redundant pair of 2 x 10Gb/s connections to the fabric interconnect. The peak bandwidth was about 600 megabits per second, or roughly 3 percent of the bandwidth available. See Appendix D for details.
capacity allocation becomes more dynamic and efficient, with managers able to deploy and reallocate server resources in a matter of minutes. To learn more about the Cisco UCS Manager, visit http://www.cisco.com/en/US/products/ps10281/index.html. About Citrix XenDesktop 5.5 Citrix XenDesktop is a desktop virtualization solution that transforms Windows desktops and applications into an on-demand service available to any user, anywhere, on any device.
indicative of a typical “knowledge worker,” opens and closes the following applications and runs their respective tasks: Microsoft Outlook®: Browsing a message Microsoft Word® (TimerDoc): Initiating response timer to see how the program responds throughout the workload Microsoft Internet Explorer® instance one: Maximizing, scrolling, and minimizing Microsoft Internet Explorer instance two: Navigating a Web site, maximizing, and scrolling Adobe® Flash® KA movie trailer Microsoft Word (
and applies the formula Baseline x 125% +3000, when the VSI index is higher than the dynamic baseline then dynamic VSI Max is achieved. In our testing, Dynamic VSI Max was calculated to be 182 sessions. It is important to note that variations in hypervisor, application, guest OS, and VDI settings can have a significant impact on expected user density in these tests.
APPENDIX A – SERVER AND STORAGE CONFIGURATION INFORMATION Figure 8 provides detailed configuration information about the test servers. Note that we used the Cisco UCS B200 M3 Blade Server for the systems under test and used two Cisco UCS B200 M2 Blade Servers for our test bed infrastructure. Figure 9 details the storage we used in our tests.
System RAID controller Vendor and model Controller firmware Operating system Name Build number Language Operating system power profile I/O Adapters Cisco UCS B200 M3 server 2x Cisco UCS B200 M2 servers LSI™ MegaRAID® SAS 2004 20.10.1-0061 LSI Logic® SAS 1064E 01.32.04.
APPENDIX B – HOW WE TESTED To determine the number of virtual desktops the server could support, we ran incremental tests increasing the virtual desktop load until Dynamic VSI Max was reached. The minimum number of sessions required to archive Dynamic VSI max was 191. When testing 191 virtual desktops, we recorded a Dynamic VSI max of 182. At 190 sessions, the benchmark did not achieve Dynamic VSI Max. At the end of the test, the processors on the Cisco UCS B200 M3 Blade Server were nearly saturated.
Figure 10: Our test environment.
Figure 11: Our logical network layout. Setting up the storage To host all testing infrastructure, we installed two Cisco UCS B200 M2 Blade Servers. Using UCS Service profiles, we configured the local disks in a RAID 1 configuration to host the ESXi hypervisor. To host all virtual desktops, we installed a Cisco UCS B200 M3 Blade Server. Using UCS Service profiles, we configured the local disks in a RAID 1 configuration to host the ESXi hypervisor.
EMC CX 3 storage array We cabled each SP (A and B) on our fibre channel switch to balance between SPs. We used seven enclosures of disks on the SAN; with one exception, each enclosure had 15 disks. We created seven RAID 5 RAID groups, each was composed of 12 disks. From each of the seven RAID groups we created a 500 GB LUN for a total of seven LUNS, formatted with the VMFS file system.
4. In the NTP settings, add a reliable NTP server, or use DC1.VDI.com. 5. Close NTP settings. 6. Select the Configuration tab, and click DNS and routing. 7. Type infra for name, and VDI.com for domain. 8. Enter 172.0.0.10 for preferred DNS. 9. Close DNS. Installing VMware vSphere 5 (ESXi) on the Cisco UCS B200 M3 (SUT) 1. Insert the ESXi 5.0 disk, and select Boot from disk. 2. On the Welcome screen, press Enter. 3. On the End User License Agreement (EULA) screen, press F11. 4.
9. Close DNS. Setting up a VM to host Microsoft Windows Active Directory® server (DC1) 1. 2. 3. 4. 5. 6. 7. 8. 9. 10. 11. 12. 13. 14. 15. 16. 17. Connect to the infra server via the VMware vSphere client. Log in as root to the infra server. In the vSphere client, connect to the vCenter™ Server, and browse to the ESXi host. Click the Virtual Machines tab. Right-click, and choose New Virtual Machine. Choose Custom, and click Next. Assign the name DC1 to the virtual machine, and click Next.
10. 11. 12. 13. 14. 15. 16. Connect the machine to the Internet, and install all available Windows updates. Restart as necessary. Enable remote desktop access. Change the hostname to DC1 and reboot when prompted. Run diskmgmt.msc. Select the 15 GB secondary volume, name it profiles format it NTFS, and assign it drive letter E Select the 50 GB secondary volume, name it share format it NTFS, and assign it drive letter F Set up networking for the data network: a.
2. 3. 4. 5. 6. Select DHCP Server, and click Next. At the Introduction to DHCP Server screen, click Next. At the Specify IPv4 DNS Settings screen, type VDI.com for the parent domain. Type the preferred DNS server IPv4 address, and click Next. At the Specify IPv4 WINS Server Settings screen, select WINS is not required for applications on the network, and click Next. 7. At the Add or Edit DHCP Scopes screen, click Add. 8. At the Add Scope screen, enter the Name DHCP Scope name. 9.
6. Click OK. Add the Web server role to DC1, and copy the Flash media to the wwwroot directory 1. Click StartAdministrative ToolsServer ManagerAdd Roles. 2. Select Web Server (IIS), and click Next. 3. Skip the introduction to Web server (IIS), and click Next. 4. Confirm role services, and click Next, 5. Click Install. 6. Open the Login VSI install directory and copy \setup\target Setup\Lib\Lib Shared\Websites folder to c:\intepub\wwwroot 7.
11. Enable remote desktop access. 12. Change the hostname to vCenter5 and reboot when prompted. 13. Set up networking for the data network: a. Click Start, Control Panel, right-click Network Connections, and choose Open. b. Right-click the VM traffic NIC, and choose Properties. c. Uncheck TCP/IP (v6). d. Select TCP/IP (v4), and choose Properties. e. Set the IP address, subnet, gateway, and DNS server. 14. Join the VDI domain. 15. Reboot the system. 16. Install VMware tools.
11. 12. 13. 14. 15. 16. 17. Choose Windows, choose Microsoft Windows Server 2008 R2 (64-bit), and click Next. For CPUs, select one virtual processor socket, and 2 cores per virtual socket, and click Next. Choose 4 GB RAM, and click Next. Click 1 for the number of NICs, select VMXNET3, connect to the VDI-NET portgroup, and click Next. Leave the default virtual storage controller, and click Next. Choose to create a new virtual disk, and click Next.
4. Change httpsWithRedirect to httpAndHttps. 5. Save the proxy.xml file, and reboot the vCenter. Installing the Citrix XenDesktop delivery Controller We installed the Citrix XenDesktop and XenDesktop licensing server on the XD-DDC VM. After installation, we added licenses for 200 XenDesktop Platinum users. 1. 2. 3. 4. 5. 6. 7. 8. 9. 10. 11. 12. Log into the server named XD-DDC. Insert the media for Citrix XenDesktop 5.5. Click Install XenDesktop. Click I accept the terms and condition, and click Next.
18. Keep the default virtual device node (0:0), and click Next. 19. Connect the VM virtual CD-ROM to the Microsoft Windows 2008 R2 installation disk. 20. Click Finish. 21. Right-click the XD-PVS, and choose Edit Settings. 22. On the Hardware tab, click Add… 23. Click Hard Disk, and click Next. 24. Click Create a new virtual disk, and click Next. 25. Specify 50 GB for the virtual disk size, thick-provisioned lazy zeroed, and specify SSD. 26. Choose SCSI (1:0) for the device node, and click Finish. 27.
11. 12. 13. 14. 15. 16. 17. Click Install. Click Finish. The Provisioning services configuration wizard will automatically launch. Click Next to begin. For DHCP, select Service runs on another computer, and click Next. For PXE services, click Service runs on this computer, and click Next. For Farm creation, click Create farm, and click Next. For the database server, for server name, type XD-PVS and for instance name, type SQLEXPRESS and click Next. 18.
3. 4. 5. 6. 7. 8. 9. 10. 11. 12. 13. 14. 15. 16. 17. 18. 19. 20. 21. 22. 23. 24. 25. 26. 27. 28. 29. 30. 31. 32. 33. 34. Click the Virtual Machines tab. Right-click, and choose New Virtual Machine. Choose Custom, and click Next. Assign the name Launcher to the virtual machine, and click Next. Select LUN3, and click Next. Choose Virtual Machine Version 8, and click Next. Choose Windows, choose Microsoft Windows 7 (64-bit), and click Next. Choose four virtual processors, and click Next.
4. Select default installs. 5. Click Install. 6. Download and run Office 2007 Service Pack 2. 7. Reboot the system. Installing Virtual Audio Cables By default, the virtual launchers cannot render audio so we installed Virtual Audio Cables version 4.10. The software can be downloaded from http://software.muzychenko.net/eng/vac.htm 1. Download and extract the media. 2. Click Setup. 3. Click Yes to begin the install. 4. Click I accept to accept the software license agreement. 5. Click Install.
7. Create a file called c:\python26\WILauncher.py (see Appendix C). Cloning the launcher We created a template from the VM named launcher and deployed eight Launchers using the sysprep functionality built into vCenter. For more information on how to clone virtual machines in VMware vCenter, please read http://www.vmware.com/support/pubs/vsphere-esxi-vcenter-server-pubs.html. Installing the Windows 7 Enterprise (x86) Citrix XenDesktop 5.5 gold image 1. 2. 3. 4. 5. 6. 7. 8. 9. 10. 11. 12. 13. 14. 15. 16. 17.
Disabling Windows Firewall The domain GPO automatically disables the Windows Firewall. Installing Login VSI target software on Gold_image 1. Log into the gold_image_image VM as VDI\administrator 2. Browse to \vsi-install\Target setup. 3. Run the setup.exe. 4. In the Target Setup wizard, specify the VSI share \\dc1\share. 5. Click Start. 6. When prompted with security warnings, click OK. Updating the Adobe Flash player on the target VM 1. Download version 11 Active X http://www.adobe.
10. Log into gold_image as VDI\Administrator 11. Browse to the Provisioning services media. 12. Execute the autorun.exe. 13. Click target Device Installation. 14. At the welcome screen for Provisioning Service Target Device Wizard, click Next. 15. Accept the License agreement, and click Next. 16. Enter user name and organization name, and click Next. 17. Accept the default path, and click Next. 18. Click Install. 19. Click Finish Provisioning Services Imaging Wizard 1. At the Welcome screen, click Next. 2.
5. Change mode from private mode to standard image mode. 6. Click the checkbox next to Enable Active Directory machine account password management. Booting the VM_gold vm from vDisk and formatting the 4 GB change disk 1. In vCenter, right-click gold_image, and click Start VM. 2. Log into VM_gold as VDI\administrator 3. Open disk manager. 4. Initialize disk0, and click Format NTFS. 5. Shutdown the VM. Enabling the 4GB local disk as cache 1.
2. Click Power Management. 3. Click Weekdays, and select all hours, no action, and position the power on machines line to be uniform across all hours on the graph. 4. Click Weekends, and select all hours, no action, and position the power on machines line to be uniform across all hours on the graph, and click OK. Configuring the Citrix XenDesktop 5 server - creating a catalog and Citrix XenDesktop group 1. Open the Citrix Desktop Studio. 2. Browse Desktop StudioMachines.
4. Browse computer ConfigurationPoliciesAdministrative templatesClassic Administrative Templates(ADM)HDX MediaStream Flash Redirection - Client. 5. Edit the Enable HDX MediaStream Flash Redirection on the user device policy. 6. Click Enabled, select Always, and click OK. Running the Login VSI benchmark We used eight launchers configured in parallel to run a medium workload of 191 user sessions on the Citrix XenDesktop pool. For more information on how to run a Login VSI test, see: http://www.loginvsi.
APPENDIX C - LOGIN VSI INI FILES USED FOR TESTING launcher.ini [Launcher] Servername= Username= Password= Domain= ConnectionType="Custom with CSV file" ConnectionNumber=User CCL=c:\python26\python.exe c:\python26\WILauncher.py http://XDDDC/Citrix/DesktopWeb/ %CSV_User% Password1 VDI pool 1 logout CSV=Z:\csv\user.
baseURL = sys.argv[1] username = sys.argv[2] password = sys.argv[3] domain = sys.argv[4] nfuseAppName = sys.argv[5] print "Message: Launching IE" ie = PAMIE() print "Message: Navigating to " + baseURL + "auth/login.aspx" ie.navigate(baseURL + "auth/login.aspx") loop = 10 while loop > 0 and not ie.textBoxExists("user"): print "Message: Page not loaded yet..." ie._wait() time.sleep(10) loop = loop - 1 if ie.textBoxExists("user"): print "Message: Setting TextBox 'user'" ie.
sys.exit(-4) if len(sys.argv) > 6: print "Message: Sleeping for " + sys.argv[6] + " seconds" time.sleep(int(sys.argv[6])) if len(sys.argv) > 7: if sys.argv[7].lower() == "disconnect": print "Message: Disconnecting..." ie.clickLink("Disconnect") ie._wait() elif sys.argv[7].lower() == "logout" or sys.argv[7].lower() == "logoff": print "Message: Logging off..." ie.clickLink("Log Off") ie._wait() else: print "I don't understand the keyword: " + sys.argv[7] print "Message: Closing IE" ie.
APPENDIX D – RESOURCE UTILIZATION DETAILS Figure 12 shows that the server supporting the virtual desktop load never exceeded 3 percent of the bandwidth available, leaving over 97 percent of fabric available for future scaling. Figure 12: Bandwidth usage for test. In our testing, the aggregate workload never exceeded 3 percent of available compute fabric bandwidth.
ABOUT PRINCIPLED TECHNOLOGIES Principled Technologies, Inc. 1007 Slater Road, Suite 300 Durham, NC, 27703 www.principledtechnologies.com We provide industry-leading technology assessment and fact-based marketing services. We bring to every assignment extensive experience with and expertise in all aspects of technology testing and analysis, from researching new technologies, to developing new methodologies, to testing with existing and new tools.