
Troubleshooting guide

10
Cisco UCS B200 M3 Blade Server Installation and Service Note
OL-26624-01
Installing and Removing a Blade Server Hard Drive
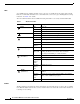
RAID volumes. If drives of different capacities are used, the useable portion of the smallest drive will
be used on all drives that make up the RAID volume. Before upgrading or adding an HDD to a running
system, check the service profile in UCS Manager to make sure that the new hardware configuration is
within the parameters allowed by the service profile.
Hard disk and RAID troubleshooting information is in the "Troubleshooting Server Hardware" chapter
of the Cisco UCS Troubleshooting Guide. This provides a procedure for moving a RAID array between
B200 M3 servers if needed.
The drives supported in this blade server are all hot pluggable and come with the drive sled attached.
Spare drive sleds are not available. The drives supported in this blade server are constantly being
updated. A list of currently supported and available drives is in the specification sheets at:
http://www.cisco.com/en/US/products/ps10280/products_data_sheets_list.html
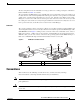
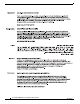
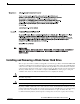
Removing a Blade Server Hard Drive
To remove a hard drive from a blade server, follow these steps:
Step 1 Push the button to release the ejector, and then pull the hard drive from its slot.
Figure 3 Removing the Hard Drive
Step 2
Place the hard drive on an antistatic mat or antistatic foam if you are not immediately reinstalling it in
another server.
Step 3 Install a hard disk drive blank faceplate (N20-BBLKD) to keep dust out of the blade server if the slot
will remain empty.
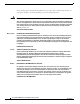
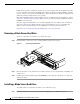
Installing a Blade Server Hard Drive
To install a blade server hard drive in a blade server, follow these steps:
Step 1 Place the hard drive lever into the open position by pushing the release button (see Figure 4).
1
2
3
331362