user guide Consult Safety Instructions Before Use.
Install Battery Pack Welcome to Flip UltraHD™ 1 Slide battery latch to unlock. 2 Slide front panel down. 3 Position rechargeable Lithium-ion battery pack with + and – at the right side and Flip Video™ logo facing up. Note: The battery pack is shipped partially charged. For best results, fully charge (up to 3 hours) before use. Simply follow steps in the Recharge Battery Pack section.
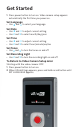
Get Started 1 Press power button to turn on. Video camera setup appears automatically the first time you power on. Set Language • Use + and – to select your language. Set Date • Use + and – to adjust current setting. • Use < and > to select month/day/year. Set Time • Use + and – to adjust current setting. • Use < and > to select hour/minute/am/pm. Set Tones • Use < and > to turn the tones on and off. Set Recording Light • Use < and > to turn the recording light on and off.
Record and Play Record Videos • 1 Press to start/stop recording. 2 Press and hold + and – to zoom in/out during recording. Play Videos 1 Press to play/pause. 2 Press and hold + and – to increase/decrease volume. 3 Press < and > to view previous/next video. Note: Press and hold < and > during playback to rewind/fast-forward. Delete Videos 1 Press button. Select YES to confirm. Note: Delete button is locked the first time you power on. To unlock, press and hold delete button.
Connect to Computer 1 Slide USB latch down. USB arm flips up automatically. 2 Plug USB arm into USB port on computer. 3 The battery pack will begin recharging and you can install pre-loaded FlipShare™ software on your computer. Recharge Battery Pack 1 Slide USB latch down. USB arm flips up automatically. 2 Plug USB arm into USB port on computer. 3 Screen will display charging status. displays to indicate charging in process. displays to indicate a fully-charged battery.
Organize, Create and Share Pre-loaded FlipShare software makes editing and sharing your videos easy. FlipShare Features • • • • • Save videos to your computer. Organize your videos. Capture snapshots from your videos. Create custom movies and greeting cards. Share videos by uploading directly to: FlipShare Installation Instructions Just plug in your video camera and follow these simple steps. Windows XP • Select VIEW YOUR FLIP VIDEOS. Click OK. Vista/Windows 7 • Select OPEN FOLDER to view files.
View On HD Television 1 Power off video camera and television. 2 Connect video camera to television with optional HDMI Cable (sold separately). 3 Power on video camera and television. • Video camera screen will be off when connected to television. 4 Switch your television to the appropriate VIDEO input. • See television manual for instructions. 5 Press play button to start/pause playback.
Video Camera Features turres 7 9 1 10 8 6 2 1 2 3 4 5 6 7 8 9 10 Power Button Wrist Strap Hook Tripod Mount HDMI Micro Port FlipPort™ Battery Latch Recording Light USB Latch / Arm Screen Recording Controls Record Button Play Button Delete Button Up/Down Buttons Left/Right Buttons 3 4 5 Press to turn on/off. Attach wrist strap (included in box). Attach a tripod or other Flip Video accessory. Connect HDMI cable accessory to your HDTV. Connect accessories to your Flip™ video camera.
Included In This Box: • • • • • • • Flip UltraHD Video Camera Rechargeable Battery Pack Wrist Strap Soft Case User Guide Safety Instructions Warranty Information Flip Video Support: www.theflip.com/support To Reset Camera: • Hold down the power button on the video camera for 10 seconds This symbol on a Cisco product, battery or packaging means that the product and/or battery should not be disposed of with your household waste.