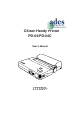
Citizen Handy Printer PD-04/PD-04C User's Manual ®
IMPORTANT SAFETY INSTRUCTIONS 1. 2. 3. 4. 5. 6. 7. 8. 9. 10. 11. 12. 13. Read all of these instructions and save them for later reference. Follow all warnings and instructions marked on the product. Unplug this product from the wall outlet before cleaning. Do not use liquid or aerosol cleaners. Use a damp cloth for cleaning. Do not use this product near water. Do not place this product on an unstable cart, stand or table. The product may fall, causing serious damage to the product.
FCC COMPLIANCE STATEMENT FOR AMERICAN USERS This equipment has been tested and found to comply with the limits for a Class B digital device, pursuant to Part 15 of the FCC Rules. These limits are designed to provide reasonable protection against harmful interference in a residential installation. This equipment generates, uses, and can radiate radio frequency energy and, if not installed and used in accordance with the instructions, may cause harmful interference to radio communications.
FCC Declaration of Conformity We, the Responsible Party : Citizen America Corporation 2102 Alton Parkway – Unit A Irvine, CA 92606 U.S.A. Telephone (949) 838-0327 declares that the product: Trade Name: Product Name: CITIZEN Printer Model Number: AR10-M01 confirms to the following specifications: Regulation: FCC Part 15B, Class B Test Method: ANSI C63.4-1992 and therefore is in compliance with the protection requirement of FCC Rules relating to electromagnetic compatibility.
Using This Product Safely About the Graphic Symbols Used In order to prevent harm and injury to the user, others and property, please follow the safety precautions stated here very carefully. The kinds of possible harm, injury or damage resulting from misuse of this product are separated into the following categories. Please read well and understand the inform in this section. Danger Used when there is a high chance of serious injury or death resulting if warning is ignored.
Contents n n n n n n n n n n n n n n Using This Product Safely ..................................................................................... 1 Notices .................................................................................................................. 3 During Operation ................................................................................................... 4 Devices Necessary to Operate this Printer ...........................................................
Notices Caution 1 Please use this unit in a flat, horizontal, stable position. 2 Because of possible damage, please do not use or store unit in the following places: [Inside a car, where there is heat exposure, in a place that receives direct sun light or close to room heaters [In a place with high temperature or humidity, in a place with low temperature or humidity or in a place that experiences severe changes of temperature or humidit [In a place where the unit will be exposed to dust.
During Operation 1 Usage of printing paper other than that suggested herein will produce poorer quality printouts and reduce the life of the print head (the part that prints the letter). 2 To prevent damage to the print head, do not allow the printer to print without any paper in the unit (empty print). Do not put down the paper depress lever (lowering the print head) and turn the roller knob. The hot print head can melt the roll and the friction can damage the print head.
Devices Necessary to Operate this Printer Thank you for purchasing this CITIZEN printer. After purchasing the unit make sure that the printer and the user manual are both in the box. There are items sold separately that are necessary to operate this printer. Please purchase those products which fit the way you want to use the printer. The printer power is supplied by the Battery Pack/Recharger, and by an AC adapter(*).
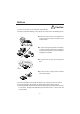
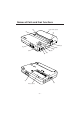
Names of Parts and their Functions !¢ Paper Holder (Option) 9 8 7 4 2 3 !º !¡ 5 6 !£ !™ Battery (Option) –6– 1
Operating the Printer 1 Power ON Lamp (POWER) This lamp is lit when the power is on. It also flashes when the battery pack become weak. If you have a factory option clock function included in your unit (PD-04C), when the back up battery needs to be replaced the error lamp will go on and the power lamp will flash. 2 Error Lamp (ERROR) Under the following circumstances the error lamp will light up or flash.
8 Paper Depressor Lever When this lever is released it is possible to adjust the paper by hand. When the lever is down (engaged), the printer is able to print. 9 Print Head Cover Please remove this cover before cleaning. AC Adapter Terminal Cover This cover protects the AC adapter terminal. AC Adapter Terminal Plug the AC adapter (sold separately) into this terminal. Battery Pack Release Lever Slide this to make it possible to remove the battery pack.
Power Source Other than the AC adapter this printer can be operated with the battery pack (sold separately). The battery pack is attached to the printer after it has been recharged using the recharger, also sold separately. Here we explain the usage of the Battery Pack and the Recharger, but before actually using them, please read the User Manuals that come with the Battery Pack and Recharger as well. Note: The new battery pack is uncharged. Be sure to charge it before your initial use.
Installation and Removal of the Battery Pack n Installing Insert the charged battery pack into the under side of the printer. 1 As shown in the illustration insert the battery pack and slide it in the direction of the arrow. n Removal of Battery 1 Slide the battery pack release lever in the direction of the arrow. 2 1 2 Remove the battery pack by sliding it just a little in the direction of the arrow. 3 3 Pull the battery pack up and out of the printer.
The Charge Time of the Battery Pack The fully recharged battery pack will operate the printer for approximately 2 hours. (When printing by the method described in the specifications on page 35) When the battery becomes depleted and is in need of recharging, the green POWER lamp will start to flash. When this occurs, please recharge the battery pack as explained on page 9 as soon as possible.
The Battery Pack u Danger: Please take careful note of the following: • • • • • Warning Never dispose of a battery pack in fire. Please do not short the terminals. Please do not take apart or alter the unit. Do not try to recharge the battery pack with any recharger other than this one. When carrying only the battery be sure to protect it by putting it in its case. u Please be careful of the following points: Caution • Do not expose the battery pack to a powerful shock or drop it.
Installation of the Paper This printer uses thermal print paper, and not an ink ribbon. There are four ways to insert paper into the printer depending on the paper, the paper course and the roll paper holder. 1 Inserting paper from the Rear. 2 Feeding Single Sheets From the Top 3 Using the roll paper holder 4 Feeding sheets from the Bottom Inserting Paper from the Rear. 1 Turn the printer on. [ If the paper depress lever is up, please put it in the down position.
4 When there is a paper jam during Auto - insertion. When It is difficult to insert the paper. [ First remove the paper from the printer. When doing so release the Paper Depress lever (up position), and slowly pull the paper out in a straight backward motion. After removing the paper try once again to feed the paper in using the automatic insertion function. [ With the Paper Depress lever up, insert the paper manually as shown in the illustration to the right. Feed the paper in by turning the knob.
Feeding Cut Sheets from the Top 1 Turn the printer on. [ Put the Paper Depress lever down. [ The error lamp will start flashing. 2 Insert the end of the paper straight into the insert path. [ As seen in the illustration to the right, holding both sides of the paper with your hands, push the paper through the top insert path until it stops and the error lamp stops flashing. After a few seconds the paper will feed in automatically and the printer will be ready for operation.
Feeding Sheets from the Bottom 1 Turn the printer on. [ Paper Depress Lever is up. [ The error lamp will turn on. 2 Place the end of the paper into the bottom insertion path. [ As seen in the illustration to the right, push the paper through the printer until it comes out of the top side. (The error message lamp changes from 'on' to 'flashing') [ After you have inserted the paper put the Paper Depress Lever down. (The error lamp stops flashing.
Inserting Roll Paper 1 Fold over the end of the roll of paper. [ To prevent bulging of the fold, press down hard while folding. 2 Connect the roll paper holder. 3 If the Paper Depress Lever is up please lower it.
4 Turn the printer on. 5 Push the paper into the insertion path keeping it straight. [ Push the paper into the printer until it stops, and the error lamp stops flashing and turns off. After a few seconds the paper will automatically feed in and the printer will be ready to print. [ Turn the roll paper to take up the slack and set it in the holder.
6 Attach the roll paper cover. [The cover can be closed by moving it in the direction of the arrows. 7 If the paper is crooked, press the Paper Feed button (FEED) and allow a few lines to be fed through. The paper will straighten out automatically. [ When removing the Roll Paper Holder, first remove the paper, then push the Roll Paper Holder Release Lever on the left side of the roll paper holder in the direction of the arrow.
Things to be Aware of when Inserting Paper [While loading the paper sometimes it is impossible to feed in when the printer is in the Head-down state. When this occurs put the printer in the Head-up position and turn the platen roller knob to feed in the paper. [Before you print, make sure that the paper is in straight at the point where the paper comes out above the thermal print head. When the paper is not straight, a paper jam will often result.
Notes on the Usage of Thermal Paper Caution This printer is a thermal printer and prints using special thermal print paper. When using thermal print paper, please note the following points in order to prevent discoloration, corruption of paper quality and poor print quality. [ Do not expose the paper to bright light for long periods of time. [ Avoid high temperatures, high humidity liquids and sunlight.
Adjusting Printer Settings Many preset functions can be accessed easily using the 4 bit DIP switches on the bottom of the printer. Please use these switches to meet your desired purpose. When the unit powers up it reads the DIP setting one time only, and carries out the print operations following those instructions. ON 1 2 3 4 n SW Assignments The mode switch function is assigned to DIP switch SW1.
n An Explanation of Each Switch [ Printing A4 to A6 reductions It is possible to reduce the print size by 1/4, however, bar codes and Raster graphics cannot be reduced. [ Manual Paper Feed Disable the auto feeder. Turn the paper feed knob, and it is possible to insert the paper by hand. (Do not do this while the paper depressor lever is down.) [ Reverse Paper Feed Switch When the paper depression lever is released / the paper feed button (FEED) is pressed, it is possible to reverse feed the paper.
n VuePrint Function The PD-04 uses its operation buttons and LED indicators as well as a YES/NO dialog type function set mode to help the user select its operation features. Below there is an explanation on how to enter the function set mode and how to set the printer. There is also a list of the various functions available. Adjust DIP Switches, enabling the VuePrint function set mode.
Operations Table Operation Effect Pressing the paper feed button (FEED). The Handy Printer registers *No and moves onto the next set up item. Moves to the next set of details. Moving the paper depress lever up and down followed by the depression of the paper feed button (FEED). The Handy Printer registers *Yes and moves onto the next item for setting. Moves onto the next set of details.
< When the Set-Up Item is "Print Contrast" > print density [-2,-1,0,+1,+2] <0> density = –2 ? (YES density = –1 ? (YES density = O ? (YES density = +1 ? (YES < ---------------------------- select 'YES' NO) < ----------------------------- select 'NO' NO) < ----------------------------- select 'NO' NO) < ----------------------------- select 'NO' NO) < ---------------------------- select 'YES' Print density (+1) is selected.
< Table of Set Up Items > VuePrint (for U.S.
VuePrint (for Europe version) Items for Set Up Details Default DIPSW function Enable/Disable Enable A4-->6 Reduce Print Enable/Disable Disable Eye Mark Enable/Disable Disable Reverse Paper Feed Switch Enable/Disable Disable Manual Paper Feed Enable/Disable Disable Paper Selection Plain, 2 Copies paper, label paper Plain Print Density -2, -1, 0, +1, +2 0 IF Selection Infrared, Cable Infrared Baud Rate 2400, 4800, 9600, 19200, 38400 9600 Data Bit lengthNotice [ In the VuePrint function set mode you can enable or disable some portion of the DIP switch controller commands. [ HEX print cannot be disabled in the VuePrint function set mode. [ When a DIP Switch has been enabled, it cannot be selected within the VuePrint function set mode. To control functions in the VuePrint function set mode, the item must be set to disable on the DIP switches.
The Self-Test Print Before operating the self-test print, make sure that the printer is set to OFF and set the DIP switch No.1 (see P.22) located on the bottom of the printer to ON. After the selftest print is finihed, set the DIP switch No.1 back to OFF. 1 ASCII Slide Print Insert paper. With the paper depress lever up (released), press the paper feed button and hold it down while turning on the power.
Cleaning the Printer When paper is stopped up in the printer, please clean it following the steps below. [First turn off the power. Also remove the battery pack and the unplug the AC adapter. [If the Paper Depress Lever is up please put it in the down position. [As in the illustration, push the printer cover forward. As it comes forward, the cover will come free. Once the cover is off, the print head section will become exposed as in the picture below.
Connecting the Printer to your Personal Computer [When connecting or disconnecting the unit to a personal computer you must power down both units before hand. [Use the PD79900 communication cable, sold separately, to connect the printer to your PC. Optical Communication Port Connector to New Portable Information Tools Serial Port [The side marked "PUSH" should be facing up. Attach the cable with a straight motion. [Do not force the printer cable in as it can cause damage to the unit.
Connecting with an Infrared Optical Communication Device [When using the optical communication system both the PC and printer should be placed so that the receptors are directly facing each other. [The PC and printer should be placed within 20 to 80 centimeters of each other. [Make sure that there is nothing covering or screening the area between the printer and your PC, as data transmission will be interrupted.
Specifications Item Details 1. Printing Method Direct Line Thermal Type 2. Print Execution Speed 1 Page Copy Time : 400 dot line/sec. (1line 64 dot or less) Label Paper : 200 dot line/sec. (34) 2 Page Copy Time : 100 dot line/sec. (34) Note: The Battery Pack Usage Time is the Full-Recharge Time 3. Print Direction Portrait:Normal print mode (prints as data is being received) Page mode : (Prints after one page of data has been received.) Landscape : Page mode only 4.
Item 10. Paper 1) Method of Paper Feed 2) Paper width 3) Paper paths 4) Paper types 11. Interface Details Friction Feed 112 mm rear/ top/ bottom Cut paper : 1P or Original + 1P Recommended paper: Nippon paper Co., Ltd. TF50-KS-E2C/E4 Mitsubishi paper Co., Ltd. AFP235 Naigai carbon Co., Ltd. TLC# 25 Black (designated paper) Connected paper : 1P or original +1P Recommended paper: Nippon paper Co., Ltd. TF50-KS-E2C/E4 Mitsubishi paper Co., Ltd. AFP235 Optical Communication Interface
Item Details 17. No. of lines Consecutively Printable 20,000 lines (When the battery is fully charged, the Print Density is set to -2, the temperature is 25°C, space between characters is 8 dots, the space between lines is 36 dots, continuously print, alternating between lines of "5(35h)" and "(20h)") However results will vary due to the state of the battery, the temperature and the material printed. 18.
When You Think The Printer Might be Broken Below are some situations where the printer appears to be malfunctioning, but in not. Please check this guide when you have trouble.
Citizen America Corporation 2102 Alton Parkway – Unit A Irvine, CA 92606 (949) 838-0327 U.S.A. Citizen Systems Europe GmbH http://www.citizen-europe.com Park House 643-651 Staines Road, Feltham Middlesex, TW14 8PA United Kingdom Mettinger Strasse 11 D-73728 Esslingen Germany Japan CBM Corporation CBM Bldg.