User’s Manual Swift 90, Swift 120D and Swift 90x Swift 240+ and Swift 240x Swift 330+ and Swift 330x 1
Contents Product Warranty ...................................................................................................................... 4 User Safety Instructions ........................................................................................................... 5 Introduction ................................................................................................................................ 6 About This Printer Manual ............................................................
Changing The Default Settings ................................................................................................ 26 Menu Mode ............................................................................................................................... 27 Menu Functions ........................................................................................................................ 27 The Install Menu Group ...............................................................................
Product Warranty This product is covered by Citizen’s 2 year warranty for manufacturing defects. Please note that items regarded as consumables, for example ribbons, where faults develop due to normal operational wear are not included. To obtain service under this warranty please return the product in its original packaging to your supplier along with your purchase receipt. The Citizen 2 year warranty is additional to your normal consumers rights. Trademark Acknowledgements Citizen: Citizen Watch Co. Ltd.
User Safety Instructions 1 2 3 4 5 • • • • 6 7 8 9 10 11 12 • • • • Read all the enclosed unpacking and operating instructions and keep them for future reference. Follow all warnings and instructions marked on the product. Do not use liquid or aerosol cleaners. Use a damp cloth with a small amount of detergent to remove marks from the covers. For more persistent marks refer to your dealer for a suitable cleaner. Do not use this product near water.
Introduction Thank you for purchasing this Citizen printer - you have made the right decision. Citizen ranks amongst the top European printer manufacturers, producing innovative, high quality printers backed by a worldwide organisation renowned for its reliable, precision engineered products. This manual covers a range of printer products, from 9-pin narrow carriage printers to 24-pin wide carriage, high performance printing.
What to do if you have problems If you have any problems with your printer or require assistance in setting it up with your software we advise you to do the following:• Read Chapter 4 and 5 of this user manual • Read the software driver documentation (if applicable) • Contact your local dealer from whom you purchased the printer. • Please visit our web site and take a look at the technical support pages.
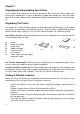
Chapter 1 Unpacking And Assembling Your Printer In this chapter, we’ll help you to set up your new printer. We’ll show you how to unpack your printer and its components, as well as suggesting a suitable work location for it. We’ll also show you how to install the ribbon and the power cable and how to connect the printer to your computer. Unpacking The Printer Lay the box on its side and slide the printer out by grasping the side packaging.
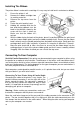
Getting To Know Your Printer With the preliminaries out of the way let’s take a closer look at the printer components and the paper controls to see what they do. Printer Components A B C D E F G The power switch is used to turn the printer on and off. It is at the left hand side of the printer near the back. While the printer is on, the top of the case may feel warm to the touch. This is normal for a high-speed printer and is nothing to worry about.
Installing The Ribbon The printer ribbon is enclosed in a cartridge. It is very easy to install and is carried out as follows: 1 2 3 4 5 6 7 Ensure the printer is off. Remove the ribbon cartridge from its packing materials. Remove the top cover from the printer. Centre the print head by hand. Holding the cartridge with the ribbon knob facing upwards, turn the knob in the direction shown by the arrow until the slack is taken up. Make sure that the ribbon isn’t twisted.
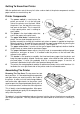
Installing The Power Cable The power cable fits into the socket located at the back of the printer on the right (viewed from the back). This socket has three prongs so that cable will fit only one way. Make sure that power switch is off before installing the power cable. Push the cable firmly into the socket to make the connection secure. The other end should be connected to a standard mains power outlet socket.
Chapter 2 Paper Handling And Loading Your printer offers great versatility in the kinds of paper you can use and the ways loading and unloading them.
Installing The Tractor Unit How you install the tractor unit and load paper into the printer depends on what kind of paper you select. The tractor unit has two positions: push and pull. The tractor unit is mounted in the push position at the factory. When installed, it fits snugly into the rear of the printer. It works by gripping the edges of the continuous paper and pushing it under and around the platen until the paper comes out of the top of the printer.
Installing The Tractor Unit In The Pull Position Follow these instructions to install the tractor unit in the pull position: A B C D E F Forward Notch Front Pins Half circle notch Platform Rear Pins Spring Arm 1 2 Remove the top cover. Remove any paper currently loaded in the printer. Place your thumbs on the release tabs located on both ends of the tractor unit. Grip the outside of the printer with your fingers, push thumbs down and back.
Adjusting The Paper Thickness Lever You can find the paper thickness lever (A) by removing the top cover and looking inside the printer opening at the far left end. The lever is mounted on a notched brace. Move the lever toward the front of the printer for thicker papers. A small bump on the brace identifies the standard location that is appropriate for most papers. Use the following tables to find the recommended setting for the type of paper you are using.
Printing On Continuous Paper Standard continuous feed paper can be fed from either the bottom or the rear. With rear feeding you can take advantage of the printer’s special features of paper tear off, top of form fine adjustment and paper parking. You can stack the paper on the desk or table behind the printer (be sure to allow space for the exiting paper so that it does not interfere with the incoming paper). With bottom feeding you have convenient paper storage and less curling around the platen.
1 Be sure the tractor is in the push position (if not, follow the installation instructions earlier in this chapter). A B C D Paper guide extension Paper holders Paper guide Paper select lever 2 Install the paper guide in the upright position used for inserting paper. To do this, hold the paper guide so that the two corner extensions point downward into the printer. Slide the guide pins (A) onto the L shaped channel slot.
The printer is mounted on a printer stand allowing your supply of forms to sit below the printer Follow these steps to load multi-part forms. 1 2 3 4 5 Be sure the tractor is in the pull position, if not, install it by following the instructions earlier in this Chapter. Turn the printer off before loading the forms from the bottom. Remove the top cover. Set the printer on its rear side. Insert the forms through the slot in the bottom of the printer, see below.
Printing On Overhead Transparencies In addition to printing on paper, your printer can also print on overhead transparencies. You should use transparencies specifically designed for dot matrix printers which have a slightly rough surface rather than a smooth surface. Set the paper thickness lever to +1 and refer to the section on “Printing on Single Sheets” earlier in this chapter.
3 4 PARK/LOAD feed again. Move the paper select lever on the right side of the printer to the rear setting (for single sheets. Individual cut-sheets can now be fed in to the printer. When you are ready to switch back to continuous paper, follow these steps: 1 2 3 4 Eject a single sheet of paper (if one remains inserted) by taking the printer off line and pressing the LF/FF key for 2 or 3 seconds. Pull the paper select lever forward Make sure that PAPER OUT is indicated. Then press the PARK/LOAD key.
Top Of Form Fine Adjustment - VTOP This is also known as Variable Top Of Form or VTOP. You should never need to use the paper feed knob for setting the top of form or feeding paper. The only time you need to use it is to clear a paper jam. All changes to the top of form can be made with the top of form fine adjustment feature.
Chapter 3 The Control Panel Your printer has a wide range of functions enabling you to control such things as different character sizes, fonts and styles, the positioning of the paper, and even how much noise the printer makes. Although there are a large number of these functions, you will find that they are very easy to use because of the unique design of the Command-Vue-III control panel. The main control on the panel is the slide switch SW1.
When switching on, ensure the slide switch SW1 is set to the ON LINE position. The POWER/ PAPER OUT light will come on and the print head will initialise itself and move to the centre of the platen. If there is no paper in the printer, the PAPER OUT/POWER light will begin to blink. On Line When the printer is “on line”, it can receive data for printing. When it’s oft line, it’s under your control and printing is halted. When the printer is “on line”, the LED next to the “on line window” will be illuminated.
Changing The Font To change the font: 1 2 3 Set slide switch SW1 to MODE. Move slide switch SW2 to LQ or LQ/DP to display one of the font menus. LQ will display four letter quality fonts; LQ/DP will display two letter quality fonts, the draft font and the high speed draft font. If the current font is in the menu you have displayed, the function LED next to it will be lit, otherwise all the LEDs will be off. Press the function switch next to the font you require.
Move SW1 to the MODE position and SW2 to the STYLE position. The top two functions on the style menu will change depending upon the version of printer that you have. They are all described below: Quarter Printing This function allows up to four pages to be compressed on to one page. This is ideal for producing pocket-sized booklets or previewing documents. Copy Mode To make the print head strike harder when you are using multi-part forms, you can enable copy mode.
2 Press the PRINT button and hold it down until the printer begins to print (about 3 seconds). The printer will print out a table of all the values the printer settings can take, with the current default value in filled and underlined print. The exact print out will vary depending upon the version of printer you own: Changing The Default Settings You can change the printer’s current, default settings using the printer’s menu mode. The new defaults will then be used when you next turn on the printer.
report explain which keys to use to make adjustments to the settings. Menu Mode 1 2 3 4 The SELECT key moves the print head from one item to the next. Press it a few times and the print head will move along each time to the next option. Repeatedly pressing the SELECT key moves the head to the next option, eventually returning to the first option. The SAVE key selects the item currently pointed to by the print head. This then becomes the standard or default setting.
FORM LENGTH is used to set the size of paper in use. The standard options are 6 inches, 8 inches , 11 inches (“Letter”), 11.66 inches (“A4”), 12 inches or 14 inches (“Legal”). PAGE SKIP is used to make the printer ‘skip over’ the perforations in continuous paper, leaving a half inch margin above and below. Most software packages specify that this should be OFF TEXT DIR or NLQ DIR and GRAPHIC DIR specify whether the print head prints when travelling in both directions (BI-DIR) or only one (UNI-DIR).
These can be saved as default by moving SW1 to the SETUP position and pressing the SAVE button for 3 seconds. These functions provide quick and easy access to settings also detailed in the Default Settings and Menu Functions above. COLOUR RIBBON With the printer off-line, this enables and disables the colour ribbon optional accessory. With the printer on-line, this button can also be used to select the colour of printing that will be used for future printouts.
Hexadecimal Dump This is a very powerful feature, allowing you to check, for example, what commands are being sent from the computer. Load the printer with paper, switch off the power, then hold down the QUIET switch while switching the printer on again. Printing The Font Print To print a demonstration page showing the printer’s features: 1 2 Move switch SW1 to SETUP Press the PRINT and SAVE function switches together and hold them down until the printer begins to print (about 3 seconds).
Chapter 4 Setting Up Your Printer To Work With Your Software Your printer emulates three different types of printer. That is to say it understands three different types of printer language. Depending upon the printer that you own, you will need to select an emulation that is most suitable for your printer.
Codepages - International Characters Your printer has a number of international character sets built in to the printer as standard. Depending upon the version of printer you have - which is usually related to the country the printer was sold in - will change the number and range of character sets available. These character sets are called codepages and will include the more common “Western” characters, including accented characters used in French, German and Spanish languages, to name but a few.
Chapter 5 Maintenance And Fault Finding Your printer requires very little routine maintenance. In fact, the best maintenance for the printer is preventative. If you have followed the suggestions for locating it in an area free of excessive dust and heat it will give you a long and trouble-free performance. Periodic cleaning, replacement of the ribbon and, after a very long time, replacement of the print head are about the only maintenance tasks you’ll need to carry out.
Problems And Solutions The following are some of the common problems which you may encounter when using the printer. By implementing the solutions suggested, you should be able to resolve them. Printer Is “Dead” No Lights. No Action Make sure that it is plugged in. Check both ends of the power cable. Make sure the power switch is turned on. Test the socket with another appliance to make sure it is working, check the fuse in the plug attached to the power cable.
Print Quality Is Not As Good At The Top Of The First Sheet As It Is Lower Down The Page When using push tractor feed, the first sheet can move sideways slightly until it reaches the top cover and is guided by the small rollers. This may affect LQ print quality slightly.
Indicated by LEDs 2 and 3 flashing alternatively Characteristic When an error is detected, the printer turns OFF LINE. Cause The paper select lever is changed whilst paper still in printer’s mechanism or when paper is inserted from both rear and bottom paper feeds Remedy Remove the paper or re-set the lever position and the printer will resume operation. Home error Indicated by LEDs 1 and 2 flashing alternatively Characteristic When an error is detected the printer goes OFF LINE.
Chapter 6 Printer Accessories Various options and accessories to improve printing performance and to make your job easier may further enhance your printer. These are detailed in this chapter. RAM Modules On 24-pin printers, you can further increase the versatility of the printer by installing optional RAM modules. These are placed in the module slot located in the options compartment at the top right hand side of the printer, beneath the top cover. To access the compartment slide the cover to the right.
Attach these wires to the automatic sheet feeder by referring as follows: 1 2 3 Attach the hopper wire by inserting its end into the holes on the hopper support. Attach the front stacker wire by squeezing its ends and inserting them into the slots on the stacker bottom. Attach the front short wire by expanding its ends and inserting them into the holes on the wire connector.
ASF Specification Bin stacker capacity Weight Size 60 (g/m²) 90(g/m²) Capacity (sheets) B5 A4 Letter Legal B4 120 120 120 100 84 82 82 82 65 54 Operating Temperature +5 to +35ºC, No condensing, Relative Humidity 30 to 80% Storage Temperature -30 to +65ºC, No condensing, Relative Humidity 5 to 85% Acoustic noise level Paper feeding noise: less than 50dB(A) Changing Between Continuous Forms And Single Sheets Once you have installed the automatic sheet feeder by the procedures above, you can alternate
1 2 3 4 5 6 7 8 Turn the printer off and remove the top cover and the black ribbon cartridge. Position the colour unit over the compartment at the right hand side of the printer as shown above. Notice that the bottom of the colour unit has a slot that looks like an upside down Y. Slide the colour unit down to fit the Y over the bar. Make sure that the connection is secure.
Serial Interface Setting Options The following available options can be set via the DIP switches on the interface: Baud Rate Parity Data Bit Stop Bit Protocol 19200, 9600, 4800, 2400, 1200. 600, 300 or 110 None, odd or even 8-bit or 7-bit data length 2-bit or 1-bit XON / XOFF or DTR / DSR Warning: Before you make any connection be sure that the power to the printer and the computer is off. Serial Interface Installation Serial interface installation is a straightforward process.
The Data-Ready Protocol The data-ready protocol works by controlling the signals on pins of the interface. The pin functions with the data-ready protocol are shown in below. The DTR pin controls the flow of information to the printer. When the remaining buffer capacity is less than 256 bytes the printer changes the DTR signal to LOW. When the data in the buffer falls to below 256 bytes the signal is again changed to HIGH.
Chapter 7 Specifications for each printer Swift90 Swift120D Swift 90x Swift 240+ Swift 240x Swift 330+ Swift 330x Number /Pins 9 9 24 24 24 24 Printing Speed (cps) HS Draft 15 cpi Draft 15 cpi 270 Draft 12 cpi 216 Draft 10 cpi 180 LQ 15 cpi 68 LQ 12 cpi 54 LQ 10 cpi 45 270 216 180 68 54 45 300 240 200 99 80 66 300 240 200 99 80 66 420 336 280 140 93 80 420 336 280 140 93 80 Columns 10cpi 80 136 80 136 80 136 Input buffer Expansion 8 Kb - 8 Kb - 8 Kb 32 / 128 Kb 8 Kb 32 / 128 Kb
General Specifications Printing Method Impact Dot Matrix Printing Direction Bi-directional standard, logic seeking (DP, LQ and graphics) Uni-directional selectable from control panel ( LQ and graphics) Ribbon Black Colour Standard Option - user installable Power Voltage Standby Operation 180 - 264 Volts AC 10 Watts 70 Watts Warranty Printer warranty Citizen’s unique 2 years, including the printhead Repair MTBF MTTR 4000 hours, excluding life of printhead 20 minutes or less Lifetime Printhead life Ri