. 2. 3. 4. 5. 6. English CONTENTS INTRODUCTION AND OVERVIEW.................................................................. 5 USING THE WATCH ............................................................................................ 6 MAIN COMPONENTS AND FUNCTIONS ........................................................ 8 SETTING THE TIME .......................................................................................... 14 SETTIGN THE CALENDAR .................................................
12. SECONDS SETTING (0)...................................................................................... 42 13. SOUND MONITOR .............................................................................................. 45 14. INITIAL MONITORING..................................................................................... 47 15. INITIAL SETTING .............................................................................................. 49 16. MOVEMENT CHECK....................................
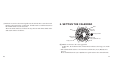
2. USING THE WATCH [MAIN WATCH] Minute hand [SUB WATCH] Small second hand Hour hand Second hand (Example) If the time signal chime is one minute slow, set the SUB WATCH forward one minute. Wearing the watchband If the watch is worn too tightly, it may be difficult to clearly hear the Watch sounds. Allow a space of one finger between the watch and your wrist for best results. Minute hand Hour hand 6 Set the Main watch and Sub watch to the current time (See "4.
3. MAIN COMPONENTS AND FUNCTIONS K 14 K 13 1 K 12 BUTTON (A) 1 2 • Day hand • Mode hand 3 BUTTON (C) • Mode switch • Day set K 11 2 Crown 9 3 BUTTON (C) 4 0 8 BUTTON (B) 7 4 5 8 5 6 NOTE: This watch displays number of years from the leap year. NOTE: The AM/PM hand should only be used to distinguish morning/evening. It should not be used as a 24 hour time display. • The design may differ according to the model.
Button Functions CROWN MODE button (A) button (B) button (C) CROWN ROTATION Normal display * Time signal chime (Repeater) * Calendar display Mode Switch * Watch hand initial position monitor ------------ Calendar display To normal display To normal display To normal display ------------ * Sound monitor (OFF) Alarm Setting Alarm 1 setting Cancelling the NORMAL alarm (ON) POSITION Mode Switch * Watch hand initial position monitor ------------ ON/OFF Switch Alarm Setting * Sound monitor Mod
Hand Function Crown Mode Normal mode Calendar display Normal position MAIN WATCH hour, minute, second SUB WATCH hour, minute Main watch hour, Local time hour, minute minute, second AM/PM hand Date hand Mode hand Local AM/PM (Main watch) Date (Main watch) Day Main watch hour, minute, second (Main watch) year, month ------------ (Main watch) Date (Main watch) Day Main watch hour, minute, second Alarm hour, minute Alarm AM/PM ON AL-1 Main watch hour, minute, second (Main watch) hour, min
4. SETTING THE TIME When setting the current time, it is essential to set both the Main watch and Sub watch to the same time. If the Sub watch is not matched to the Main watch, the Repeater will not sound properly. (1) Pull the crown out to the 2nd step position when the small second hand is at 0 position (12 o'clock) Minute hand Mode and stops. hand Small * When the crown is pulled out the 2nd second step, the mode hand points to "0.
(5) Push the crown in to the normal position at the desired time to start the watch running at the current time. At this time, the Sub watch second hand returns to this normal function as the date hand. The mode hand switches to indicate the day, the hour and minute hands of the Sub watch switch to local time. 5. SETTIGN THE CALENDAR Date Day Button (A) Date set 1st step position Button (C) Day set Leap year Button (B) Leap year/month set Month (1) Pull the crown out to the 1st step position.
(2) • Press the (A) button to set the date. (3) • Check the number of years following the leap year for the current year. (see below) • Press the (B) button to set the leap year and month. The year hand is synchronized with the month hand. U Reading the leap year display The leap year and years following the leap year year 1 year 2 are displayed as shown in the diagram.
(4) • Press the (C) button to set the day. • Pressing the (C) button advances the hand one day at a time. Quick-advance is not a feature of this function. U Reading the day display Monday Wednesday Friday The points between the days listed on the day display represent the days not listed. Therefore, the line between "Sun" and "Tue" represents "Monday", etc. Adjustment-free calendar This feature lets you use your watch without need to make end-of-month or leap year adjustments.
6. SWITCHING MODES 7. NORMAL DISPLAY The normal time display appears as follows.
Press the (A) button to sound the time signal chime (see "1. Time signal chime (Repeater)"). Press the (B) button to display the calendar (see "2. Calendar display"). 1. Time signal chime (Repeater) The feature allows you to tell the current time by the watch's chime sound. Mode hand Button (A) Press and hold down for more than 1 second. 7 • Crown in the normal position * This feature will not work unless the mode hand is set to day (normal) display.
(Example) You want to make the watch chime sound at 7:32. 1) Hour sound: One high-pitched chime sounds each seconds for each hour (7 times=7 o'clock). 2) Quarter sound: One high and one low-pitched chime sounds each second (1/4HR M 2=30 minutes). 3) Minute sound: One low-pitched chime sounds each second (2 times= 2 minutes). By playing the above sound, you know the time is now 7:32. * Press the any button while the chime is playing to stop the sound.
• Crown in the normal position • Press and hold down the (B) button for more than 2 seconds to switch the Local time hour, minute hands to the Leap year, month hands. 8. ALARM 1 (AL-1) Alarm 1 ...... Lets you set the desired alarm time quickly and easily. The alarm rings once at the set time and then cancels the alarm setting. Setting Alarm 1 • The alarm can be set in one-minute increments. • AM/PM can be determined with the AM/PM hand. • Alarm hour, minute hands and AM/PM hand are synchronized.
Mode Button (A) Cancelling the alarm Alarm ON/OFF Button (C) To AL-1 mode Alarm set (4:00 PM) Button (B) Alarm time set AM/PM • Crown in the normal position (Example) You want to set the alarm for 4:00 PM today. (1) Press the (C) button to move the mode hand to the AL-1 position. At this time, the hour and minute hands of local time switch to the hour and minute hands showing current time. (2) Press the (B) button and set the alarm to 4:00 PM.
9. ALARM 2 (AL-2) Mode Alarm 2 (Daily alarm) ...... This feature allows the alarm to ring every day at the set time. Setting the Daily alarm (Alarm 2) • The alarm can be set in one-minute increments. • AM/PM can be determined with the AM/PM hand. • Alarm hour, minute hands and AM/PM hand are synchronized. • Press the (B) button once to advance the hands one minute at a time. Press and hold down the (B) button to use the quick-advance feature.
NOTE: When the alarm is set between 12:00-12:30 AM, the alarm hands sweeps forward and back in a 30 minute arc and stops at the set time. This is normal and does not indicate faulty movement. (3) Press the (C) button 4 times when the setting is complete to move the mode hand back to the normal time display. [About the Daily alarm (AL-2)] Depending on the time of day for which the alarm is set, for the watch will sound 3 different alarms. • Refreshing sound ...
10. LOCAL TIME (L-TM) Setting Local Time • Settings can be made in 30-minute increments. • Local time hour, minute hands and AM/PM hand are synchronized. • Press the (B) button once to advance in 30-minute increments. Press and hold down the (B) button to use quick-advance feature. Mode Button (C) To L-TM mode AM/PM • Crown in the normal position (Example) You want to synchronize the current time in Tokyo (5:30 PM) with the local (current) time in Paris (9:30 AM).
(3) Press the (C) button 3 times when the setting is complete to move the mode hand back to the Day (normal) mode position. * If there is no input for about 1 minute, the watch automatically returns to the normal display. 11. LOCAL TIME ALARM (L-AL) Local time alarm (L-AL) ...... This feature allows the alarm to ring every day at the set time. Setting the Local time alarm • The alarm can be set in one-minute increments. • AM/PM can be determined with the AM/PM hand.
Mode Button (C) To L-AL Mode Alarm set hands (10:00 AM) Button (A) Alarm ON/OFF switch Button (B) Alarm time set AM/PM • Crown in the normal position (Example) You want to set the alarm to sound at 10:00 AM Paris time. (1) Press the (C) button to move the mode hand to the L-AL position. At the same time, the Local time hands switch to the alarm hour, minute set hands and the date hand switches to the Alarm ON/OFF hand. (2) Press the (B) button to set the alarm to 10:00 AM.
12. SECONDS SETTING (0) Refer to the "Seconds adjustment" entry below for instructions on adjusting the watch. Seconds adjustment Mode hand Button (C) To 0 mode 42 Button (A) Second setting Main watch second hand Sub watch second hand (3) Press the (C) button when the setting is complete to move to the normal display. (The mode hand displays the day mode.) * If there is no input for about 2 minutes, the watch automatically returns to the normal display.
13. SOUND MONITOR Second hand position MAIN WATCH (Second hand) 0-29 SEC 30-59 SEC 44 SUB WATCH (Second hand) Second hand stops. Movement begins when Sub watch second hand reaches same position. Second hand advances to the 0 position and begins movement. The minute hand advances one minute. Second hand returns to the 0 position and begins movement. Second hand advances to the 0 position and begins movement. The minute hand advances one minute. Sound monitor ......
• Alarm 2: When the Local Time Alarm is set to ON or OFF, pressing button (A) for more than 2 seconds will activate the sound monitor. Caution should be exercised at this time because the Local Time Alarm switch setting will also be changes. 46 14. INITIAL MONITORING Positioning of the watch's hands ... This feature allows you to check and confirm the proper position for each of the watch's hands.
If the hands do not move to the above positions, see "15. INITIAL SETTING". If there is no input for about 20 seconds, the watch will automatically return to the normal display. Press the any button to manually return to the normal display. 15. INITIAL SETTING If the calendar, local time or various alarm functions for the watch do not operate correctly, follow the procedures listed below. * These instructions should always be completed when new batteries are installed.
• Crown is in the 2nd step position (1) Press the (A) button to set the date 31 31 hand to the "31" position (12 o'clock). "SUN" Button (A) (2) Press the (B) button to set the Local time hand to the 12 o'clock position and AM/PM hand to the "PM" 2nd step position. position Button (3) Press the (C) button to set the day (C) Button (B) hand to "SUN". The day hand may not align precisely with the SUN 12:00 PM mark but this does not adversely effect normal watch operations.
16. MOVEMENT CHECK 1. Date hand quick-advances clockwise • When the date hand quick-advances in a clockwise direction this indicates that the "time setting" between the Main watch and Sub watch was not successfully completed. See "4. SETTING THE TIME" for further instruction. (Time setting incomplete warning indication) 52 2. Date hand quick-advances counterclockwise • When the date hand quick-advances in a counterclockwise direction this indicates that the initial setting was not successfully completed.
For correct use within the design limits of the watch, confirm the level of waterresistance of your watch, as indicated on the dial and case, and consult the table. 17. PRECAUTIONS WARNING: Water-resistance performance Examples of use There are several types of water-resistant watches, as shown in the following table. The unit "bar" is roughly equal to 1 atmosphere. * WATER RESIST(ANT) xx bar may also be indicated as W.R. xx bar.
WARNING: Water-resistance performance • Water-resistance for daily use (to 3 atmospheres): This type of watch is water-resistant to minor exposure to water. For example, you may wear the watch while washing your face; however, it is not designed for use underwater. • Upgraded water-resistance for daily use (to 5 atmospheres): This type of watch is waterresistant to moderate exposure to water. You may wear the watch while swimming; however, it is not designed for use while skin diving.
WARNING: Handling of the battery • Keep the battery out of the reach of small children. If a child swallows the battery, contact a physician immediately. CAUTION: Replacing the battery • For replacement of the battery, take your watch to your dealer or Citizen Service Center. • Replace the battery as soon as possible if the service life of the battery has expired. Leaving a depleted battery in the watch may result in leakage, which can damage the watch severely.
18. SPECIFICATIONS 1. Model: 6765/6766 2. Type: Multi-hand analog quartz watch 3. Quartz oscillation frequency: 32,768 hertz 4. Accuracy: ±20 seconds per month at normal temperatures +5°C to +35°C 5. Effective temperature range: -10°C to +60°C 6.