Setting Instructions for Movement Caliber C660 Contents (click on a topic) 1. Features 2. Before using this watch 3. Names of Components and Major Functions 4. Switching Modes (Display Functions) 5. Checking ‘0’ Position of Each Hand 6. Accessing Times and Dates of Major Cities Around the World 7. Switching between the Analog and Digital Times 8. Hand Evacuation Function 9. Setting the Time 10. Setting the Date 11. Using the Race Timer 12. Using the Chronograph 13. Using the Timer 14. Using the Alarm 15.
Return to Table of Contents 1. FEATURES This watch is a combination solar – powered watch that contains a solar cell in its face that drives the watch hands, race time, chronograph, alarm and numerous other functions by converting light energy into electrical energy.
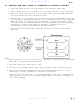
Return to Table of Contents 3. NAMES OF COMPONENTS AND MAJOR FUNCTIONS Name /Mode Time Calendar Timer (1) Mode Hand (2) Hour Hand (3) Minute Hand (4) Second Hand TME CAL Always Indicates Hours Always Indicates Minutes Always Indicates Seconds RACE (7) Digital Display 1 Hours, minutes, seconds (8) Digital Display 2 City Name, SMT (when set to daylight savings time) Indicates the remaining race time (minutes, seconds).
Return to Table of Contents 4. SWITCHING THE MODE (DISPLAY FUNCTIONS) In addition to the time and date modes, this watch is also equipped with three a race timer, chronograph, countdown timer as well as alarm 1 and alarm 1. The mode can be switched by turning the crown. Check the current mode with the mode hand. TME Time CAL Calendar RACE Race Timer Set Zone Setting AL-2 Alarm 2 AL-1 Alarm 1 CHR Chronograph TMR Timer 5.
Return to Table of Contents O-Position Correction (Setting to the Watch Base ‘0’ Position) When setting the 0-position of each hand, always make sure to turn the crown forward (clock-wise) to set each hand to its 0-position in the clockwise direction. 1. Turn the crown while in the normal position to set the mode hand to the chronograph [CHR] mode. 2. Pull the crown out to the second click (0-position correction position). a.
Return to Table of Contents 6. ACCESSING TIMES OR DATES OF MAJOR CITIES The time of date of major cities pre-registered in this watch can be easily accessed by pressing the buttons. 1. Turn the crown to set the mode hand to the time [TME] or calendar [CAL] mode. 2. When button (A) is pressed, the times or dates of major cities are displayed while scrolling up each time it is pressed. 3.
Return to Table of Contents 7. SWITCHING ANALOG TIME AND DIGITAL TIME This watch is able to switch between analog time display and digital time display. 1. Turn the crown to set the mode hand to the time [TME) mode. 2. Press button (A) and (B) simultaneously. 3. After a confirmation tone sounds, the watch switches the time of the city displayed by analog display and the time of the city displayed by digital display.
Return to Table of Contents 9. SETTING THE TIME (TIME IS CORRECTED BY DIGITAL DISPLAY) When digital time is corrected, the second, minute, hour, 24 hour and UTC hour and minute hands of the analog time are corrected automatically in conjunction with digital time. 1. Turn the crown and set the mode hand to the time [TME] mode. 2. Press either button (A) or button (B) to access the city to be corrected. 3.
Return to Table of Contents 10. SETTING THE DATE (DATE IS CORRECTED BY DIGITAL DISPLAY) 1. Turn the crown and set the mode hand to the calendar [CAL] mode. 2. Press either button (A) or button (B) to access the city to be corrected. 3. When the crown is pulled out to the second click (date setting position), the watch enters the date correction state. 4. When button (A) is pressed, the location to be corrected changes each time it is pressed. Select the location to be corrected so that it is flashing.
Return to Table of Contents 11. Using the Race Timer The race timer is able to set the time for 5-minute intervals for times between 60 and 10 minutes, and to 6,5,4,3,2 and 1 minute. 3. Turn the crown and set the mode hand to the [RACE] race timer position. 4. When the crown is pulled out to the first click, (race timer setting position), the watch enters the minute correction state. The Race Timer Setting Time (minutes flashes in Digital Display 2. 3.
Return to Table of Contents When the race timer measurement is finished, upon finishing simultaneously, it changes to the auto chronograph that starts counting down automatically. The auto chronograph measures to a maximum of 23 hours, 59 minutes and 59 seconds in 1second increments. After timing is finished, the chronograph automatically returns to the RACE timer initial setting display. 1.
Return to Table of Contents 12. USING THE CHRONOGRAPH The chronograph is able to measure and display time up to a maximum of 23 hours, 59 minutes, 59.99 seconds in 1/100th second units. After 24 hours have elapsed, the chronograph automatically returns to the chronograph reset display (00'00"00) and stops. Normal Chronograph Display 1. Turn the crown to set the mode hand to the chronograph [CHR] mode. ( the second hand rapidly advances to the 12:00 position and stops) 2.
Return to Table of Contents 13. USING THE TIMER The timer can be set to a maximum of 99 minutes in 1-minute units. When the set time has elapsed, a tone indicating that the set time is up sounds for about 5 seconds, after which the timer returns to the timer initial setting display. 1. 2. 3. 4. Turn the crown to set the mode hand to the timer [TMR] mode.
Return to Table of Contents 14. USING THE ALARM The alarm setting procedure and other procedures for alarm use are the same for Alarm 1 and 2. Only the tone that sounds is different. The alarm sounds for 15 seconds when the set time is reached once a day. When the alarm is sounding, it can be turned off by pressing button (A) or (B). 1. Turn the crown and set the mode hand to either the Alarm 1 or 2 [AL-1] or [AL-2] mode. NYC 12:00 On 2.
Return to Table of Contents 15. USING ZONE SETTING The zone setting function enables only those cities for which "SET" has been selected to be easily accessed (displayed) in each mode. 1. 1.Turn the crown while in the normal position and set the mode hand to the mode setting [SET] mode. 2. 2.The city can be changed by pulling out the crown to the first click (for changing cities between SET and OFF and for setting the location for switching to daylight saving time). 3.
Return to Table of Contents 17.
Return to Table of Contents [Insufficient Charging Warning Function] (Analog Display) Regardless of the display (Mode) of the watch at the time, when the watch becomes insufficiently charged, the watch changes to the time display and the second hand begins to move at two-secondinterval movement. Although the 24-hour hand, hour hand and minute hand continue to keep the correct time, the watch stops after about 1.5 days have elapsed after the insufficient charging warning function is activated.
Return to Table of Contents [Time Setting Warning Function] (Analog Display) The watch stops when insufficient charging continues for about 1.5 days. When the watch is charged by exposing to light after having stopped due to insufficient charging, each hand is rapidly advanced to the base position and stops. Each hand remains stopped until the time is reset. (Digital Display) The initial setting display (12 hours, 00 minutes, 00 seconds, UTC or January 1 TU) flashes in the time or calendar mode.
Return to Table of Contents [Power Save 1] When power is not generated as a result of the solar cell not being exposed to light, the second hand stops when it reaches the zero seconds position and the watch automatically enters the power save state to inhibit power consumption of the secondary battery. (Analog Display) • The second hand stops at the base position (12:00). • Other hands continue to keep the correct time.
Return to Table of Contents 18. GENERAL REFERENCE FOR CHARGING TIMES The time required for recharging varies according to the model of the watch (color of the dial, etc). The following times are shown below to serve only as a reference. Recharging time refers to the amount of time the watch is continuously exposed to light. Running Time At Full Charge Low Charge Warning Quick Start Feature 4 Years 1.5 Days No Charge Rates from Indoor Light Source Indoors, Office (500 lux) One Day Use 2.
Return to Table of Contents PRECAUTIONS ABOUT CARE AND HANDLING OF WATCHES TEMPERATURE CARE Avoid temperature extremes. Exposing your watch to high temperatures, such as placing it on the dashboard of a vehicle or use in a hot tub, may cause the watch to malfunction, shorten battery life or damage certain components. Leaving the watch in extreme cold temperatures may cause irregular timekeeping until the watch returns to normal operating temperature.
Return to Table of Contents Water Resistance The water-resistant quality of our timepieces is offered in varying degrees depending on the model. This ranges from non-water resistant models to those suitable for SCUBA diving. Water resistance of our timepieces is measured in BAR or Barometric Pressure. Each BAR of pressure is equal to 14.5 pounds per square inch of pressure. Water resistance is measured when the watch is at a static, or motionless state.
Return to Table of Contents 21.