CITIZEN POS for .NET DRIVER 1.12 Setup Guide For Ver. 1.12.1.5 6-1-12 Tanashi-cho, Nishi-Tokyo-shi, Tokyo 188-8511 JAPAN Tel 81-424-68-4631 Fax 81-424-68-4740 sales-op@systems.citizen.co.jp http://www.citizen-systems.co.
CITIZEN POS for .NET DRIVER 1.12 Setup Guide Revision Record Date 2011/01/17 2011/04/05 Version 1.02 1.03 2011/06/22 1.12.1.4 2011/09/12 1.12.1.5 Description New issue - The CT-S310II model was added to each item. (Page 5,6,7,17,40) - “Printer Test” and “Drawer Test” was added to Configuration Utility Function. (Page 31,32,33) - Version number is changed to same version as driver itself. - The outline explanation was added to “1. Operating Environment”. (Page 5) - The version of .
CITIZEN POS for .NET DRIVER 1.12 Setup Guide Notes 1. Unauthorized use of all or any part of this document is prohibited. 2. The information in this document is subject to change without prior notice. 3. This document has been created with full attention. If, however, you find an error or question, please contact us. 4. We shall not be liable for any effect resulting from operation regardless of the above item 3. 5. If you do not agree with the above terms, you are not permitted to use this driver.
CITIZEN POS for .NET DRIVER 1.12 Setup Guide Table of Contents 1. Operating Environment ................................................................................................................................. 5 2. Installation ..................................................................................................................................................... 8 2.1. Installation Procedure ...............................................................................................
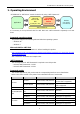
CITIZEN POS for .NET DRIVER 1.12 Setup Guide 1. Operating Environment “CITIZEN POS for .NET Driver” control the devices by using “.NET Framework”. Microsoft POS for .NET SDK Application (POSExplorer API) CITIZEN POS for .NET Driver Devices (POS Printer) (Cash Drawer) (Service Object) .NET Framework It is necessary to set up "Microsoft POS for .NET SDK" and ".NET Framework" separately to use this driver.
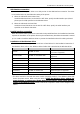
CITIZEN POS for .NET DRIVER 1.12 Setup Guide USB interface connection You need to install the printer driver to use this product via the USB interface connection. The driver to be installed varies by the USB mode setting of the printer: 1) When the USB mode is the Printer Class Install the Windows driver. On the POS for .NET driver, specify the USB interface port (Virtual printer port for USB) specified on the Windows driver. 2) When the USB mode is Virtual COM Install the Virtual COM driver.
CITIZEN POS for .NET DRIVER 1.12 Setup Guide Installation of the USB Virtual COM driver Install the Virtual COM driver that corresponds to each model. For the installation instruction of the Virtual COM driver, refer to the “Virtual COM Driver Installation Guide” that is attached to the Virtual COM driver.
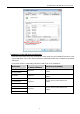
CITIZEN POS for .NET DRIVER 1.12 Setup Guide 2. Installation 2.1. Installation Procedure This section describes the installation instruction of this product. Make sure to terminate all the running applications before starting the installation. 1) Activate CSJ_POSforNET_JA_Vxxxx.exe (the installer, where xxxx represents the version). Proceed with the installation by following the instruction of the dialog. On Windows 7, click “Yes” when the following “User Account Control” dialog is displayed.
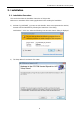
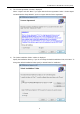
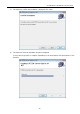
CITIZEN POS for .NET DRIVER 1.12 Setup Guide 3) The “License Agreement” window is displayed. Select “I Agree” and click “Next” if you agree with the license agreement. Select “I Do Not Agree” and terminate the Setup Wizard if you do not agree with the license agreement. 4) The “Select Installation Folder” window is displayed. Specify the installation directory. If you do not change the default installation folder, click “Next”.
CITIZEN POS for .NET DRIVER 1.12 Setup Guide 5) The window to confirm the installation is displayed. Click “Next”. 6) The window to show the installation progress is displayed.
CITIZEN POS for .NET DRIVER 1.12 Setup Guide 7) When the installation is completed successfully, the “Installation Complete” window is displayed. Click “Close”. 2.2. Installation Structure This section shows the installation files of this product. “Installation Folder”¥CITIZEN¥CITIZEN Service Objects for .NET BcWidth.dll : Extended library for service objects ConfigurationUtility.exe : Driver setting tool CSJCheckHealthLib.dll : Extended library for setting tool CSJWPOS.
CITIZEN POS for .NET DRIVER 1.12 Setup Guide 2.3. Uninstallation Procedure This section describes the uninstallation of this product. Deleting Configuration XML file Delete the physical and logical devices in Configuration Utility. The Configuration XML file is deleted when everything is deleted. For the deletion of a device, see the description in “3.4 Deleting a device”. ※ It is recommended to leave the registered device setting when upgrading the version of this product. Deleting Service Objects for .
CITIZEN POS for .NET DRIVER 1.12 Setup Guide 4) When the uninstallation is completed successfully, “Citizen Service Objects for .NET” is removed from the list of the “Programs and Features” (or “Add/Remove Programs” in some OS versions).
CITIZEN POS for .NET DRIVER 1.12 Setup Guide 3. POS for .NET Driver Setting Tool This section describes the usage of Configuration Utility. When the driver is installed, the shortcut icon is registered in the Windows Start Menu. “Start” -> “Programs” -> “CITIZEN” -> “Pos for .NET” -> “Configuration Utility” Main Screen Setting View: The setting of each device is displayed (the setting can be changed directly) Device View: The service objects and the logical devices are shown in the tree view.
CITIZEN POS for .NET DRIVER 1.12 Setup Guide 3.1. Adding New Printer and Cash Drawer 1) Click “Add New Printer” in the “Device” menu. Or, click “Add New Printer” icon on the tool bar. Or, click “Add New Printer” in the context menu on the device view. 2) “Add New Printer Wizard” is activated. Enter the model and the logical device name of the printer to be added, and click “Next”. The default logical device name is the “model name of the printer+ serial number of the printer”.
CITIZEN POS for .NET DRIVER 1.12 Setup Guide For the functions of each printer, see “1. Operating Environment”. 3) The “Please choose the printer type” window is displayed. Choose the paper width and the maximum columns per line with reference to the table below. The setting is linked to the default value of the ”RecLineWidth / RecLineChars / RecLineCharsList” properties. For details, refer to Application Development Guide of this product.
CITIZEN POS for .NET DRIVER 1.12 Setup Guide CT-S310 Series Paper Size (mm) Max. print columns RecLineWidth RecLineChars RecLineCharsList 30 360 30 30, 40, 45 32 384 32 32, 42, 48 42 504 42 42, 56, 63 48 576 48 48, 64, 72 Max.
CITIZEN POS for .NET DRIVER 1.12 Setup Guide Status Back Interval You can specify the polling interval to obtain the printer status. Setting range: 100 – 900 msec Write Timeout You can specify the timeout period for the writing to the output port. Setting range: 5,000 - 1,000,000 msec Write Buffer You can specify the buffer size for the writing to the output port.
CITIZEN POS for .NET DRIVER 1.12 Setup Guide Specify the above settings and click “Next”. 5) The “Please select the port” window is displayed. Select the port to use and click “Next”. When the COM port is specified The “Serial Port settings” window is displayed. Specify “BaudRate”, “Parity” and “Handshake”, and click “Next”. * The communication cannot be performed when the same serial port setting is not made on the printer and the terminal.
CITIZEN POS for .NET DRIVER 1.12 Setup Guide When NET is specified The “Network Settings” window is displayed. Input the “IP Address” and the “Port Number” to use. * When “Print Server Settings” is clicked, the print server setting tool is activated. For the usage of this tool, refer to the manual attached to the tool. * Specify “Job receive timeout” in “Print Server Settings”. It is recommended to set the time in seconds to cancel the connection to “120”. Specify the above settings and click “Next”.
CITIZEN POS for .NET DRIVER 1.12 Setup Guide Please enter the device name Enter the logical device name of the cash drawer. The default logical device name is “the model name of the printer + the serial number of the printer + CD1”. (And for the second drawer, it is “the model name of the printer + the serial number of the printer + CD 2”.) Signal Length Specify the time interval of the pulse signal to be output to the solenoid of the cash drawer.
CITIZEN POS for .NET DRIVER 1.12 Setup Guide 8) When the wizard is terminated, the registered printer and the cash drawer are shown in “Device View” and “Setting View”. When the drawer is selected, the logical device name of the connected printer is added at the tail of the logical device name on the title bar, and the “service object name of the connected printer / logical device name of the printer” is shown in the tooltip.
CITIZEN POS for .NET DRIVER 1.12 Setup Guide 3.2. Adding New Cash Drawer 1) Click “Add Cash Drawer” in the “Device” menu. * Make sure to complete the registration of the printer before adding a cash drawer. Or, click the “Add Cash Drawer” icon on the tool bar. Or, click “Add Cash Drawer” in the context menu on the Device View. 2) “Add New Cash Drawer Wizard” is activated.
CITIZEN POS for .NET DRIVER 1.12 Setup Guide * For the subsequent procedure, see the descriptions in “6) “Add New Cash Drawer Wizard” is activated subsequently.” and later in “3.1 Adding a new printer / cash drawer” and add a drawer in the same manner.
CITIZEN POS for .NET DRIVER 1.12 Setup Guide 3.3. Modifying Logical Device Modify the logical device name of the registered printer or cash drawer. 1) Select the printer or the cash drawer to change the logical device name from the list of “PosDevices” in the Device View. 2) Click “Modify Device” in the “Device” menu. Or, click the “Modify Device” icon on the tool bar. Or, Click “Modify Device” in the context menu on the Device View.
CITIZEN POS for .NET DRIVER 1.12 Setup Guide 3) The “Modify Device” window is displayed. The logical device name of the selected printer or cash drawer before modification is shown in “The device name before modification”. Enter the new logical device name in the “Please enter the device name” textbox. Specify the above and click “OK”. Or, click “Cancel” to cancel the above setting. 4) When the above operation is completed, the modified logical device name is shown in the Device View.
CITIZEN POS for .NET DRIVER 1.12 Setup Guide 3.4. Deleting Device Delete a registered physical device (printer or cash drawer). * Even after “Delete” or “Delete All” is executed, the setting is not reflected to the Configuration XML file until “Save” is clicked on the Main Screen. (See the description in “Save” in 3.5 “File menu” for how to “Save”) Deleting Printer 1) Select the printer to remove from the list of “PosPrinter” in the Device View. 2) Click “Delete” in the “Device” menu.
CITIZEN POS for .NET DRIVER 1.12 Setup Guide Or, click “Delete” in the context menu on the Device View. 3) The message dialog “Warning – Do you want to delete printer device and associated cash drawers” is displayed. Click “Yes”. Or, click “No” to cancel the deletion of the printer. * When the printer is deleted, the registered drawers are also deleted. Deleting Cash Drawer 1) Select a cash drawer to remove from the list of “CashDrawer” in the Device View. 2) Click “Delete” in the “Device” menu.
CITIZEN POS for .NET DRIVER 1.12 Setup Guide Or, click the “Delete” icon on the tool bar. Or, click “Delete” on the context menu on the Device View.
CITIZEN POS for .NET DRIVER 1.12 Setup Guide Delete all devices (Delete All) 1) Click “Delete All” in the “Device” menu. 2) The message dialog “Warning – Do you want to delete all printer devices and associated cash drawers” is displayed. Click “Yes”. Or, click “No” to cancel the delete all.
CITIZEN POS for .NET DRIVER 1.12 Setup Guide 3.5. Testing Device Test a registered physical device (printer or cash drawer). * Before testing device, it is necessary to save the setting. (See the description in “Save” in 3.5 “File menu” for how to “Save”) Testing Printer 1) Select the printer to test from the list of “PosPrinter” in the Device View. 2) Click “Printer Test” in the “Device” menu. Or, click “Printer Test” on the context menu on the Device View.
CITIZEN POS for .NET DRIVER 1.12 Setup Guide Testing Cash Drawer 1) Select a cash drawer to test from the list of “CashDrawer” in the Device View. 2) Click “Drawer Test” in the “Device” menu. Or, click “Drawer Test” on the context menu on the Device View.
CITIZEN POS for .NET DRIVER 1.12 Setup Guide Test Results If you can successfully run the testing, the following message is displayed. When the printer was selected, the test printing is run. And when the cash drawer was selected, the CheckHealth method is run. If an error occurred calling the testing, like the following error message is displayed.
CITIZEN POS for .NET DRIVER 1.12 Setup Guide 3.6. File Menu Save 1) Click “Save” in the “File” menu. Or, click the “Save” icon on the tool bar. The above operation reflects the current setting to the Configuration XML file. * This function can be selected only when a change is made after activation, saving or restoration. Restore 1) Click “Restore” in the “File” menu. 2) The message dialog “This will undo your changes! Are you sure you want to restore?” is displayed. Click “Yes”.
CITIZEN POS for .NET DRIVER 1.12 Setup Guide The above operation changes the current setting to the state upon the last saving. (When saving is not performed after the activation, it is changed to the state immediately after the activation.) * This function can be selected only when a change is made after activation, saving or restoration. Exit 1) Click “Exit” in the “File” menu.
CITIZEN POS for .NET DRIVER 1.12 Setup Guide 3.7. Tool Menu Setting Print Server 1) Click “Setting Print Server” in the “Tool” menu. * The print server setting tool is activated when “Setting Print Server” is clicked. Refer to the manual attached to the tool for the usage of this tool. Setting Option 1) Click “Setting Option” in the “Tool” menu. 2) The “Option” dialog is displayed.
CITIZEN POS for .NET DRIVER 1.12 Setup Guide 3.8. Help Menu Version information 1) Click “About Configuration Utility” in the “Help” menu. 2) The dialog “About Configuration Utility” is displayed. You can see the detailed version information of POS for .NET Driver / POS for .NET Configuration Utility on this dialog.
CITIZEN POS for .NET DRIVER 1.12 Setup Guide 4. Printer Setting It is the prerequisite for the use of this product that the DIP switch and the memory switch of the printer are set as listed below. For the switching and the detailed setting of each switch, refer to the user’s manual of each model. 4.1. CT-S310 Series DIP Switch Setting DSW No. 8 Function Setting Description INIT OFF Disabled (when serial interface is used) Memory Switch Setting MSW No.
CITIZEN POS for .NET DRIVER 1.12 Setup Guide 4.2. CT-S310II Series Memory Switch Setting MSW No.
CITIZEN POS for .NET DRIVER 1.12 Setup Guide 4.3. CT-S601/651/801/851 Series DIP Switch Setting DSW No. 8 Function Setting Description INIT OFF Disabled (when serial interface is used) Memory Switch Setting MSW No.
CITIZEN POS for .NET DRIVER 1.12 Setup Guide 4.4. CT-S2000 Series DIP Switch Setting DSW No. 8 Function Setting Description INIT OFF Disabled (when serial interface is used) Memory Switch Setting MSW No.
CITIZEN POS for .NET DRIVER 1.12 Setup Guide CITIZEN POS for .NET DRIVER 1.12 Setup Guide 2011/09/12 For Ver.1.12.1.5 CITIZEN SYSTEMS JAPAN CO., LTD.