For Safe Operation Start-up Guide Sicherheitshinweise Leitfaden zur Inbetriebnahme 안전한 동작을 위해 시작 가이드 Указания по безопасности Начальное руководство 安全にお使いいただくために スタートアップガイド 关于安全操作 入门指南 關於安全操作 入門指南 Para un funcionamiento seguro Guía de inicio de Pour un fonctionnement sans risque Guide de démarrage ©2011 Dai Nippon Printing Co., Ltd.
For Safe Operation Be sure to adhere to the following warnings! ・ Be sure to read this manual before use. ・ For detailed product explanations, please refer to the User’s Manual (on the included CD). ・ The warnings listed here are to ensure proper use of the device, to prevent physical injury to the customer or other persons, and to prevent property damage. After reading, keep it in a safe place, where it can be re-read as needed. Please obey these warnings.
CAUTION ・ Do not set the printer up in dusty or overly humid places. This could cause fire or electric shock, or damage the printer. ・ Do not set the printer up on an unstable surface. ・ It could fall and cause injury to the user or others. Do not allow foreign objects to enter the printer. They could cause electric shock, short circuit, or fire, or break the printer. If something falls into the printer, immediately turn the power OFF, and call a service representative.
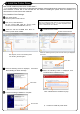
Start-up Guide Before using, please read “For Safe Operation” 1. Check the package contents Printer Unit Power cord (*) L spacer Paper holder Screw Manuals (*) ♦For Safe Operation ♦Start-up Guide Attatchment illustration Paper tray (*) CD (*) ♦Printer driver ♦User’s manual 2. Set up the printer (*) *Items with the * mark may not be attached according to destination. Open lever ○ × 1.Connect the power code and the USB cable. Turn on the power.
3. Install the Printer Driver Now we will install the printer driver for Windows 7. ※ If you will install the printer driver for Windows XP, Windows Vista and Windows 8, please refer to “Printer Driver User’s Manual” of each OS on the included CD. The detail of installing the printer driver for Windows 7 is documented in “Printer Driver User’s Manual”. First, install the Driver Package. ① ② ③ Turn off the printer. Check the printer’s LED is all off. Turn on PC, start Windows 7.
After installing the Driver Package, install the printer driver. ⑧ Connect the printer to the PC with USB cable, and turn on the printer. When the computer recognizes the printer, it will display the following screen on the taskbar, and then, it starts the printer driver installation. ⑨ The Printer Driver installation is complete. After a while, the following screen is displayed on the taskbar. The printer driver installation is complete.
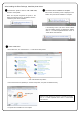
4. Printing If the computer operating system is Windows 7, you can print from “print” menu of Explorer. [Note] If you does not use “print” of Explorer, print with standard applications like [Adobe Photoshop]. ① Display the data you want to print with “Computer” or ④ “Explorer”. ② ③ “Print pictures” screen is displayed. Select [DS-RX1] on “Printer” . Select the data you want to print. Select “Paper size” and “Quality” which you Click the “print” on menu bar. want, and click “Print”.
5. Repacking Transporting the printer requires the reuse of the original packing materials. The printer must be packed in the same way it was at the time of purchase. If the original packaging materials are not used and the printer is not packed correctly, the printer may be broken during transport. Remove all Accessories and Attachments from the printer (print media ink ribbon, paper roll and holders, USB cable, power cable and paper tray) and store or transport them separately.