
User`s manual


2. Set up the printer
Before using, please read “For Safe Operation”
Start-up Guide
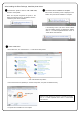
9. Set the supply side of the ribbon to the printer
carefully to take out any slack. Insert the
protrusion of the core left side in the hole on the
printer, then set the right side to the holder of the
same color (white).
Take up the ribbon slack by
rotating the ribbon on the supply side.
Open lever
4. Set the paper into the printer.
10.Close the front cover.
7. Insert the paper under the black paper guide until the buzzer beeps
(approx. to the dotted line). Make sure to insert the paper straight.
5. Remove a paper fixed tape,
and insert the paper.
3.Set a new roll of paper on the paper holders.
Please do not set gaps between the roll paper
and the paper holder.
8. Set the take-up side core of the ribbon to the
printer. Insert the protrusion of the core left side in
the hole on the printer, then set the right side to the
holder of the same color (yellow).
[Note] When the front cover is closed, the printer will run initialization(5 blank sheets will be fed out).
However, if you turn on the printer after set the paper, the printer does not run initialization.
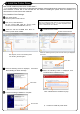
1.Connect the power code and the USB cable.
Turn on the power.
※When you install the printer driver, do not
connect the USB cable
6.Fit the paper to the proper position for each size.
L size and 2L size correspond to the line of L,
and PC size and A5 size correspond to the line
of PC.
L
PC
2.Release the open lever, and open
the front cover.
Insert position 1
Insert position 2
(Under the black paper guide)
11.Set the paper tray to the printer.
○
×
①
②
③
④
Paper tray (
*
)
*Items with the * mark may not be attached according to destination.
Printer Unit
Power cord (
*
)
Paper holder
Attatchment
illustration
(*)
CD (
*
)
♦Printer driver
♦User’s manual
L spacer
Screw
Manuals (
*
)
♦For Safe Operation
♦Start-up Guide
1. Check the package contents