PROGRAM RATING TV-PG LTD1510 15" LCD/DVD COMBO
Table of Contents Table of Contents -------------------------------------------------------------------------- 2 Safety Instructions ------------------------------------------------------------------------ 3 Features ----------------------------------------------------------------------------------------- 4 Disc Information ---------------------------------------------------------------------------- 5 Front View -------------------------------------------------------------------------------------- 6 Rear an
Important Safety Instructions The lightning flash with arrowhead symbol, within an equilateral triangle, is intended to alert the user to the presence of un-insulated “dangerous voltage” within the product’s enclosure that may be of sufficient magnitude to constitute a risk of electric shock. The exclamation point within an equilateral triangle is intended to alert the user to the presence of important operating and maintenance (servicing) instructions in the literature accompanying the appliance.
Safety Instructions NOTES: 1. 2. 3. 4. 5. 6. 7. 8. 9. 10. 11. 12. 13. 14. 15. Read these instructions. Keep these instructions. Heed all warnings. Follow all instructions. Do not use near water. Clean only with dry cloth. Do not block any ventilation openings. Maintain well ventilated conditions around the product. Do not put product on bed, sofa or anything that blocks ventilation. Install in accordance with the manufacturer’s instructions.
Features This product has incorporated a DVD player, BBE LCD display, TV receiver and computer By correcting the phase delay and distortion monitor. naturally generated by audio systems, BBE ensures that the sound that reaches your ears is as natural as the original recording. Television Features By enhancing the mid-range sound frequencies, High Resolution Adopts a MPEG2 decoding format to achieve more than 500 lines of resolution. BBE increases the presence and clarity of dialog and music tracks.
Disc Information Discs Formats Supported By This Player DISC LOGO CONTENTS SIZE MAXIMUM TIME 133min(SS-SL) DVD Audio+Video (active picture) 12cm 242min(SS-DL) 266min(DS-SL) 484min(DS-DL) Audio CD JPEG • Still high resolution 12cm 74min 12cm The operating method of some DVD discs is specified by the software maker. Please refer to the instruction manual of the disc.
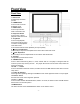
Front View Front View 1. LCD screen Presents high resolution pictures. 2. POWER button Press to enter or exit the STANDBY mode. 3. EJECT button Press to eject the disc while in the DVD mode. 4. Play/Pause button Press to start or pause playback under DVD mode. 5. Stop button Press to stop playback, then press the PLAY button to resume normal playback under DVD mode. Press the STOP button twice repeatedly to stop completely. 6.
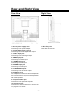
Rear and Right View Rear View Right View 1. DC 12V power supply Jack Connecting to the power adapter. 2. Coaxial digital audio out jack Connecting for coaxial digital audio output. 3. S-Video input jack Connecting for S-Video signal input. 4. VIDEO input jack Connecting for VIDEO input. 5. L-AUDIO input jack Connecting for audio input. 6. R-AUDIO input jack Connecting for audio input. 7. PC AUDIO INPUT jack Connecting to the PC audio output. 8. Headphone jack For headphone connection.
Remote Control Remote Control Drawing 5. MENU button Press to access the disc menu during DVD playback. 6. +10 button Select track number greater than 9, in DVD mode. 7. GOTO button Press to access or exit from the search menu under DVD mode. 8. SCREEN SETUP button Press to access to LCD functional setup menu. 9. direction buttons Press to select menu items or settings. Under TV mode, use the , buttons to advance to the next channel or to go back to the preceding channel. 10.
Remote Control 15. CLEAR button Press to clear incorrect input under DVD programming status. 16. REPEAT button Press to repeat a chapter, track, title, or all content under DVD mode. 17. A-B Repeat Press to mark a segment to repeat between A and B. 18. Previous Skip Press once to go to the beginning of the current chapter/track, press twice repeatedly to skip to the previous chapter/track for some discs under DVD mode. 19. Next Skip Press to skip to the next chapter/track for some discs under DVD mode.
Remote Control Preparation Of Remote Control Using Of Remote Control Insert the battery while observing the correct (+) Point the remote control unit from no more than and (-) polarities. about 7m from the remote control sensor and within about 60 degrees of the front of the unit. 1. Refer to the drawing; take off the empty battery receptacle. 2. A separating film was applied to the battery The operating distance may vary depending to the brightness around. for shipment. Remove this film. 3.
Connecting Other Equipment • Do not connect the power cord until all other connections have been made. • Each time you start the unit, it will begin from the last playback function that was used. Connecting to Another Audio/Video Source • Use the supplied audio/video cable to connect the unit and the external AV signal input source. • • For Digital sound, connect a Digital Coax cable to the jack marked "COAXIAL OUT" to the "COAXIAL IN" jack on a digital amplifier.
Connecting Other Equipment Connecting to TV Signal Input Plug the TV signal cable to the jack marked with ANT INPUT on the rear panel of the unit. connecting, press the SOURCE button to shift to TV mode. After Connecting to a Personal Computer The unit can be used as a display screen, when connecting to a personal computer. Connect the unit and the computer via the VGA jack. Use an audio cable to connect the Audio input jack on the rear panel of the unit to the audio output of the computer.
Connecting Other Equipment Connecting to Power Adapter Power is supplied through the provided appropriative power adapter, one end of which is connected to the DC 12V IN jack on the rear panel, another to wall outlet with AC100-240V. Connecting to Headphone Plug the headphones to the jack on the rear panel of the unit. When headphones are connected to the unit, the internal speakers will mute.
Basic Operation Connect the antenna to the antenna jack on the unit rear panel. After connection, plug in the power supply. If the player is in standby mode, press the POWER button to turn on the power. Press the SOURCE button to select the TV mode. Press the ▼/▲ (direction buttons) on the remote control, or use the number buttons directly, to select the channel that you wish to view.
NOTE: The default password is 3308. This password will always be effective even after you change the PIN. When you input the password, the following menu will be displayed: V-CHIP SETTING ►V-CHIP TV RATING MPAA RATING CHANGE PIN ON In this menu, use the▼/▲ buttons to select items you want to set, press the OK button to exit from the menu. V-Chip Use the ▼/▲ button to select the V-CHIP, use the ►/◄ button to select ON or OFF.
MPAA Rating In the V-CHIP setting menu, use the ▼/▲ button to select the MPAA RATING, press the ► button to enter and the following menu will be displayed: G PG PG13 R NC17 X MPAA RATING U U U U U U : PREVIOUS : CHANGE : NEXT : EXIT Use the ▼/▲ button to select items, and then press the ► button to change the settings, press the ◄ button to return to the V-CHIP SETTING menu.
Press the SCREEN SETUP button once on remote control to enter picture setup menu, the following menu will be displayed: PICTURE ►BRIGHT CONTRAST SATURATION HUE SHARPNESS 050 050 070 050 000 Use the ▼/▲ buttons to move cursor to the item you want to set (Bright, Contrast, Saturation, Hue and Sharpness). Use the ►/◄ buttons to select the desired values. Press the OK button on the remote control to exit from the setup menu.
or OFF. When ON, the player will automatically fine tune the frequency. Skip Use the▼/▲ buttons to select SKIP, press the ►/◄ buttons to select ON or OFF. When ON, it will skip the current channel, when using the ▼/▲ buttons to select channel under normal playback status. When select OFF, it will play the channels in sequence when selecting under normal playback status. TV MODE Use the ▼/▲ button to select TV MODE, press the ►/◄ buttons to select AIR or CABLE.
AUX Function AUX Function The player has some other AUX functions. You can enjoy programs from external input sources by pressing the SOURCE button on the remote control. Change to AUX mode after connecting to an AV signal such as a VCR, camcorder, game system, etc.
S-Video Function S-Video Function The player has S-VIDEO functions. You can enjoy programs from external S-VIDEO input sources. After connecting to the external S-Video input source, press the SOURCE button on the remote control to change to S-VIDEO mode.
Computer Screen Function You can use the unit’s TFT LCD as your computer’s monitor. Access the computer setup menu and take the steps shown as below: 1. Turn OFF the power of the unit and the computer. Connect the unit to the computer VGA jack with a VGA cable (not included). 2. Turn ON the power of this unit and the computer. If the unit is in standby mode, press the POWER button to switch ON. 3.
Disc Playback Preparation:After all connections have been made, turn ON the unit and select the relevant video input. Disc Loading Steps: 1. Press the POWER button on the front panel of the unit. The player will search for a disc and play it automatically. 2. Handle the disc with the printed side facing outward vertically from the disc tray. (Referring to the below picture.) 3. Put the disc slightly into the disc tray 4. The disc will be taken automatically into the tray.
Disc Playback Language (Audio) There can be up to 8 audio languages on a DVD disc. When you play a multi-language DVD disc you can use the AUDIO button on the remote control to select a language. Subtitle The DVD player can support multiple kinds of subtitles. When you play a multi-subtitle disc you can use the SUBTITLE button to select different subtitles. Various Camera Angles The movies on some DVDs have been recorded from various camera positions.
Disc Playback Picture Rotation This can be used only when the picture is normally displayed. Once another picture is selected, rotation will be cancelled automatically. There are four kinds of rotational modes. You can use the direction buttons to select them. Picture Zoom The ZOOM button is used to turn on/off the zoom function and the move function. When this function is turned on, use the buttons to control zoom proportion and the TV screen will display the relevant proportion.
Playback Functions Stop selecting the Title or Chapter, use number Press this button once to stop playback and buttons to input desired title or chapter. then press PLAY button to resume it. Press NOTE: the button twice to stop playback completely. Some DVD discs do not support the Search function. Pause Press the PAUSE button to pause playback. Press the PLAY button to resume playback.
Playback Functions Programming Chapters / Tracks CD: Insert the CD and press the PROGRAM You can store up to 20 chapters of a DVD (or button. The screen shows: 20 tracks of a CD) in an individually programmed order. Please proceed accordingly: DVD: Insert the DVD and press the PROGRAM button. The screen shows: Now input the desired track number. Again please use the +10 button for two-digit inputs. Repeat this procedure until all desired audio tracks are stored.
Playback Functions Switching On and Off, Stand-by Connect the main cord to a wall outlet with a Playback will start automatically and most voltage corresponding to the specifications on discs will display a menu. You can control this the rear panel of the unit. menu with the direction buttons. Select the desired option and press the OK Press the POWER button on the front panel to button to activate. To determine what content a switch on the unit.
System Setup DVD Setup Menu General Setup Page Please read this section to select the important The General Setup is shown as follows: settings for corresponding the DVD, TV and other additional audio equipment. 1. Remove the disc from the DVD drive and press the ‘DVDSETUP’ button on the remote control, the settings menu will appear. It includes General Setup, Speaker Setup, Dolby Digital Setup, Video Setup, and Preference. 2.
System Setup OSD Lang Please select preferred language for the OSD menus. SPDIF Output This item is used to set the format of digital audio. ‘SPDIF Off’ turns off the digital audio; ‘SPDIF/RAW’ outputs the original. For example, if the disc being played is Dolby Digital, then the digital audio output is also Dolby Digital. Select ‘SPDIF/PCM’ when you connect with a 2 channel digital stereo amplifier. Captions You can choose captions ON or OFF on screen during playback.
System Setup Sharpness This menu allows the settings for the sharpness of the picture: high, medium or low. Brightness If you activate this function you can set the brightness of the picture using the / buttons. Press the OK to return to the setup. Contrast If you activate this function you can set the contrast of the picture using the / buttons. Press the OK to return to the setup.
System Setup Screen Setup Menu After connecting the unit, there are other preferences you can set. Turn the POWER ON and press the SOURCE button on the remote or front panel and select DVD mode. Picture Parameter Setup Press the SCREEN SETUP on the remote and the screen will display the following: PICTURE ►BRIGHT CONTRAST AUTO PHASE CLOCK H.POSITION V.POSITION 055 050 000 100 050 027 Press the ▼/▲ button to highlight Bright, press the ►/◄ button to adjust the desired value.
Placement of the Unit When first using the player, please take following steps to place it: 1. Turn over the player with its chassis up, put it on a soft and smooth surface. Pos A 2. With one hand hold the player, the other hand tilt the set stand downwards about its axis. The unit will revolve about 90 degree (position C) at which point you will hear a click. Set the stand vertically with the LCD screen. Pos B 3.
Troubleshooting SYMPTOM CHECK ITEM The player cannot play. Make sure disc is loaded in. Make sure disc is correctly loaded. Make sure disc is not dirty or warped. Make sure the DVD disc region code is 1. Make sure water condensation has not occurred. If it occurs, take out disc and leave the player on for at least one hour. There is no sound. Make sure system connection is correct. Make sure the power of speakers is turned on. Make sure the sound setup of DVD disc is correct.
Specifications TFT-LCD Screen Size 15 Inches Laser Wavelength Wavelength: 780/650nm Digital Audio Out Out Level: 0.5Vp-p, Load: 75Ω AC100V~ 240V, 50/60Hz Power DC +12V Power Consumption <48W Dimension 422 mm x374 mm×102mm Weight About 6.5 kgs DESIGN AND SPECIFICATIONS ARE SUBJECT TO CHANGE WITHOUT NOTICE Manufactured under license from Dolby Laboratories. “Dolby” and the double-D symbol are trademarks of Dolby Laboratories. Confidential unpublished works. © 1992 -1997 Dolby Laboratories.
CITIZEN WARRANTY Consumer Electronics Products Thank you for choosing Citizen! Citizen Electronics gives the following express warranty to the original consumer purchaser or gift recipient for this Citizen brand product, when shipped in its original container and sold or distributed in Canada by Citizen Electronics or by an Authorized Citizen Dealer: Citizen Electronics warrants that this product is free, under normal use and maintenance, from any defects in material and workmanship.