
Operation Manual


© 2010
OPERATION
Check mains for correct voltage as indicated near to the IEC mains inlet on the rear panel.
Connect to mains supply using the IEC cable provided.
Connect the Main unbalanced RCA and/or balanced XLR outputs to the main PA and
ensure that the volume levels are turned down to avoid damage.
Connect the BOOTH outputs to powered booth monitors or separate PA zone.
Connect any turntables to the RCA PHONO inputs on ch.1 and ch.2.
Earth turntables to the case grounding point on the rear panel
Connect CD players or other line output sources to the CD inputs.
Connect CD, CD+G, laptop, TV decoder, DVD or MP3 players to LINE inputs.
Connect DJ mic and Vocal mics 1 + 2 to the top panel jack/XLR combo sockets
If required, connect personal MP3 player to top panel 3.5mm input
Connect headphones to the HEADPHONE jack
With MASTER LEVEL down, switch the power on.
Ensure microphone levels are turned down
Gradually increase MASTER LEVEL and channel levels to check input signals.
Be aware that the CROSSFADER also operates across assigned channels - this can be
bypassed by pressing DEFEAT.
To use crossfader, select channels using the ASSIGN levers, ensure DEFEAT is off and the
crossfader will then seamlessly blend between these 2 channels.
Gradually increase microphone channel levels to check microphone signals.
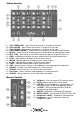
Monitor each stereo channel via headphones selecting using the CUE switches
Whilst a channel is on CUE, adjust the GAIN so that LED meters show a full signal without
showing “in the red” (overload)
Adjust Hi, Mid and Lo EQ settings to the desired tonal effect
When using the DJ mic, push the ON AIR switch and if required, push MANUAL
OVERRIDE to drop the music level by a fixed amount whilst talking.
Adjust Hi and Lo EQ and DJ MIC level settings to suit.
For singers and karaoke, increase the levels of Vocal mics 1 + 2 and adjust Hi and Lo EQ
settings to suit.
For each vocal mic, adjust DELAY level to the desired amount, variation in the time between
delay repeats can be adjusted via the TIME rotary.
Should a different effect (eg. Reverb, compression, DSP) be required, connecting SEND on
the rear panel to an external processor’s input and the processor’s output(s) to the rear
panel RETURNS will serve as an effects loop, overriding the internal delay effect. The
DELAY controls will now act as an external effects mix.
When not being used, turn down the Vocal mic levels to avoid unwanted noise.