
Instruction manual


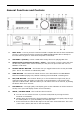


9. TAP BUTTON - This button is used for manual BPM. When in manual BPM mode, tap this
button to the beat of the current track.
10. PITCH SLIDER - This slider is used to adjust the playback pitch percentage. Move the
slider down to speed up the music and move the slider up to slow the music down.
11. PITCH BEND BUTTONS – The speed rises while the “+button” is pressed and returns to
the original pitch when the button is released. The speed drops when the “–button” is
pressed and returns to the original pitch when the button is released. These buttons can
be used to synchronise the beats of 2 tracks.
12. PITCH (KEY) LOCK BUTTON - This button turns on or turns off the PITCH LOCK
function. This function allows you to use the PITCH SLIDER to speed up or slow down
playback speed without altering the tonal pitch of the track.
13. PITCH RANGE BUTTON - Press the button to choose pitch percentage adjustment.
±4%, ±8%, ±16%, and ±100%. (Note: 100% does not work with MP3 music)
14. SEARCH BUTTONS – These search buttons allow you to quickly scan forwards and
backwards through the track. The search speed will actively change depending on how
long you hold down the button.
15. FOLDER BUTTON – Use the FOLDER button to switch between FOLDER and TRACK (see
search options above - 8. “TRACK KNOB” When the LED is lit the player is in FOLDER
search mode when it is not lit it is in TRACK search mode.
NOTE: Hold the FOLDER button down for 2 seconds to activate and REPEAT function
16. PLAY/PAUSE BUTTON – Pressing the PLAY/PAUSE button once will instantly start the
track. Pressing this button again will PAUSE the current track.
17. CUE BUTTON – Can be used in a number of ways:
a. Pressing the CUE button during playback immediately stops the current track and
returns the music to the last set cue point.
b. In pause mode pressing and holding the CUE button plays the track from the last
set CUE point. Releasing CUE button will return the track to the last set CUE point.
c. Pressing and holding the Cue will start the track. If PLAY/PAUSE button is pressed
during this time the track will continue to play when CUE button is released.
18. SEAMLESS LOOP BUTTONS:
a. IN BUTTON – Pressing the IN button sets a CUE POINT without music interruption.
This button is also used to set the starting point of a SEAMLESS LOOP.
b. OUT BUTTON - This button is used to set the ending point of a LOOP. A LOOP is
started by pressing the IN button to select the starting point and the OUT button to
set the LOOP ending point. The LOOP will continue to play until the OUT button is
pressed once again.
c. RELOOP BUTTON - If a SEAMLESS LOOP has been made, but the player is not
actively in SEAMLESS LOOP mode.
i. Pressing the RELOOP button will instantly reactivate the seamless loop
mode. To exit loop, press the OUT button. LOOP will appear in the LCD
display when the RELOOP function is available.
ii. You can fine tune the SEAMLESS LOOP by holding the RELOOP button and
using the jog wheel to set the exact OUT point.