Owner’s manual & Installation manual Mode d’emploi et manuel d’installation Manual de instrucciones y de instalación RADIO/DVD MULTIMEDIA CENTER WITH CeNET CONTROL CENTRE MULTIMÉDIA DVD/RADIO AVEC COMMANDE CeNET CENTRO DE MULTIMEDIA DE DVD/RADIO CON CONTROL CeNET Clarion Co., Ltd. All Rights Reserved.Copyright © 2006: Clarion Co., Ltd.
Fr.book 77 ページ 2005年12月27日 火曜日 午後9時16分 Nous vous remercions d’avoir acheté ce modèle Clarion VRX765VD. * * * * * Ce mode d’emploi et manuel d’installation concernent le modèle VRX765VD. Lisez tout le mode d’emploi et manuel d’installation avant de mettre l’appareil en service. Après avoir lu ce manuel, conservez-le dans un endroit pratique (par ex. dans la boîte à gants). Lisez le contenu de la carte de garantie jointe et conservez-la précieusement avec ce manuel.
Fr.book 78 ページ 2005年12月27日 火曜日 午後9時16分 1. CARACTERISTIQUES Français ■ Afficheur à cristaux liquides de 7 pouces grand écran entièrement assisté ■ Commande par écran tactile ■ Possibilité de lecture de DVD vidéo/CD-DA/ MP3/WMA/CD vidéo ■ Sortie RCA 6(+2) canaux (2-zone) ■ Amplificateur 50 W × 4 intégré ■ CeNET avec transmission de ligne audio équilibrée et annulation dynamique du bruit ■ Compatible CD-R/CD-RW/DVD-R/DVD-RW ■ Décodeur 5.
Fr.book 79 ページ 2005年12月27日 火曜日 午後9時16分 2. PRECAUTIONS AVERTISSEMENT Pour des raisons de sécurité, le conducteur ne doit pas regarder des DVD vidéo, le téléviseur ou le magnétoscope, ni actionner les commandes en conduisant. Notez que cela est interdit par la loi dans de nombreux pays. Par ailleurs, le volume doit également être réglé à un niveau qui permette de percevoir les sons extérieurs. 2. La conduite sur des routes mauvaises ou non carrossables peut entraîner des coupures du son.
ori.fm Page 5 Tuesday, December 27, 2005 2:42 AM [CONT.] [MENU] Names of Buttons Note: • Be sure to read this chapter while referring to the front diagrams for chapter “3.CONTROLS” on page 5 (unfold). [E], [e] buttons Español • Use these buttons to increase/decrease the volume. [p] button • Press this button to enter the play pause mode in the DVD PLAYER/iPod/changer modes. Press the button again to resume playback.
Fr.book 80 ページ 2005年12月27日 火曜日 午後9時16分 4. NOMENCLATURE DES TOUCHES Noms des touches Français Mode d’emploi Remarque : • Lisez attentivement ce chapitre en vous référant aux schémas de la façade illustrés au chapitre “3.COMMANDES”, page 5 (dépliante). Touche [iPod] Touches [E], [e] • Utilisez ces touches pour augmenter/diminuer le volume. • Appuyez sur cette touche pour afficher/ masquer le clavier tactile sur l’écran de menu du DVD vidéo/Video CD.
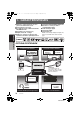
Fr.book 81 ページ 2005年12月27日 火曜日 午後9時16分 5. PRESENTATION DU FONCTIONNEMENT DES TOUCHES ET DES BOUTONS TACTILES Mise sous tension Français ∗2 (OPEN) Mode d’emploi Position Marche (ON) Moteur Lorsque l’écran à cristaux liquides est fermé ∗1 Lorsque l’écran à cristaux liquides est ouvert Vérification du système Le format CeNET utilisé pour cet appareil est doté d’une fonction de vérification du système.
Fr.book 82 ページ 2005年12月27日 火曜日 午後9時16分 Fonctionnement du mode TUNER (Menu Source) ∗3 Français (Clavier tactile) Mode d’emploi ∗4 (Écran de liste des présélections) ∗Saisissez la fréquence de votre choix. 1 0 7 9 ENT ∗5 ∗Sélectionnez la station de votre choix. (Écran de saisie de titre) Remarque : ∗1:La touche de commande correspond à la touche [ P ](OPEN) dans la description des modes de fonctionnement. ∗2:Les périphériques externes non raccordés via CeNET ne sont pas affichés.
Fr.book 83 ページ 2005年12月27日 火曜日 午後9時16分 Fonctionnement du mode DVD vidéo (Écran de mode DVD PLAYER)∗6 (Menu Source) Français ∗Écran en mode DVD lorsque le véhicule est marche. (Menu Option) Mode d’emploi (Menu DVD SETUP) Remarque : ∗6:Lors de l’affichage de films en mode DVD vidéo, il suffit d’effleurer la surface de l’écran pour appeler l’écran du mode DVD PLAYER.
Fr.book 84 ページ 2005年12月27日 火曜日 午後9時16分 Réglages des fonctions audio (A partir de n’importe quel écran) Lorsqu’un décodeur surround 5.1 canaux est connecté (Menu AUDIO) (Menu AUDIO EXT.
Fr.book 85 ページ 2005年12月27日 火曜日 (Menu AUDIO EXT.
Fr.book 86 ページ 2005年12月27日 火曜日 午後9時16分 Autres réglages du système (A partir de n’importe quel écran) (Menu de mode ADJUST) Français (Menu GENERAL) Mode d’emploi (Menu MONITOR) (CLOCK) (Écran CLOCK) (MONI ADJ) (Écran de réglage du moniteur) (heures, minutes, am./pm.) Bright Color Hue Dimmer ∗Appuyez plusieurs fois sur ce bouton pour passer d’un réglage à l’autre.
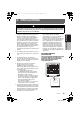
Fr.book 87 ページ 2005年12月27日 火曜日 午後9時16分 6. TELECOMMANDE Télécommande Emetteur de signal Rayon d’action: 30˚ dans toutes les directions [BAND] [MUTE] Français [SRC] [VOLUME] [P.TIME] [0-9] Mode d’emploi [DISC SEL] [ ],[ ] [SEARCH MODE] [MENU] [RTN] [TOP MENU] [SET UP] [ENT] [ ],[ ] [ISR] [2-ZONE] [RPT] [SCN] [PBC] [RDM] [AUDIO] [SLOW] [ANGLE] [SUB TITLE] Installation des piles 1. Retournez la télécommande à l’envers, puis poussez le couvercle arrière dans le sens de la flèche.
Fr.book 88 ページ 2005年12月27日 火曜日 午後9時16分 Fonctions des touches de la télécommande Vous pouvez utiliser la télécommande pour commander le VRX765VD. Lorsque la fonction 2-ZONE est activée, les commandes fonctionnement uniquement pour la zone sélectionnée. Modes partagés Touche [ENT] Touche [SRC] • Appuyez sur cette touche pour valider les données saisies à l’aide du clavier tactile. Français • Appuyez sur cette touche pour mettre l’appareil sous tension.
Fr.book 89 ページ 2005年12月27日 火曜日 午後9時16分 Fonctions des touches de la télécommande Touches [r], [f] • Appuyez sur ces touches du clavier tactile pour entrer les chapitres/titres du DVD vidéo. • Appuyez sur ces touches pour sélectionner le numéro de plage/dossier du CD, du Video CD ou du fichier MP3/WMA. • En mode DVD vidéo, appuyez sur ces touches pour sélectionner le numéro de chapitre précédent ou suivant.
Fr.book 90 ページ 2005年12月27日 火曜日 午後9時16分 Fonctions des touches de la télécommande Mode iPod Touche [BAND] • Appuyez sur cette touche pour revenir à la première plage de la liste de lecture en cours. • Maintenez cette touche enfoncée pendant plus d’une seconde pour passer en mode de lecture de toutes les plages. Toutes les plages de la liste Song sont alors lues. Touche [6] Français • Appuyez sur cette touche pour lire le support sélectionné ou interrompre la lecture.
Fr.book 91 ページ 2005年12月27日 火曜日 午後9時16分 Fonctions des touches de la télécommande Lorsque la zone SUB est sélectionnée Le fonctionnement en zone SUB est pris en charge, avec toutefois les limitations suivantes au niveau des fonctions des touches : Modes partagés Touches [VOLUME] Français • Commande le volume pour la source de la zone MAIN. Touche [MUTE] • Commande la fonction de coupure du son pour la source de la zone MAIN. Mode d’emploi Touche [ISR] Non prise en charge.
Fr.book 92 ページ 2005年12月27日 火曜日 午後9時16分 7. CLAVIER DE COMMANDE AMOVIBLE (DCP) Le clavier de commande peut être détaché de l’unité pour éviter tout vol. Lorsque vous le retirez, rangez-le dans le boîtier prévu à cet effet pour éviter qu’il ne se raye. Français Nous vous recommandons d’emporter le clavier de commande amovible avec vous quand vous quittez votre voiture. Retrait du CLAVIER DE COMMANDE AMOVIBLE (DCP) Mode d’emploi 1.
Fr.book 93 ページ 2005年12月27日 火曜日 午後9時16分 8. PRECAUTIONS DE MANIEMENT Panneau d’affichage à cristaux liquides/Généralités Pour garantir une durée de vie optimale de votre appareil, lisez attentivement les précautions suivantes. Nettoyage • Nettoyage du boîtier Enlevez délicatement la saleté à l’aide d’un chiffon doux et sec. Pour les endroits très sales, imprégnez légèrement un chiffon doux de détergent neutre dilué dans l’eau, frottez doucement la saleté, puis essuyez à l’aide d’un chiffon sec.
Fr.book 94 ページ 2005年12月27日 火曜日 午後9時16分 Manipulation des disques Manipulation Rangement • Les disques neufs peuvent présenter certaines aspérités sur les bords. Avec ces disques, il se peut que l’appareil ne fonctionne pas ou que le son soit discontinu. A l’aide d’un stylo-bille ou d’un autre objet similaire, supprimez les aspérités sur le pourtour du disque. • N’exposez les disques ni aux rayons du soleil, ni à une aucune source de chaleur.
Fr.book 95 ページ 2005年12月27日 火曜日 午後9時16分 9. SYSTEME DE DVD VIDEO Un DVD vidéo est une source vidéo numérique haute qualité qui diffuse des images claires et nettes. Un disque de 12 cm est capable de contenir un film entier ou quatre heures de musique. Caractéristiques du DVD Vidéo Cet appareil offre, outre une qualité d’image et de son de DVD vidéo exceptionnelle, les fonctions suivantes. Un DVD vidéo peut enregistrer jusqu’à 8 langues pour un seul film.
Fr.book 96 ページ 2005年12月27日 火曜日 午後9時16分 Disques Disques compatibles Disques incompatibles Ce lecteur de DVD vidéo peut lire les disques suivants. Ce lecteur de DVD vidéo ne peut pas lire les disques DVD-Audio, DVD-RAM, CD de photos, etc. Disque qui peut être lu Français DVD vidéo CD vidéo CD TEXT CD audio MP3 ID3 TAG WMA A propos des disques CD Extra Mode d’emploi Un disque CD Extra comprend deux sessions d’enregistrement.
Fr.book 97 ページ 2005年12月27日 火曜日 午後9時16分 10.FONCTIONNEMENT Fonctionnement de base Remarque : Lisez attentivement ce chapitre en vous référant au chapitre “3. COMMANDES”, à la page 5. ATTENTION PRÉCAUTION Remarque : • Démarrez le moteur avant d’utiliser l’appareil. • Veillez à ne pas utiliser cet appareil pendant une période prolongée alors que le moteur est à l’arrêt.
Fr.book 98 ページ 2005年12月27日 火曜日 午後9時16分 Fonctionnement de base Mise en sourdine 1. En mode TUNER, Radio Satellite, VISUAL ou TV, appuyez sur la touche [p] pour activer/désactiver la fonction de sourdine. En mode DVD PLAYER, iPod ou changeur, activez la fonction de sourdine en maintenant la touche [p] enfoncée pendant plus d’une seconde. 70˚ * Lorsque la sourdine est activée, l’indication “MUTE” apparaît en bas à gauche de l’écran.
Fr.book 99 ページ 2005年12月27日 火曜日 午後9時16分 Fonctionnement de base Réglage de l’angle de l’écran à cristaux liquides Si la façon dont l’écran à cristaux liquides est monté gêne le fonctionnement du climatiseur, vous pouvez le mettre temporairement à l’horizontale. 1. Maintenez la touche [P] (OPEN) enfoncée pendant plus de 2 secondes lorsque l’écran à cristaux liquides est ouvert. Un bip retentit et l’écran à cristaux liquides se place à l’horizontale.
Fr.book 100 ページ 2005年12月27日 火曜日 午後9時16分 Fonctionnement de base Réglage de balance/équilibre avantarrière Réglage des fréquences moyennes (MID) 2-1. Appuyez sur le bouton []] de l’élément BAL/ FAD. Le gain du medium, la fréquence moyenne (fréquence centrale), le quotient du medium (Q) peuvent être réglés comme suit. 3-1. Appuyez sur le bouton [{] ou [}] pour régler le niveau d’équilibre. * Le réglage par défaut est “0” (plage de réglage : 12 à l’avant à 12 à l’arrière).
Fr.book 101 ページ 2005年12月27日 火曜日 午後9時16分 Fonctionnement de base Mise en/hors service de MAGNA BASS EXTEND L’effet MAGNA BASS EXTEND ne règle pas la plage des sons graves comme une fonction de réglage sonore ordinaire, mais elle accentue la plage des graves profonds afin de procurer un son dynamique. 2-1. Appuyez sur le bouton [C] pour afficher l’écran de menu suivant. 1. Appuyez sur la touche [ADJ], puis sur le bouton tactile [MONITOR]. 2-2.
Fr.book 102 ページ 2005年12月27日 火曜日 午後9時16分 Fonctionnement de base Affichage d’avertissement lors du branchement d’une caméra CCD Verrouillage du moniteur avant 2-1. Appuyez sur le bouton [ON] ou [OFF] de l'élément CAMERA WARNING pour activer ou désactiver cette fonction (le réglage par défaut est “ON”). Lorsqu’un périphérique externe est raccordé à la borne VISUAL, verrouillez le moniteur avant pour afficher la source d’entrée visuelle. 1.
Fr.book 103 ページ 2005年12月27日 火曜日 午後9時16分 Fonctionnement de base Réglage du bip sonore (BEEP) Un “bip” retentit à chaque opération effectuée sur l’appareil. Il est cependant possible de désactiver ce bip sonore. * Le réglage par défaut est “BEEP ON”. 2-1. Appuyez sur le bouton [ON] ou [OFF] de l’élément BEEP pour activer ou désactiver la fonction. Effectuez les réglages suivants lorsqu’un périphérique externe est raccordé à la borne Visual.
Fr.book 104 ページ 2005年12月27日 火曜日 午後9時16分 Fonctionnement de base Fonction 2-ZONE Réglage de la fonction 2-ZONE * Le réglage par défaut est “OFF”. A propos de la fonction 2-ZONE Français Mode d’emploi La fonction 2-ZONE envoie des sons/images séparés de la zone MAIN et de la zone SUB (ainsi que du moniteur arrière en option) en lisant simultanément deux sources de l’unité centrale. Ainsi, plusieurs auditeurs peuvent écouter/voir des sources audio/vidéo différentes.
Fr.book 105 ページ 2005年12月27日 火曜日 午後9時16分 Fonctionnement de base Image et son du moniteur selon l’activation ou la désactivation de la fonction 2-ZONE ●Fonction 2-ZONE désactivée Verrouillage du moniteur avant activé Verrouillage du moniteur avant désactivé Connexion visuelle [OTHER] (*1) Connexion visuelle [NAVI] (*1) Image avant (écran à cristaux liquides) Affiche l’image du périphérique raccordé à la borne VISUAL. (*3) Affiche l’image du périphérique raccordé à la borne VISUAL.
Fr.book 106 ページ 2005年12月27日 火曜日 午後9時16分 Fonctionnement de la radio Ecoute de la radio 1. Appuyez sur la touche [SRC], puis sur le bouton tactile [TUNER]. L’écran du mode TUNER s’affiche. Français Mode d’emploi 2. Appuyez sur la touche [BAND] ou sur le bouton tactile [Band] pour sélectionner une fréquence radio. Chaque pression modifie la gamme de réception comme suit : FM1 ➜ FM2 ➜ FM3 ➜ AM ➜ FM1... 3. Appuyez sur la touche [R] ou [F] pour syntoniser la station présélectionnée précédente ou suivante.
Fr.book 107 ページ 2005年12月27日 火曜日 午後9時16分 Fonctionnement de la radio Rappel d’une station présélectionnée * Vous pouvez sélectionner la fréquence de votre choix en appuyant sur le bouton tactile [Band]. * Maintenez le bouton de présélection de votre choix enfoncé pendant plus de 2 secondes pour placer la station actuelle dans la mémoire de présélection. 3. Appuyez sur le bouton tactile [List] pour revenir à l’écran précédent. Mémoire manuelle 1.
Fr.book 108 ページ 2005年12月27日 火曜日 午後9時16分 Fonctionnement du lecteur DVD vidéo Changement des réglages du système DVD Remarque : • Si l’installation est effectuée au milieu de la lecture d’un DVD vidéo, la lecture reprend depuis le début. • Vous ne pouvez pas effectuer les réglages du menu DVD SETUP avec la télécommande. Réglage de la taille de l’écran Réglez la taille de l’écran en fonction du moniteur de visualisation arrière raccordé à cet appareil. 4-1.
Fr.book 109 ページ 2005年12月27日 火曜日 午後9時16分 Fonctionnement du lecteur DVD vidéo Réglage de l’affichage de la marque d’angle Vous pouvez faire en sorte que la marque d’angle apparaisse sur les scènes pour lesquelles les angles peuvent être modifiés. 4-1. Appuyez sur le bouton [ON] ou [OFF] de l’élément ANGLE pour “activer” ou “désactiver” la fonction Angle. * Le réglage par défaut est “OFF”. Réglage du code du pays pour régler le niveau de contrôle parental. 4-1.
Fr.book 110 ページ 2005年12月27日 火曜日 午後9時16分 Fonctionnement du lecteur DVD vidéo 4-3. Appuyez sur le bouton [[] ou []] pour sélectionner un niveau de 1 à 8, ou 0 (pas de contrôle). * Le réglage par défaut est “8”. La relation entre les codes de catégorie des DVD vidéo et le niveau de contrôle parental est présentée dans le tableau ci-dessous. Utilisez-le tableau pour régler le niveau de contrôle parental.
Fr.book 111 ページ 2005年12月27日 火曜日 午後9時16分 Fonctionnement du lecteur DVD vidéo Fonctionnement du DVD vidéo Visionnage d’un DVD vidéo L’écran du mode DVD PLAYER permet de contrôler le mode lecture depuis l’écran. 1. Appuyez sur l’écran tactile. L’écran du mode DVD PLAYER s’affiche. Si vous ne touchez pas l’écran pendant au moins 7 secondes, l’affichage revient sur l’écran de lecture.
Fr.book 112 ページ 2005年12月27日 火曜日 午後9時16分 Fonctionnement du lecteur DVD vidéo Commutation de la position du clavier tactile Lorsque le clavier tactile est mal positionné au niveau du menu, vous pouvez le déplacer de l’autre côté de l’écran. Touches fléchées Lecture au ralenti Français 1. Appuyez sur la touche [p] ou sur le bouton tactile [p], puis maintenez la touche [F] enfoncée. Tant que vous ne relâchez pas la touche, la lecture continue à 1/3 de la vitesse de lecture normale.
Fr.book 113 ページ 2005年12月27日 火曜日 午後9時16分 Fonctionnement du lecteur DVD vidéo Recherche par numéro de chapitre/ titre Cette fonction permet de balayer et de lire les 10 premières secondes de tous les chapitres enregistrés sur le DVD vidéo. 1. Sur l’écran du mode DVD PLAYER, appuyez sur le bouton [Option]. 2. Appuyez sur le bouton [CHAPTER SCAN], puis sur le bouton [Back]. Le message “C.SCN” s'affiche.
Fr.book 114 ページ 2005年12月27日 火曜日 午後9時16分 Fonctionnement du lecteur DVD vidéo Français Mode d’emploi Commutation des langues Commutation des angles Sur les disques où deux langues audio ou plus sont enregistrées, vous pouvez commuter la langue en cours de lecture. 1. Sur l’écran du mode DVD PLAYER, appuyez sur le bouton [Option]. 2. Appuyez sur le bouton tactile [Audio] pendant la lecture. • Chaque pression sur le bouton permet de changer la langue audio.
Fr.book 115 ページ 2005年12月27日 火曜日 午後9時16分 Fonctionnement du lecteur DVD vidéo Visionnage d’un Video CD Affichage du menu V-CD (pour les Video CD avec fonction PBC) 1. Appuyez sur la touche [p], puis maintenez la touche [F] enfoncée. Tant que la touche reste enfoncée, la lecture continue à 1/3 de la vitesse de lecture normale. • La lecture au ralenti ne peut pas s’effectuer vers l’arrière. De plus, aucun son n’est émis pendant la lecture au ralenti. Saut de plage (recherche) 1.
Fr.book 116 ページ 2005年12月27日 火曜日 午後9時16分 Fonctionnement du lecteur DVD vidéo Recherche par numéro de plage Français Cette opération permet de rechercher des plages enregistrées sur le Video CD à partir de leur numéro. 1. Appuyez sur l’écran tactile pour afficher le mode VIDEO CD. 2. Appuyez sur le bouton tactile [Search]. 3. Entrez le numéro de la plage que vous souhaitez lire à l’aide des boutons [0] à [9]. 4. Appuyez sur le bouton [ENT].
Fr.book 117 ページ 2005年12月27日 火曜日 午後9時16分 Fonctionnement du lecteur DVD vidéo Saut de plage (recherche) Sélection d’une plage sur l’écran de la liste des plages Cette fonction vous permet de sélectionner des plages à partir d’une liste qui s’affiche. 1. Appuyez sur le bouton tactile [List]. L’écran de la liste des plages s’affiche. 2. Si la plage que vous recherchez ne s’affiche pas, appuyez sur le bouton tactile [v] ou [V] pour faire défiler la liste des plages. 3.
Fr.book 118 ページ 2005年12月27日 火曜日 午後9時16分 Fonctionnement du lecteur DVD vidéo Affichage des titres de CD Cet appareil peut afficher les titres des CD compatibles CD-text. 1. Appuyez sur le bouton tactile [Title]. 2. Appuyez sur le bouton tactile [X] de l’élément Disc, Artist ou Track pour faire défiler l’écran correspondant. Ecoute de fichiers MP3/WMA Français Mode d’emploi Cet appareil est compatible avec les étiquettes ID3.
Fr.book 119 ページ 2005年12月27日 火曜日 午後9時16分 Fonctionnement du lecteur DVD vidéo A propos de la création de dossiers MP3/WMA Vous pouvez créer une arborescence jusqu'à 8 niveaux de dossiers (répertoire racine inclus) pour les fichiers MP3/WMA (éléments 1 – sur l'illustration). Cependant, avec cet appareil, les dossiers créés au-delà du troisième niveau seront convertis en deux niveaux. 1 1 3 Saut du dossier en cours 1. Appuyez sur la touche [BAND] pendant la lecture.
Fr.book 120 ページ 2005年12月27日 火曜日 午後9時16分 Fonctionnement du lecteur DVD vidéo Lecture par sélection d’un dossier et d’une plage (mode de sélection directe) Français Mode d’emploi Cette opération permet de rechercher un dossier et une plage enregistrés sur le disque MP3/WMA à partir de leur numéro. 1. Appuyez sur le bouton tactile [Search]. Le clavier tactile apparaît en mode de saisie du numéro de plage.
Fr.book 121 ページ 2005年12月27日 火曜日 午後9時16分 Autres fonctions Saisie de titres Vous pouvez stocker dans la mémoire des titres contenant jusqu’à 10 caractères pour les stations de radio, les chaînes de télévision, les CD lus par le lecteur et par le changeur. Les nombres de titres pouvant être entrés pour chaque mode sont indiqués ci-dessous.
Fr.book 122 ページ 2005年12月27日 火曜日 午後9時16分 Autres fonctions Changement de la taille d’affichage du moniteur Fonction d’annulation de l’amplificateur interne * Cette fonction n’est pas disponible lorsque l’écran est fermé. Remarque : • Cette fonction n’est pas disponible lorsque vous conduisez. • Sélectionnez le mode approprié entre DVD PLAYER (DVD vidéo ou CD vidéo)/VISUAL/ changeur de DVD/TV. Cette fonction permet de désactiver l’amplificateur interne lorsqu’un amplificateur externe est connecté.
Fr.book 123 ページ 2005年12月27日 火曜日 午後9時16分 11.FONCTIONNEMENT DES ACCESSOIRES Fonctionnement de l’iPod Remarques à propos de l’utilisation de l’iPod Apple • Pour utiliser un iPod, une fois celui-ci raccordé au connecteur, sélectionnez le mode iPod en appuyant sur la touche [iPod] ou sur le bouton tactile [iPod] du menu Source. • Lorsque l’iPod est raccordé à cet appareil, les touches de commande de l’iPod sont désactivées. • En mode iPod, un écran de commande iPod spécial apparaît.
Fr.book 124 ページ 2005年12月27日 火曜日 午後9時16分 Fonctionnement de l’iPod Français Mode d’emploi Bouton [Shuffle] • Permet de passer d’un mode de lecture aléatoire à un autre dans l’ordre suivant : ➜ Lecture aléatoire d’une chanson ➜ Lecture aléatoire d’un album ➜ Lecture aléatoire désactivée. La lecture aléatoire est désactivée par défaut. Lorsqu’elle est activée, cette fonction permet de lire des plages dans un ordre aléatoire, indépendamment de leur ordre d’enregistrement.
Fr.book 125 ページ 2005年12月27日 火曜日 午後9時16分 Fonctionnement de l’iPod Saut de plage (recherche) Avance et retour rapide 1. Maintenez la touche [R] ou [F] enfoncée pendant la lecture. La vitesse de lecture est multipliée par 5, puis par 20 au bout de 3 secondes. Relâchez la touche pour revenir à la vitesse de lecture normale. Fonction TOP La fonction TOP réinitialise la lecture à la première plage. 1. Appuyez sur la touche [BAND] pour lire la première plage de la liste en cours.
Fr.book 126 ページ 2005年12月27日 火曜日 午後9時16分 Opérations visuelles (VISUAL) Cette fonction est disponible lorsqu’un magnétoscope, etc., est raccordé à la borne Visual. AVERTISSEMENT Pour des raisons de sécurité, le conducteur ne doit pas regarder le magnétoscope, etc., ni actionner les commandes en conduisant. Notez que cela est interdit par la loi dans de nombreux pays.
Fr.book 127 ページ 2005年12月27日 火曜日 午後9時16分 Fonctionnement du changeur de CD Passage au disque suivant (fonction Disc Up) Autres fonctions de lecture 1. Appuyez sur le bouton tactile [Option]. La fonction Disc Up permet de commencer la lecture à partir de la première plage (plage 1) du disque suivant. 1. Appuyez sur la touche [BAND]. Le changeur passe au disque suivant. Recherche par numéro de plage Saut de plage (recherche) * Cette fonction est disponible uniquement pour le disque en cours. 1.
Fr.book 128 ページ 2005年12月27日 火曜日 午後9時16分 Fonctionnement du changeur de DVD Français Seules les fonctions de base du changeur de DVD sont accessibles à partir de cet appareil. Utilisez la télécommande pour effectuer les fonctions suivantes.
Fr.book 129 ページ 2005年12月27日 火曜日 午後9時16分 Fonctionnement du téléviseur Sélection par numéro de canal Syntonisation manuelle * Si l’indication “MANU” n’apparaît pas à l’écran, maintenez la touche [BAND] enfoncée pendant plus d’une seconde. “MANU” s’affiche et la syntonisation manuelle est alors possible. 2. Syntonisez une station. Syntonisation rapide : Maintenez la touche tactile [X] ou [x] enfoncée plus d’une seconde pour syntoniser une station.
Fr.book 130 ページ 2005年12月27日 火曜日 午後9時16分 Fonctionnement du téléviseur Mémorisation automatique Français Mode d’emploi Cette fonction permet de sélectionner automatiquement 6 stations TV et de les enregistrer dans une mémoire de présélection. S’il n’est pas possible de recevoir correctement 6 stations, les stations déjà mémorisées sont conservées et seules les stations émettant un signal puissant sont mémorisées. 1. Appuyez sur le bouton [Band] pour sélectionner la bande TV souhaitée (TV1 ou TV2). 2.
Fr.book 131 ページ 2005年12月27日 火曜日 午後9時16分 Fonctionnement de la radio satellite Cette fonction est disponible lorsqu’un récepteur de radio satellite est raccordé via le câble CeNET.
Fr.book 132 ページ 2005年12月27日 火曜日 午後9時16分 Fonctionnement de la radio satellite Sélection des canaux Utilisez la touche [R] ou [F] pour sélectionner les canaux. * Pour de plus amples détails, reportez-vous aux descriptions des opérations suivantes. Remarque : • Pendant la sélection des canaux, la sortie audio est coupée et la commande des touches est verrouillée. Français Sélection d’une station par numéro de canal Mode d’emploi 1. Appuyez sur le bouton tactile [Search]. 2.
Fr.book 133 ページ 2005年12月27日 火曜日 午後9時16分 Fonctionnement de la radio satellite Deux modes de balayage sont disponibles : le balayage par catégorie et le balayage des présélections. Pendant le balayage, le nom des canaux s’affiche sous forme abrégée et vous ne pouvez pas changer de mode d’affichage. ●Balayage par catégorie Dans ce mode, les canaux de diffusion appartenant à la même catégorie que le canal reçu sont sélectionnés toutes les 10 secondes. 1. Appuyez sur le bouton tactile [List]. 2.
Fr.book 134 ページ 2005年12月27日 火曜日 午後9時16分 Fonctionnement du décodeur surround 5.1 canaux Français Mode d’emploi Cette fonction est disponible lorsqu’un décodeur surround 5.1 canaux optionnel (DVH940) est raccordé. Lorsque vous raccordez le décodeur surround 5.1 canaux (DVC940, vendu séparément) via le câble CeNET, l’unité de commande de celui-ci ne peut plus être utilisée.
Fr.book 135 ページ 2005年12月27日 火曜日 午後9時16分 Fonctionnement du décodeur surround 5.1 canaux ●FILTER Cette fonction permet de sélectionner des fréquences de filtres adaptées aux haut-parleurs utilisés. * Elle n’est pas disponible pour les haut-parleurs dont l’élément SPEAKER SEL est réglé sur “OFF”. 3-1. Appuyez sur le bouton tactile []] de l’élément FILTER pour afficher le sousmenu.
Fr.book 136 ページ 2005年12月27日 火曜日 午後9時16分 Fonctionnement du décodeur surround 5.1 canaux Mode P.EQ Activation/Désactivation de l’effet DSF Activation/Désactivation de l’effet P.EQ * Le réglage par défaut est “OFF”. * Le réglage par défaut est “OFF”. 1. Appuyez sur la touche [ADJ], puis sur le bouton tactile [AUDIO]. 1. Appuyez sur la touche [ADJ], puis sur le bouton tactile [AUDIO]. 2. Appuyez sur le bouton []] de l’élément STATUS. 3. Appuyez sur le bouton [ON] ou [OFF] de l’élément P.
Fr.book 137 ページ 2005年12月27日 火曜日 午後9時16分 Fonctionnement du décodeur surround 5.1 canaux [FREQUENCY] : Ce réglage sélectionne la fréquence centrale àcompenser sur une plage comprise entre 18 Hz et 20 kHz (par pas de 1/3 octave, 31 points). ●Réglage du volume central 3-1. Appuyez sur le bouton [[] ou []] de l'élément CENTER VOL pour régler le niveau souhaité (entre –6 et 0). * Le réglage par défaut est “0”. * Le réglage par défaut est “1 kHz”.
Fr.book 138 ページ 2005年12月27日 火曜日 午後9時16分 12.EN CAS DE DIFFICULTE GENERALITES Erreur Pas d'alimentation (aucun son émis) Cause Solution Le fusible a sauté. Remplacez-le par un fusible de même intensité. Si le fusible saute de nouveau, consultez votre revendeur. Raccordement incorrect. Consultez votre revendeur. Français Aucune action ne se Une défaillance du produit en appuyant microprocesseur est survenue à cause de sur les touches. parasites, etc. L’affichage est incorrect.
Fr.book 139 ページ 2005年12月27日 火曜日 午後9時16分 Lecteur de DVD Erreur Impossible de charger le disque. Cause Solution Un disque est déjà chargé dans l’appareil. Ejectez le disque avant d’en introduire un nouveau. Un corps étranger est coincé dans l'appareil. Sortez de force le corps étranger. Le son est discontinu Le disque est sale. ou brouillé. Le disque est fortement gondolé ou rayé. Nettoyez le disque avec un chiffon doux. Remplacez-le par un disque non rayé. Le frein à main n’est pas enclenché.
Fr.book 140 ページ 2005年12月27日 火曜日 午後9時16分 TV/VTR (lorsqu’un tuner TV, etc. optionnel est raccordé) Erreur Cause Solution L’image ne s’affiche pas. Le frein à main n’est pas enclenché. L’affichage est sombre. Le réglage de la luminosité Réglez correctement la luminosité. est trop faible. Français Les conditions d’utilisation ne sont pas optimales. La température à l’intérieur du véhicule avoisine les 0 °C ou moins.
Fr.book 141 ページ 2005年12月27日 火曜日 午後9時16分 13.AFFICHAGE DES ERREURS Lorsqu’une erreur se produit, l’un des affichages suivants apparaît. Appliquez les solutions décrites ci-dessous pour résoudre le problème. Lecteur de DVD Erreur Cause Solution Ceci est une anomalie du mécanisme du changeur de CD. Consultez votre revendeur. ERROR 3 La lecture du disque est impossible parce qu’il est rayé, etc. Remplacez-le par un disque non rayé et non gondolé.
Fr.book 142 ページ 2005年12月27日 火曜日 午後9時16分 14.
Fr.book 143 ページ 2005年12月27日 火曜日 午後9時16分 MANUEL D’INSTALLATION ET DE CONNEXION 1. PREPARATIFS Français 1. Cet appareil est conçu exclusivement pour les voitures avec une alimentation de 12 V à masse négative. 2. Veuillez lire attentivement ces instructions. 3. Veillez à débrancher la borne “-” de la batterie avant d’installer l’appareil, afin d’éviter tout court-circuit. (Figure 1) Batterie de la voiture 2.
Fr.book 144 ページ 2005年12月27日 火曜日 午後9時16分 4. PRECAUTIONS D’INSTALLATION Français 1. Préparez toutes les pièces nécessaires avant de procéder à l’installation de l’unité principale. 2. Ce modèle inclut un écran à cristaux liquides qui coulisse vers l’avant (système de chargement par tiroir). Sur certains modèles de voitures, l’écran à cristaux liquides peut venir heurter le tableau de bord ou le levier de vitesses, auquel cas l’appareil ne pourra pas être installé.
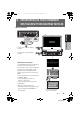
Fr.book 145 ページ 2005年12月27日 火曜日 午後9時16分 5. INSTALLATION DE L’UNITE PRINCIPALE Montage universel Orifice Armature * Pièce non fournie. 2-1/16" (53 mm) 7-3/16" (182 mm) MANUEL D'INSTALLATION ET DE CONNEXION • Dimensions de l’orifice d’escamotage de la console Remarque : *1 Certains modèles de voiture nécessitent un kit de montage spécial. Consultez votre revendeur Clarion pour plus d’informations à ce sujet. *2 Serrez bien le butoir avant pour éviter que l’unité principale ne se décroche.
Fr.book 146 ページ 2005年12月27日 火曜日 午後9時16分 Montage fixe (TOYOTA, NISSAN et autres véhicules équipés ISO/DIN) Français Cet appareil est conçu pour une installation fixe dans le tableau de bord. Si le véhicule est équipé d’un autoradio monté en usine, installez l’unité principale au moyen des pièces et des vis repérées par (*). (Figure 8) Si le véhicule n’est pas équipé d’un autoradio monté en usine, procurez-vous un kit d’installation et procédez comme suit pour installer l’unité principale. 1.
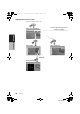
Fr.book 147 ページ 2005年12月27日 火曜日 午後9時16分 6. RETRAIT DE L’UNITE PRINCIPALE 1. Si l’arrière de l’unité principale a été fixé suivant la méthode indiquée à la Figure 6, dévissez la vis spéciale. 2. Retirez l’embout extérieur. 3. Placez la plaque à crochets entre le ressort et le support de montage universel, insérez la languette B du ressort dans l’orifice A de la plaque, puis dégagez l’unité principale en tirant la plaque à crochets. (Insérez les bords droit et gauche de la plaque.
Fr.book 148 ページ 2005年12月27日 火曜日 午後9時16分 8. BRANCHEMENT DES FILS Remarque: • Avant de réliser une installation, déonnectez la batterie de la voiture (le câle néatif). • Pour les périphériques optionnels, la broche RCA et le câble de connexion sont vendus séparément.
Fr.
Fr.book 150 ページ 2005年12月27日 火曜日 午後9時16分 Branchement des accessoires ●Branchement à l’amplificateur externe Vous pouvez brancher l’amplificateur externe, sauf si le décodeur surround 5.1 canaux est déjà raccordé. Pour plus d’informations, reportez-vous au mode d’emploi du décodeur surround 5.1 canaux. ●Branchement à la caméra CCD pour véhicule La caméra CCD pour véhicule peut être raccordée à la borne CCD du tuner TV.
Fr.book 151 ページ 2005年12月27日 火曜日 午後9時16分 9.
152 ページ 152 VRX765VD 2005年12月27日 火曜日 午後9時16分 Français Fr.