Owner’s manual Mode d’emploi Manual de instrucciones DXZ785USB CD/USB/MP3/WMA/AAC RECEIVER WITH CeNET CONTROL AUTORADIO CD/USB/MP3/WMA/AAC / AVEC COMMANDE CeNET RECEPTOR CD/USB/MP3/WMA/AAC CON CONTROL CeNET
English This equipment has been tested and found to comply with the limits for a Class B digital device, pursuant to Part 15 of the FCC Rules. These limits are designed to provide reasonable protection against harmful interference in a residential installation. This equipment generates, uses, and can radiate radio frequency energy and, if not installed and used in accordance with the instructions, may cause harmful interference to radio communications.
English CLARION PRODUCT REGISTRATION INFORMATION For USA and Canada only www.clarion.com Dear Customer: Congratulations on your purchase of a Clarion mobile electronic products. We are confident that you’ll enjoy your Clarion experience. There are many benefits to registering your product. We invite you to visit our website at www.clarion.com to register your Clarion product. We have made product registration simple with our easy to use website. The registration form is short and easy to complete.
English 1.FEATURES • Digital Time Alignment Control with 3-way Crossover • USB Audio for iPod® • USB Digital Media Streaming Capability ∗ “iPod” is for legal or rightholder-authorized copying only. Don’t steal music. “iPod” is a trademark of Apple Inc., registered in the U.S. and other countries. ∗ XM and the XM logos are trademarks of XM Satellite Radio Inc. 2. PRECAUTIONS 1.
Motorized Face 4. After a disc is ejected, the MOTORIZED FACE automatically returns to the tilted or closed state. If there is any obstruction when the MOTORIZED FACE tries to close, the safety mechanism is triggered and the MOTORIZED FACE returns to the open state. If this happens, remove the obstruction, then press the [Q] button. 5. To avoid scratching the compact disk, keep the CD level when inserting or removing them. Handling Compact Discs Use only compact discs bearing the or mark.
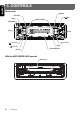
English 3. CONTROLS Source unit [MENU] [OPTION] [ [SRC] ENT] [SEEK PANEL] [RELEASE] [VOL] [ [P.
Names of the Buttons and Their Functions [P.CH] button • Deeply push in the button to unlock the DCP. • Push the button upward or downward to recall the stored station while in the radio mode. • Select the folder while in the MP3/WMA/AAC mode. • Perform various settings. [SRC] button • Press the button to turn on the power. • Press and hold the button for 1 second or longer to turn off the power. • Switch the operation mode among the radio mode, etc.
Display Items English Source indication • FM1-3, AM : Radio mode • SR1-3 : Satellite radio mode (SIRIUS) • XM1-3 : Satellite radio mode (XM) • CD : CD/MP3/WMA/AAC mode • USB : USB/MTP/iPod mode • CDC1-4 : CD changer mode • DVDC1-4 : DVD changer mode • TV1-2 : TV mode • AUX : AUX mode • TEL : Telephone mode • Radio mode: Preset No. / frequency mode : Track No. / playback time • MP3/WMA/AAC mode : Folder No. /track No. / playback time • CD / DVD changer mode : Disc No. / track No.
The control panel can be detached to prevent theft. When detaching the control panel, store it in the DCP (DETACHABLE CONTROL PANEL) case to prevent scratches. We recommend taking the DCP with you when leaving the car. Attaching the DCP 1. Insert the DCP so that the A section on the right side of the DCP catches on the hook B on the unit. Removing the DCP 1. With the MOTORIZED FACE closed, turn off the power. 2. Press the [RELEASE] button deeply to open the DCP. [RELEASE] button 2.
English 5. REMOTE CONTROL Inserting the Battery 1 Turn over the remote control unit and slide the cover in the direction indicated by the arrow in the illustration. 2 Insert the battery (CR2025) into the insertion guides, with the printed side (+) facing upwards. 3 Press the battery in the direction indicated by the arrow so that it slides into the compartment. 4 Replace the cover and slide in until it clicks into place.
Functions of Remote Control Unit Buttons Signal transmitter [SRC] [BND] [MUTE] [DISP] [ISR] [RDM] [SCN] [RPT] ● Shared modes ● Radio/Satellite Radio modes [SRC] button [BND] button • Press the button to turn on the power. Press and hold the button for 1 second or longer to turn off the power. • Use to alternate operation mode among the various modes. • Switches reception band. [w], [z] buttons • Increases and decreases volume. [MUTE] button • Turns mute function on and off.
Functions of Remote Control Unit Buttons English [ ] button ● iPod mode • Switches between playback and pause. [x], [v] buttons [SCN] button • Press to move the tracks up and down. • Press and hold the button for 1 second or longer to perform fast-forward/fast-backward. • Press to perform scan play. • When in MP3/WMA/AAC and USB/MTP modes, press and hold the button for 1 second or longer to perform folder scan play. [RPT] button • Press to perform repeat play.
English 6. OPERATIONS Note: • Be sure to read this chapter referring to the front diagrams of chapter “3. CONTROLS” on page 6. Basic Operations ● 2way speaker system (2WAY) CAUTION Tweeter (left) Be sure to lower the volume before switching off the unit power or the ignition key. The unit remembers its last volume setting. If you switch the power off with the volume up, when you switch the power back on, the sudden loud volume may hurt your hearing and damage the unit.
Basic Operations English Turning on/off the power Switching the display Note: • Be careful about using this unit for a long time without running the engine. If you drain the car’s battery too far, you may not be able to start the engine and this can reduce the service life of the battery. Press and hold the [TITLE] button for 1 second or longer to select the desired display. ● When the power is turned on 1.
Basic Operations To change sound mode 1. Press the [ ] button and select the sound mode to adjust. 2. Push the [SEEK PANEL] leftward or rightward to select the “item name”. ● Adjusting the subwoofer output volume You can adjust the volume output from the unit’s subwoofer output terminal. “S-W VOLUME” can be adjusted only when “SUB WOOFER” is set to “ST” or “MONO” (page 22). 2-1. Select the “S-W VOLUME”. 3-1. Push the [P.CH] button upward or downward to change the output volume.
Basic Operations English ● Compensation ● Setting P.EQ There is no need to compensate frequency characteristics if they are flat (no peaks or valleys) when you have measured the frequency characteristics with a measuring device. However, sometimes the frequency characteristics rise or fall in some places. If this happens, the frequency characteristics must be compensated.
Basic Operations F: Center frequency, Q: Q curve, G: Gain (output level) Parametric Equalizer Parameters (default) No. (car type) Band 1 Channel F Q 250 Hz 3 Band 2 G F Q –8 dB 2 kHz 1 Band 3 G F Q 5 kHz 1 –4 dB G 1 (SEDAN-1) Front –4 dB Rear 250 Hz 3 –10 dB 1.25 kHz 5 0 dB 8 kHz 5 0 dB 2 (SEDAN-2) Front 250 Hz 7 –10 dB 800 Hz 3 –4 dB 8 kHz 1 –5 dB Rear 80 Hz 7 +3 dB 125 Hz 5 –12 dB 1.25 kHz 5 0 dB 3 (MINI VAN-1) Front 125 Hz 5 –4 dB 1.
Basic Operations English ● Adjusting the bass ● Adjusting the fader 2-1. Select “BASS”. 3-1. Press the [ ] button. 3-2. Push the [P.CH] button upward or downward to adjust the gain from –6 to +6 (The factory default setting is “0”). 3-3. Press the [ ] button to return to the previous mode. “FADER” can be adjusted only when the speaker system is set to “2WAY” or “NORMAL”. 2-1. Select “FADER”. 3-1. Push the [P.
Basic Operations To change sound setting mode 1. Press and hold the [ ] button for 2 seconds or longer and select the sound setting mode to adjust. 2. Push the [SEEK PANEL] leftward or rightward to select the “item name”. When speaker system is “NORMAL”: “PRESET” ↔ “ALL SEAT” ↔ “T ALIGNMENT” ↔ “P.EQ ON/OFF” ↔ “EQ SELECT” ↔ “SUB WOOFER” ↔ “PRESET”... When speaker system is “3WAY”: “PRESET” ↔ “ALL SEAT” ↔ “X-OVER” ↔ “T ALIGNMENT” ↔ “SPEAKER GAIN” ↔ “P.EQ ON/OFF” ↔ “EQ SELECT” ↔ “SUB WOOFER” ↔ “PRESET”...
Basic Operations English ● Setting the X-OVER ● HIGH This function allows you to adjust the speaker setting such as cutoff frequencies or slope matched to the speakers you are using. (Crossover). 2-1. Select “X-OVER”. 3-1. Press the [ ] button. 3-2.
Basic Operations The distance from the listener up to each speaker can be entered in 2.3 cm steps, and the time that the sound reaches the listener from each speaker can be adjusted (Time alignment). 2-1. Select “T ALIGNMENT”. 3-1. Press the [ ] button. 3-2.
Basic Operations English ● Setting the P.EQ ON/OFF ∗ The factory default setting is “OFF”. 2-1. Select “P.EQ ON/OFF”. 3-1. Push the [P.CH] button upward or downward to select “ON” or “OFF”. ● Setting the EQ SELECT You can change the equalizer that adjusts the sound quality. ∗ The factory default setting is “P.EQ”. 2-1. Select “EQ SELECT”. 3-1. Push the [P.CH] button upward or downward to select “P.EQ” or “B/T” (Bass/ Treble). ● Setting the Subwoofer ∗ The factory default setting is “ST”. 2-1.
Radio Operations 1. Press the [SRC] button and select the radio mode. The frequency appears in the display. 2. Press the [MENU] button and select the radio band. Each time the button is pressed, the radio reception band changes in the following order: FM1 ➜ FM2 ➜ FM3 ➜ AM ➜ FM1... 3. Push the [SEEK PANEL] leftward or rightward to tune in the desired station. Tuning There are 3 types of tuning mode available, seek tuning, manual tuning and preset tuning. Seek tuning 1.
Radio Operations English Auto store Instant station recall (ISR) Auto store is a function for storing up to 6 stations that are automatically tuned in sequentially. If 6 receivable stations cannot be received, a previously stored station remains unoverwritten at the memory position. 1. Press the [MENU] button and select the desired band (FM or AM). 2. Press the [OPTION] button. 3. Push the [SEEK PANEL] leftward or rightward to select “AUTO STORE”. 4.
CD/MP3/WMA/AAC Operations What is MP3? MP3 is an audio compression method and classified into audio layer 3 of MPEG standards. This audio compression method has penetrated into PC users and become a standard format. This MP3 features the original audio data compression to about 10 percent of its initial size with a high sound quality. This means that about 10 music CDs can be recorded on a CD-R disc or CD-RW disc to allow a long listening time without having to change CDs.
CD/MP3/WMA/AAC Operations English ● Number of files or folders 1. Up to 255 files can be recognized per folder. Up to 510 files can be played. 2. Tracks are played in the order that they were recorded onto a disc. (Tracks might not always be played in the order displayed on the PC.) 3. Some noise may occur depending on the type of encoder software used while recording.
CD/MP3/WMA/AAC Operations 1. Press the [Q] button. The MOTORIZED FACE opens. 2. Insert a CD into the center of the CD SLOT with the labeled side facing up. The CD plays automatically after loading. Notes: • Never insert foreign objects into the CD SLOT. • If the CD is not inserted easily, there may be another CD in the mechanism or the unit may require service. • Discs not bearing the or mark and CD-ROMs cannot be played by this unit. • Some CDs recorded in CD-R/CD-RW mode may not be usable.
CD/MP3/WMA/AAC Operations English Top function The top function resets the CD player to the first track of the disc. Press and hold the [MENU] button for 1 second or longer to play the first track (track No. 1) on the disc. ∗ In case of MP3/WMA/AAC, the first track of a folder being played will be returned. List search function 1. Press the [MENU] button to enter the list search mode. And then the track list appears in the display. 2. Push the [P.CH] button upward or downward to select a track.
Operations Common to Each Mode 1. Press and hold the [OPTION] button for 1 second or longer to switch to the adjustment selection display. 2. Push the [SEEK PANEL] leftward or rightward to select the “item name”. “CLOCK EDIT” ↔ “COLOR” ↔ “CONTRAST” ↔ “SCREEN SAVER” ↔ “MSG INPUT” ↔ “AUTO SCROLL” ↔ “SCROLL SPEED” ↔ “DIMMER” ↔ “BLINK LED” ↔ “AMP CANCEL” ↔ “TEL-SPEAKER” ↔ “TEL-SWITCH” ↔ “SYSTEM CHECK” 3. Push the [P.CH] button upward or downward to select the “desired setting value”.
Operations Common to Each Mode English ● Setting the contrast You can adjust the display contrast to match the angle of installation of the unit. ∗ The factory default setting is “8”. (Adjustment level: 1 to 16) 2-1. Select “CONTRAST”. 3-1. Push the [P.CH] button upward or downward to adjust the contrast.
Operations Common to Each Mode ● Cellular phone interrupt setting You can set the dimmer control “HIGH”, “MID”, “LOW” or “OFF”. If you connect this unit and your cellular phone with a separately sold cable, you can listen to your telephone calls on your car speakers. When the AUX input cable is used to connect a AUX BLUETOOTH BB (BLT370) (sold separately). ∗ The factory default setting is “MID”. 2-1. Select “DIMMER”. 3-1. Push the [P.CH] button upward or downward to select the setting.
Operations Common to Each Mode English AUX function This system has an external input cable so you can listen to sounds and music from external devices connected to this unit. ● Selecting AUX IN sensitivity Make the following settings to select the sensitivity when sounds from external devices connected to this unit are difficult to hear even after adjusting the volume. ∗ The factory default setting is “MID”. 1. Press the [OPTION] button, “AUX SENSE MID” appears in the display. 2. Push the [P.
English 7. ACCESSORIES USB/MTP Operations USB memory/MTP device operation Note: • The following operations are the same as for CD mode: ∗Pause ∗Track selection ∗Fast-forward/fast-backward (Except DRM file) ∗Top function ∗Scan play ∗Repeat play ∗Random play ∗Folder selection ∗List search function See “CD/MP3/WMA/AAC Operations” (page 2528) for details. About USB memory • USB is an acronym for Universal Serial Bus, and refers to an external bus standard supporting data transfer rates of 12 Mbps.
USB/MTP Operations English CAUTION • Insert and remove a USB memory/MTP device only when the device is not being accessed. Connecting or disconnecting the device at the following times may result in the loss of data: - If the USB memory/MTP device is removed or power is disconnected during writing to the device. - When the device is subjected to static electricity or electric noise. • Do not leave a USB memory/MTP device unattended in an automobile.
iPod Operations Notes: • See the iPod Owner’s Manual for details regarding operation conditions. • The unit will not operate, or may operate improperly with unsupported versions. • For a list of compatible Apple iPod unit with the this model, please contact your Clarion dealer or www.clarion.com.
iPod Operations English ● To cancel the trick play 2. Push the [SEEK PANEL] leftward or rightward to select “RPT OFF” or “RDM OFF”. 3. Press the [ ] button. Notes: • When the repeat play mode is canceled, after play all tracks within a selected category, playback will begin from the first track in the selected category. • When playing the last track within a selected category in Random mode, if ACC is switched off then on again, playback will begin from a different track.
Satellite Radio Operations Confirming your SIRIUS ID Note: • When the function is differ depending to the connected receiver, they are distinguished by the following notations: “XM”: for an XM Satellite Radio Receiver “SIRIUS”: for a SIRIUS Satellite Radio Receiver 1. Press the [TITLE] button to select the desired channel label. Channel ➜ Category ➜ Title ➜ Artist ➜ Radio text ➜ Channel... English This function is available when a Satellite Radio Receiver is connected through the CeNET cable.
Satellite Radio Operations English Recalling a preset station Scan function A total of 18 satellite radio stations can be stored. • XM: 6-XM1, 6-XM2 and 6-XM3 • SIRIUS: 6-SR1, 6-SR2 and 6-SR3 This allows you to store your favorite satellite radio stations in memory for later recall. 1. Press the [MENU] button to select the desired band. 2. Push the [P.CH] button upward or downward to select the desired preset station. There are two scan modes: the category scan mode and the preset scan mode.
CD Changer Operations CD changer functions When an optional CD changer is connected through the CeNET cable, this unit controls all CD changer functions. This unit can control a total of 2 changers. Press the [SRC] button and select the CD changer mode to start play. If 2 CD changers are connected, press the [SRC] button to select the CD changer for play. ∗ If “NO MAGAZINE” appears in the display, insert the magazine into the CD changer.
CD Changer Operations English Other various play functions ● Disc random play ● Disc scan play The disc random play selects and plays individual tracks or discs automatically in no particular order. This function continues automatically until it is cancelled. 1. Press the [OPTION] button. 2. Push the [SEEK PANEL] leftward or rightward to select “RDM”. 3. Push the [P.CH] button upward or downward to select “ALL”, and then press the [ ] button.
DVD Changer Operations • The DVD control and display functions supported by this unit are limited; the unit does not support all the functions possible on a DVD changer. For fullest functionality, use the remote control unit provided with your DVD changer to control its operations. For details, consult the Owner’s Manual provided with your DVD changer.
TV Operations English Note: • The following operations are performed the same as for radio mode: ∗Channel selection ∗Storing channels in memory ∗Calling channels from memory ∗Auto store ∗Preset scan See “Radio Operations” (page 23-24) for details. TV tuner functions When an optional TV tuner is connected through the CeNET cable, this unit controls all TV tuner functions. To watch TV requires a TV tuner and monitor. Watching a TV 1. Press the [SRC] button and select the TV mode. 2.
General Problem Cause Measure Power does not turn on. (No sound is produced.) Fuse is blown. Replace with a fuse of the same amperage. If the fuse blows again, consult your store of purchase. Incorrect wiring. Consult your store of purchase. No sound output when operating the unit with amplifiers or power antenna attached. Power antenna lead is 1. Turn the unit off. shorted to ground or 2. Remove all wires attached to the power antenna excessive current is required lead.
Problem English No sound heard Cause Measure The device contains no MP3/ Record MP3/WMA/AAC files properly to the device. WMA/AAC files. The files are not proper MP3/ Use only properly encoded MP3/WMA/AAC files. WMA/AAC format. USB/MTP/iPod Connectors are loose. The device isn’t recognized. The device is damaged. Connectors are loose. According to the state of operation on the device, the communication fault is caused. Can’t insert the device. DXZ785USB Disconnect the device and reconnect.
English 9. ERROR DISPLAYS If an error occurs, one of the following displays is displayed. Take the measures described below to eliminate the problem. DVD changer CD changer CD/MP3/WMA/AAC Error Display Cause Measure ERROR 2 A CD is caught inside the CD This is a failure of CD deck’s mechanism and consult deck and is not ejected. your store of purchase. ERROR 3 A CD cannot be played due to scratches, etc. ERROR 6 A CD is loaded upside-down Eject the disc then reload it properly.
English 10.SPECIFICATIONS FM Tuner General Frequency Range: 87.9 MHz to 107.9 MHz Usable Sensitivity: 9 dBf 50dB Quieting Sensitivity: 15 dBf Alternate Channel Selectivity: 70 dB Stereo Separation (1 kHz): 35 dB Frequency Response (±3 dB): 30 Hz to 15 kHz Power Supply Voltage: 14.4 V DC (10.8 to 15.6 V allowable), negative ground Current Consumption: Less than 15 A Speaker Impedance: 4 Ω (4 Ω to 8 Ω allowable) Auto Antenna Rated Current: 500 mA or less Weight / Source unit: 2.75 lb. (1.
Clarion Co., Ltd. 2007/12 All Rights Reserved. Copyright © 2007: Clarion Co., Ltd.