Clarion Co., Ltd. 2007/2 All Rights Reserved. Copyright 2007: Clarion Co., Ltd.
CJ-5600E.book Page 2 Friday, February 23, 2007 11:53 AM English Contents 1. Before Use................................................... 3 2. Features ...................................................... 3 3. Names of the Buttons .................................. 4 4. Operations ................................................... 4 5. Connections................................................. 7 6. Installation ................................................... 8 7. Troubleshooting..................
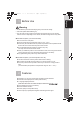
CJ-5600E.book 3 ページ 2007年2月7日 水曜日 午前9時25分 English 1. Before Use Warning • Do Not Back Up Vehicle While Relying Only on the Monitor Image • Use Slow Speeds When Backing Up • The rear-view monitor image has the same right-left inversion as your vehicle’s rearview mirrors. Depending on the vehicle, the field and angle of view may differ. Precautions (when you use the monitor) z Do not touch the LCD panel. z Use the product at the temperature range of -10°C ~ 60°C.
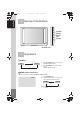
CJ-5600E.book 4 ページ 2007年2月7日 水曜日 午前9時25分 English 3. Names of the Buttons [POWER] [MODE] [MENU] [UP] [DOWN] STAND BY LED 4. Operations 1 POWER ON OFF (1) (2) 2 Press [POWER] button to on the power. (STAND BY state is OFF) Press [POWER] button again to off the power. (STAND BY state is ON) MODE (Camera Selection) It is a function to change CAMERA (CAM1/CAM2). CAM1 (1) (2) Press [MODE] button. CAM1 or CAM2 appears on the screen and it disappears after 5 seconds.
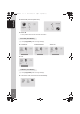
CJ-5600E.book 5 ページ 2007年2月7日 3 水曜日 午前9時25分 MENU (1) Press [MENU] button to select MAIN MENU, changed color in red when it is selected. • Every time the button is pressed, the setting changes. SETUP (2) English It is a function to select MAIN MENU (SETUP, PICTURE CAMERA) CAMERA PICTURE Press [MODE] button to select SUB MENU, changed color in red when it is selected. • Every time the button is pressed, the setting changes.
CJ-5600E.book 6 ページ 2007年2月7日 水曜日 午前9時25分 z DIRECTION (Inverted upside down) DIMMER LANGUAGE DIRECTION RESET English ENGLISH 180 DIMMER LANGUAGE DIRECTION RESET ENGLISH 0 z RESET X A factory default reset will clear all of OSD information PICTURE (SUB MENU) (3) Press [UP]/[DOWN] button to change Settings.
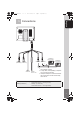
CJ-5600E.book 7 ページ 2007年2月7日 水曜日 午前9時25分 English 5. Connections CAMERA1 *1 (Sold Separately) GREEN BLACK (CAMERA2) (CAMERA1) *3 CAMERA2 *3 CAMERA2 CAMERA1 *1 (Sold Separately) *2 *2 *1 BLACK GROUND BLACK (CAMERA-1, priority) GREEN (CAMERA-2) RED POWER DC12V~24V *2 *3 Use a Clarion camera. A relay cable, sold separately, is required for connecting the camera. Use tape to keep the connection between the monitor cable and the camera relay cable secure.
CJ-5600E.book 8 ページ 2007年2月7日 水曜日 午前9時25分 English 6. Installation 1. Choose a location where you install the Monitor. Clean the place for the Stand with cleanser and remove the Protective Tape. And then attach it exactly where you want. 2. Fasten the Monitor with Tapping Screw. 3. Adjust angle of Stand and install Monitor. 4. Connect each connecting cable as in the product installation reference.
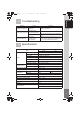
CJ-5600E.book 9 ページ 2007年2月7日 水曜日 午前9時25分 English 7. Troubleshooting Problem Cause No image is displayed. Is camera connected properly? Check the wiring to the camera and the camera connection. Is power cable connected properly? Check the wiring. Is a fuse blown out? Replace with a fuse of the same amperage (2A). Operating environment is inappropriate. Temperature in the car is below 0°C or over 60°C. Check to see that the temperature in the car is appropriate (around 25°C).
Clarion Co., Ltd. 2007/2 All Rights Reserved. Copyright 2007: Clarion Co., Ltd.