CD/MP3/WMA RECEIVER LECTEUR CD/MP3/WMA RECEPTOR CD/MP3/WMA
English 1
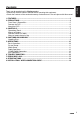
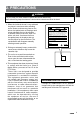
Contents English Thank you for purchasing this Clarion product. • Please fully read this owner’s manual before operating this equipment. • Check the contents of the enclosed warranty card and store it in a safe place with this manual. 1. FEATURES......................................................................................................................... 3 2. PRECAUTIONS..................................................................................................................
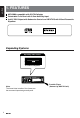
English 1. FEATURES MP3/WMA compatible with ID3-TAG display Detachable Front Panel with 3.5mm Auxiliary Input 2ch/2V RCA Output with Subwoofer Control and BEAT-EQ with 3 Band Parametric Equalizer Expanding Systems Expanding audio features 2 Channel Amplifier Note: The items listed outside of the frames are the commercial products generally sold.
English 2. PRECAUTIONS WARNING For your safety, the driver should not operate the controls while driving. Also, while driving, keep the volume to a level at which external sounds can be heard. 1. When the inside of the car is very cold and the player is used soon after switching on the heater, moisture may form on the disc or the optical parts of the player and proper playback may not be possible. If moisture forms on the disc, wipe it off with a soft cloth.
Front Panel / Generalities English For a longer service life, be sure to read the following cautions. • Do not allow any liquids on the set from drinks, umbrellas, etc. Doing so may damage the internal circuitry. • Do not disassemble or modify the set in any way. Doing so may result in damage. • Do not let cigarettes burn the display. Doing so may damage or deform the body. • If a problem should occur, have the set inspected at your store of purchase.
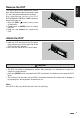
Remove the DCP English The control panel can be detached to prevent theft. When detaching the control panel, keep it in the safety place and prevent scratches. We recommend taking the DCP (DETACHABLE CONTROL PANEL) with you when leaving the car. 1. Press the [SRC / ] button (1 sec.) to turn off the power. 2. Deeply push in [OPEN] button to unlock the DCP. 3. H old the side popped out, remove the DCP. Attach the DCP 1. Hold the DCP and ensure that the panel faces towards you.
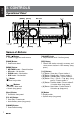
English 3. CONTROLS Operational Panel [MENU] [PS/AS] [ , ] [OPEN] [BAND] [SRC/ ] Disc Slot [VOLUME] [SOUND] [ [1~6] [ISR] ] AUX Jack [D] Names of Buttons [SRC / ] Button • Power / Toggle the audio source [VOLUME] Knob • Adjust volume level / Confirm (press) [BAND] Button • Select tuner band [ISR] Button • Recall ISR station stored in memory and store current station in ISR memory (long press) [MENU] Button • MP3/WMA mode – Search function. • CD mode – No function.
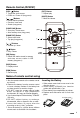
Remote Control (RCX001) [MUTE] Button • Mute the volume , ] Buttons [ • Preset station up/down • Previous / next track • Search (long press) [SCN/PS/AS] Button • Scan play / Preset scan • Auto memory store (long press) [BAND/TOP] Button • Select tuner band • Top play (long press) [SRC / [ , ] [BAND/TOP] [ , ] [ ] ] [ , ] Buttons • Volume up / down [MUTE] [ ] Button • Play / Pause English [RPT] Button • Repeat play [SRC / ] Button • Toggle the audio source • Power on / Power off (long pr
English 4. CAUTIONS ON HANDLING Handling Discs Handling Storage • New discs may have some roughness around the edges. If such discs are used, the player may not work or the sound may skip. Use a ball-point pen or the like to remove any roughness from the edge of the disc. • Do not expose discs to direct sunlight or any heat source. • Do not expose discs to excess humidity or dust. • Do not expose discs to direct heat from heaters.
English 5. OPERATIONS Basic Operations Note: • Refer to the diagrams in “3. CONTROLS” when reading this chapter. CAUTION Volume adjustment Turn the [VOLUME] knob on the front panel or press the [ ] or [ ] button on the remote control. The adjustable range of volume is 0 to 40. When the unit is turned on, starting and stopping the engine with its volume raised to the maximum level may harm your hearings. Be careful about adjusting the volume.
System Setup English At all mode, press and hold [D] button to enter system setup. Press [ ] or [ ] button to select options, rotate the [VOLUME] knob to adjust. CLOCK Press the [VOLUME] knob to enter clock setting mode, rotate the [VOLUME] knob ] or [ ] button to to set clock, press [ select hour or minute, press and hold the [VOLUME] knob to confirm. DX/LO (RADIO mode) Rotate the [VOLUME] knob to choose radio local or distant at RADIO mode. • LO: Only stations with strong signal can be received.
Audio Setup BALANCE:LEFT 1-7->CENTER->RIGHT 1-7 FADER:FRONT 1-7->CENTER->REAR 1-7 M-BEX: ON/OFF LPF: THROUGH/80/120/160 SUBW VOL: (-6)-(+6) English Press the [SOUND] button, then press [ ] ] button to select USER preset or [ including: BALANCE -> FADER -> M-B EX -> LPF(low pass filter) -> S-W VOL (Subwoofer Volume), rotate the [VOLUME] knob to select a value. Radio Operations Select tuner as playing source Auto store Press [SRC / ] button once or more to enter RADIO mode.
CD/MP3/WMA Operations English This unit can play back MP3/WMA files Notes: • I f you play a WMA file with active DRM (Digital Rights Management), no audio is output. To disable DRM (Digital Rights Management) When using Windows Media Player 9/10/11, click on Tool -> Options -> Copy music tab, then under Copy settings, unclick the Check box for Copy protect music. Then, reconstruct files. Personally constructed WMA files are used at your own responsibility.
CD/MP3/WMA Operations Pausing play 1. Press the [ 4 ] button to pause play. “PAUSE” appears in the display. 2. To resume CD play, press the [ 4 ] button again. Displaying CD titles This unit can display title data for MP3/WMA disc. When SCROLL is OFF, each time you press the [BAND] button to change the title display. MP3/WMA disc Track - > Folder -> File title -> Album -> Title -> Artist -> Track ... Notes: • If MP3/WMA disc is not input TAG, “NO TITLE” appears in the display.
CD/MP3/WMA Operations English track repeatedly or play a track currently being played in the MP3/WMA folder repeatedly. CD: 1. Press the [ 2 ] button once or more until “RPT ON” appears on the LCD to perform repeat play. 2. Press [ 2 ] button repeatedly until “RPT OFF” appears on the LCD to cancel repeat playback. MP3/WMA: 1.
English 6. TROUBLE SHOOTING GENERAL Problem Unit can not power on. Cause Replace with new fuse of correct rating. Car battery fuse blown. Replace with new fuse of correct rating. Turn off the power and remove the DCP. Press the [RESET] button with a thin rod. Unit can not power on. Nothing happens The microprocessor has when buttons are malfunctioned due to noise, etc. pressed. Display is not accurate. Remote control does not work. Measure Unit fuse blown.
DISC Player English Problem Disc cannot be loaded. Cause Another disc is already loaded. Eject the disc before loading the new one. There is an object installed inside Remove the object inside the unit. the unit. Compact disc is dirty. Sound skips or is noisy. Measure Clean the compact disc with a soft cloth. Compact disc is heavily scratched Replace with a compact disc with no or warped. scratches.
Dimensions of the Main Unit: 188mm Width × 58mm Height × 190mm Depth 7-2/5(width) × 2-7/25(Height) × 7-12/25(Depth) Weight of the Main Unit: 2.87lb. (1.30kg) Dimensions of the Remote Control unit: 43mm Width × 11mm Height × 113mm Depth 1-2/3(Width) × 2/5(Height) × 4-2/5(Depth) Weight of the Remote Control Unit: 1.16oz. (36g) (including battery) FM Tuner Frequency range: 87.9-107.
English 9. INSTALLATION / WIRE CONNECTION GUIDE CONTENTS 1) Before Starting.................................................................................. 19 2) Package Contents............................................................................. 19 3) General Cautions.............................................................................. 19 4) Cautions on Installation..................................................................... 20 5) Installing the Source Unit...................
4) Cautions on Installation 4. Use the enclosed screws for installation. Using other screws can cause damage. (Figure 3) Chassis English 1. Prepare all articles necessary for installing the source unit before starting. 2. Install the unit within 30° of the horizontal plane. (Figure 2) 3. If you have to do any work on the car body, such as drilling holes, consult your car dealer beforehand. Chassis Damage Max 30˚ Max. 6 mm (M5 screw) Figure 2 Figure 3 5) Installing the Source Unit 1.
Notes of installation English 1. Before installation, please make sure proper connections are conducted and the unit operates normally. Improper connection may result in damage to the unit. 2. Use only accessories designed and manufactured for this unit and other unauthorized accessories may result in damage to the unit. 3. Before installation, please fasten all power cables. 4. DO NOT install the unit in the place where close to hot area to prevent damage to electrical components such as the laser head.
6) Removing the Source Unit Method B 1. Push the trim ring to right and pull out the right part. English Disassemble trim ring M5x6 2. Push the trim ring to left and pull out the left part. Dashboard Mounting Frame 1. Insert this unit directly to the opening of the dashboard. 2. Place M5×6 cylindrical screw through the holes of the mounting frame located inside the opening to holes of the unit and fasten the screws to left & right. Trim ring installation Disassemble the unit 1.
7) Wiring and Connections English Black White REAR LEFT / SUB OUT 1 Black REAR RIGHT / SUB OUT 2 Black Rear audio output (Right) / Subwoofer output 2 Black SWC Steering wheel control terminal Red Rear audio output (Left) / Subwoofer output 1 2 Channel Amplifier (Black) Antenna Refer to next page 23
Gray Front Right English 16-Pin Connector Extension Lead (attached to the source unit) Brown wire (Phone mute lead) Gray/Black Connect to cellular phone mute lead.
Clarion Co., Ltd. All Rights Reserved. Copyright © 2010: Clarion Co., Ltd.