Owner's manual & Installation manual d'emploi Manual de instrucclones y de instalaci6n CZ102 CD/MP3/WMA RECEIVER RECEPTOR CD/MP3/WMA
Contents CLARION PRODUCT REGISTRATION INFORMATION For USA and Canada only www.clarion.com Dear Customer: Congratulations on your purchase of a Clarion mobile electronic products. We are confident that you'll enjoy your Clarion experience. There are many benefits to registering your product. We invite you to visit our website at www.clarion.com to register your Clarion product. We have made product registration simple with our easy to use website. The registration form is short and easy to complete.
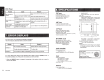
• MP3/WMA compatible with 103-TAG display • Detachable Front Panel with 3.5mm Auxiliary Input • 2V/2CH RCA Output with Sub woofer Control and BEAT-EQ with 3 Band Parametric Equalizer [Q]oc~~ DIGITAL AUDIO I MP3/WMAI For your safety, the driver should not operate the controls while driving. Also, while driving, keep the volume to a level at which external sounds can be heard. 1.
Front Panel I Generalities Remove the DCP For a longer service life, be sure to read the following cautions. Do not allow any liquids on the unit from drinks, umbrellas, etc. Doing so may damage the internal circuitry. Do not disassemble or modify the unit in any way. Doing so may result in damage. Do not let cigarettes burn the display. Doing so may damage or deform the body. If a problem should occur, have the unit inspected at your store of purchase.
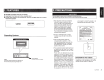
3. CONTROLS ,, ' " Operational Panel [BAND] [MENU] [PS/AS] [~] Disc Slot Remote Control (RCX001) [SAC I] Button • Toggle the audio source • Power on I Power off (long press) [ 1+11 .
Basic Operations Handling Discs Handling • New discs may have some roughness around the edges. If such discs are used, the player may not work or the sound may skip. Use a ball-point pen or the like to remove any roughness from the edge of the disc. Storage Note: Volume adjustment • • Refer to the diagrams in "3. CONTROLS" when reading this chapter. Turn the [VOLUME] knob on the front panel or press the [ .A. ] or [ ""' ] button on the remote control. The adjustable range of volume is 0 to 40.
Radio Operations System Setup In any mode, press and hold [DISP] button to enter system setup. Press [..,_.] or [..,...] button to select options, rotate the [VOLUME] knob to adjust. CLOCK Press the [VOLUME] knob to enter clock setting mode, rotate the [VOLUME] knob to set clock, press [..,_.] or [..,...] button to select hour or minute, press and hold the [VOLUME] knob to confirm.
CDIMP3/WMA Operations This unit can playback MP3/WMA files Notes: • If you play a WMA file with active DRM (Digital Rights Management), there will be no audio.. To disable DAM (Digital Rights Management) When using Windows Media Player 9110111 , click on Tool -> Options -> Copy music tab, then under Copy settings, unclick the check box for Copy protect music. Then , reconstruct files. Personally constructed WMA files are used at your own responsibility.
CDIMP3/WMA Operations Other various play functions Scan play This function allows you to locate and play the first 10 seconds of all the tracks recorded on a disc. Press the [ 1 ] button to perform scan play. Repeat play This function allows you to play the current track repeatedly or play a track currently being played in the MP3/WMA folderrepeatedly. CD: 1 . Press the [ 2 ] button once or more until "APT ON" appears on the LCD to perform repeat play. 2.
DISC Player Problem Disc cannot be loaded. Another disc is already loaded. Eject the disc before loading the new one. There is an object installed inside Remove the object inside the unit. the unit. Compact disc is dirty. Sound skips or is noisy. Measure Cause Clean the compact disc with a soft cloth. Compact disc is heavily scratched Replace with a compact disc with no scratches. or warped.
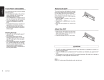
4) Cautions on Installation 9. INSTALLATION I WIRE CONNECTION GUIDE 1 . Prepare all articles necessary for installing the source unit before starting. 2. Install the unit within 30° of the horizontal plane. (Figure 2) 3. If you have to do any work on the car body, such as drilling holes, consult your car dealer beforehand. CONTENTS 1) 2) 3) 4) 5) 6) 7) 8) Before Starting ........ .......... .. ......... .... ...... .... .. ......... .......... .... .. ......... .. 10 Package Contents ...... ...........
Notes of installation 1. Before installation, please make sure proper connections are conducted and the unit operates normally. Improper connection may result in damage to the unit. 2. Use only accessories designed and manufactured for this unit and other unauthorized accessories may result in damage to the unit. 3. Before installation, please fasten all power cables. 4. DO NOT install the unit in the place where close to hot area to prevent damage to electrical components such as the laser head. 5.
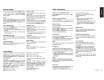
7) Wiring and Connections 16-Pin Connector Extension Lead (attached to the source unit)
Clarion Co., Ltd. All Rights Reserved. Copyright® 2011: Clarion Co., Ltd.
•arw-w clarion GARANTIE LIMITEE DE 1 AN CLARION Pour le Canada et les Etats-Unis seulement Ce produit Clarion vendu par marchand autorise Clarion est garanti contre tous defauts de materiel et de mise en ceuvre pour une duree de un (1) an a compter de Ia date de vente initiale quand 1 achat ET 1 iJ:")stallation ont ete effectues chez un marchand autorise Clarion.
'7iEU2iJ 281-0639-00 2007/9 clarion® CLARION 1 YEAR LIMITED WARRANTY For USA and Canada only This Clarion product purchased from an authorized Clarion dealer are warranted against all defects in materials and workmanship for a period of one (1) year from the date of original purchase, when purchased from AND installed by an authorized Clarion dealer.