Owner’s manual Mode d’emploi Bedienungsanleitung Istruzioni per l’uso Gebruiksaanwijzing Manual de instrucciones Bruksanvisning Manual de instruções DB268RMP BD269RMP BD269RGMP CD/MP3 RECEIVER RÉCEPTEUR CD/MP3 CD/MP3-RECEIVER RICEVITORE CON LETTORE CD/MP3 CD/MP3-RECEIVER RECEPTOR CON REPRODUCTOR DE DISCOS CD/MP3 CD/MP3-SPELARE/RECEIVER RECEPTOR CD/MP3 Clarion Co., Ltd. 2005/12 +DB268RMP-001-Cover All Rights Reserved. Copyright © 2005: Clarion Co., Ltd.
Thank you for purchasing this Clarion product. ∗ Please read this owner’s manual in its entirety before operating this equipment. ∗ After reading this manual, be sure to keep it in a handy place (e.g., glove compartment). ∗ Check the contents of the enclosed warranty card and keep it carefully with this manual. CAUTIONS: OBS! This appliance contains a laser system and is classified as a “CLASS 1 LASER PRODUCT”.
Signal transmitter [SRC] [BND] [ ] [ ], [ [ ], [ ] [MUTE] ] [DISP] [TA] [PTY] Handling Compact Discs 1. PRECAUTIONS .............................................................................................................................. 3 Handling Compact Discs ................................................................................................................. 4 2. CONTROLS .......................................................................................................
Signal transmitter [SRC] [BND] [ ] [ ], [ [ ], [ ] [MUTE] ] [DISP] [TA] [PTY] Handling Compact Discs 1. PRECAUTIONS .............................................................................................................................. 3 Handling Compact Discs ................................................................................................................. 4 2. CONTROLS .......................................................................................................
] [Z] Note: • Be sure to read this chapter referring to the front diagrams of chapter “2. CONTROLS” on page 5 (unfold). Italiano [A-M] [RDM] [SCN] ] [UP] [ [D] button • Press the [RELEASE] button to unlock the DCP. • CD insertion slot. • Switch the display indication (Main display, clock display). MP3 FUNCTION-DISPLAY SELECTION • Display changes in the following order: Track No. / Play time ➜ Folder No. / Track No. ➜ Title Display ➜ Clock Display ➜ Track No. / Play time...
] [Z] Note: • Be sure to read this chapter referring to the front diagrams of chapter “2. CONTROLS” on page 5 (unfold). Italiano [A-M] [RDM] [SCN] ] [UP] [ [D] button • Press the [RELEASE] button to unlock the DCP. • CD insertion slot. • Switch the display indication (Main display, clock display). MP3 FUNCTION-DISPLAY SELECTION • Display changes in the following order: Track No. / Play time ➜ Folder No. / Track No. ➜ Title Display ➜ Clock Display ➜ Track No. / Play time...
] [Z] Note: • Be sure to read this chapter referring to the front diagrams of chapter “2. CONTROLS” on page 5 (unfold). Italiano [A-M] [RDM] [SCN] ] [UP] [ [D] button • Press the [RELEASE] button to unlock the DCP. • CD insertion slot. • Switch the display indication (Main display, clock display). MP3 FUNCTION-DISPLAY SELECTION • Display changes in the following order: Track No. / Play time ➜ Folder No. / Track No. ➜ Title Display ➜ Clock Display ➜ Track No. / Play time...
Signal transmitter [SRC] [BND] [ ] [ ], [ [ ], [ ] [MUTE] ] [DISP] [TA] [PTY] Handling Compact Discs 1. PRECAUTIONS .............................................................................................................................. 3 Handling Compact Discs ................................................................................................................. 4 2. CONTROLS .......................................................................................................
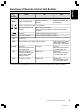
Mode Radio CD English Functions of Remote Control Unit Buttons MP3 Button [SRC] Switches between radio and CD/MP3. [BND] Switches reception band. [ ],[ ] [ ] [MUTE] [TA] [DISP] Plays the first track of the current folder. Increases and decreases volume (in all modes). ] Moves preset channels up and down. ],[ [ Plays the first track. Top play. Moves tracks up and down. When pressed and held for 1 second: Fast-forward/fastbackward. No function Switches between playback and pause.
English 5. DCP The control panel can be detached to prevent theft. When detaching the control panel, store it in the DCP (Detachable Control Panel) case to prevent scratches. We recommend taking the DCP with you when leaving the car. Removing the DCP Storing the DCP in the DCP case Hold the DCP, in the orientation as shown in the figure below, and put it into the supplied DCP case. (Ensure the DCP is in the correct orientation.) DCP 1.
Basic Operations Note:Be sure to read this chapter referring to the front diagrams of chapter “2. CONTROLS” on page 5 (unfold). CAUTION Be sure to lower the volume before switching off the unit power or the ignition key. The unit remembers its last volume setting. If you switch the power off with the volume up, when you switch the power back on, the sudden loud volume may hurt your hearing and damage the unit.
Basic Operations English Turning on/off MAGNA BASS EX ADJ mode adjustment The MAGNA BASS EX does not adjust the low sound area like the normal sound adjustment function, but emphasizes the deep bass sound area to provide you with a dynamic sound. 1. Press [D] button more than 1 second at POWER ON mode to enter ADJ mode, the previous selected ADJ items will be called out. 2. Press [D] button again at ADJ mode will cancel ADJ mode and return to previous display. 3.
Radio Operations Adjusting telephone interrupt setting Listening to the radio This unit requires special wiring to mute the audio signal automatically when a cellular telephone rings in the car. ∗ This function is not compatible with all cellular telephones. Contact your local authorized Clarion dealer for information on proper installation and compatibility. ∗ The factory default setting is “TEL OFF”. 1. Press the [D] button and press [å]/[∂] button to select “TEL-SW”. 2.
Radio Operations English Manual tuning Auto store There are 2 ways available: Quick tuning and step tuning. When you are in the step tuning mode, the frequency changes one step at a time. In the quick tuning mode, you can quickly tune the desired frequency. 1. Press the [BND] button and select the desired band (FM or AM (MW/LW)). Auto store is a function for storing up to 6 stations that are automatically tuned in sequentially.
RDS Operations TA (Traffic Announcement) This unit has a built-in RDS decoder system that supports broadcast stations transmitting RDS data. This system can display the name of the broadcast station being received (PS) and can automatically switch to the broadcast station with the best reception as you move long distances (AF switching). Also, if a traffic announcement or programme type is broadcast from an RDS station, no matter what mode you are in, this broadcast is received.
RDS Operations English Adjusting PTY PTY preset memory This function enables you to listen to a broadcast of the selected programme type when it starts even if the unit is on a function mode other than radio. 1. Press the [TA] button for 1 second or longer and press [å]/[∂] button to select “PTYS”. Press [ ] to enter PTY selection mode. 2. Turn the [ROTARY] knob clockwise or counterclockwise to select the desired PTY. The 29 types of PTY below can be selected.
CD Mode Operations Adjusting AF Loading a CD The AF function switches to a different frequency on the same network in order to maintain optimum reception. Insert a CD into the center of the CD insertion slot with the labeled side facing up. “LOADING” appears in the display, the CD enters into the slot and start playing. Notes: • Do not put your hand, fingers, or foreign objects into the CD insertion slot. • If a CD has already been loaded, another CD cannot be inserted.
English CD Mode Operations MP3 Mode Operations Selecting tracks (Songs) What is MP3? Press the [å] or [∂] button. ∂ : Playback will start from the next track. å : Playback will start from the beginning of the track currently playing. When this button is pressed again, the CD will play from the previous track. MP3 is an audio compression method and classified into audio layer 3 of MPEG standards. This audio compression method has penetrated into PC users and become a standard format.
MP3 Mode Operations When selected for play folder up down functions, files and folders are accessed in the order in which they were written by the CDROM writer. Because of this, the order in which they are expected to be played may not match the order in which they are actually played. You may be able to set the order in which MP3 are to be played by writing them onto a medium such as a CD-R with their file names beginning with play sequence numbers such as “01” to “99”, depending on your CD writer.
MP3 Mode Operations English 3. Each time the button is pressed, scan play turns on or off. Display selection 1. You can choose the display type for MP3 CD by pressing the [D] button. To select the next type, press the [D] button again. The arrangement is shown below. MAIN-1 ..... T02 02 : 18 (Track No., Play time) MAIN-2 ..... F03 T05 (Folder No., track No.) TITLE ..... FOLDER (Folder) ∗ Refer to “Title display mode” CLOCK ..... AM 10: 00 Title display mode 1.
Problem Power does not turn on. (No sound is produced) Cause English 7. IN CASE OF DIFFICULTY Solution Fuse is blown. Replace with a fuse of the same amperage. If the fuse blows again, consult your store of purchase. Incorrect wiring. Consult your store of purchase. Compact disc cannot be loaded. Another compact disc is already loaded. Eject the compact disc before loading the new one. Sound skips or is noisy. Compact disc is dirty. Clean the compact disc with a soft cloth.
FM tuner Audio Frequency Range: 87.5 MHz to 108 MHz Usable Sensitivity: 11 dBf 50 dB Quieting Sensitivity: 17 dBf Alternate Channel Selectivity: 75 dB Stereo Separation (1 kHz): 35 dB Frequency Response (±3 dB): 30 Hz to 15 kHz Output Power: 4 × 20 W (DIN 45324, +B=14.4 V) Bass Control Action (100 Hz): ±14 dB Treble Control Action (10 kHz): ±14 dB Line Output (with A/C 1 kHz, 10 k Ω): 1.
Thank you for purchasing this Clarion product. ∗ Please read this owner’s manual in its entirety before operating this equipment. ∗ After reading this manual, be sure to keep it in a handy place (e.g., glove compartment). ∗ Check the contents of the enclosed warranty card and keep it carefully with this manual. CAUTIONS: OBS! This appliance contains a laser system and is classified as a “ CLASS 1 LASER PRODUCT” .
Owner’s manual Mode d’emploi Bedienungsanleitung Istruzioni per l’uso Gebruiksaanwijzing Manual de instrucciones Bruksanvisning Manual de instruções DB268RMP BD269RMP BD269RGMP CD/MP3 RECEIVER RÉCEPTEUR CD/MP3 CD/MP3-RECEIVER RICEVITORE CON LETTORE CD/MP3 CD/MP3-RECEIVER RECEPTOR CON REPRODUCTOR DE DISCOS CD/MP3 CD/MP3-SPELARE/RECEIVER RECEPTOR CD/MP3 Clarion Co., Ltd. 2005/12 +DB268RMP-001-Cover All Rights Reserved. Copyright © 2005: Clarion Co., Ltd.