Ownerʼs manual Mode dʼemploi Bedienungsanleitung Istruzioni per lʼuso Gebruiksaanwijzing Manual de instrucciones Bruksanvisning Manual de instruções CD/USB/MP3/WMA RECEIVER RECEPTEUR CD/USB/MP3/WMA CD/USB/MP3/WMA RECEIVER RICEVITORE CD/USB/MP3/WMA CD/USB/MP3/WMA ONTVANGER RECEPTOR PARA CD/USB/MP3/WMA CD/USB/MP3/WMA MOTTAGARE RECEPTOR PARA CD/USB/MP3/WMA Clarion Co., Ltd. All Rights Reserved. Copyright © 2006: Clarion Co., Ltd.
Thank you for purchasing this Clarion product. ∗ Please read this ownerʼs manual in its entirety before operating this equipment. ∗ After reading this manual, be sure to keep it in a handy place (e.g., glove compartment). ∗ Check the contents of the enclosed warranty card and keep it carefully with this manual. CAUTIONS: This appliance contains a laser system and is classified as a “CLASS 1 LASER PRODUCT”.
Contents 1. PRECAUTIONS ..............................................................................................................................3 Handling Compact Discs .................................................................................................................4 2. CONTROLS ....................................................................................................................................5 3. NOMENCLATURE ............................................................
Contents 1. PRECAUTIONS ..............................................................................................................................3 Handling Compact Discs .................................................................................................................4 2. CONTROLS ....................................................................................................................................5 3. NOMENCLATURE ............................................................
3. NOMENCLATURE Note: Be sure to read this chapter referring to the front diagrams of chapter “2. CONTROLS” on page 5 (unfold). Names of the Buttons and Their Functions [RELEASE] button Press the [RELEASE] button to unlock the detachable panel. [A] button Deutsch Press the button to switch to the ADJ mode. Press and hold the button for 1 second or longer to enter RDS ADJ mode. [ , ] buttons Italiano Select a station while in the Radio mode or select a track when listening to a CD/USB.
3. NOMENCLATURE Note: Be sure to read this chapter referring to the front diagrams of chapter “2. CONTROLS” on page 5 (unfold). Names of the Buttons and Their Functions [RELEASE] button Press the [RELEASE] button to unlock the detachable panel. [A] button Deutsch Press the button to switch to the ADJ mode. Press and hold the button for 1 second or longer to enter RDS ADJ mode. [ , ] buttons Italiano Select a station while in the Radio mode or select a track when listening to a CD/USB.
3. NOMENCLATURE Note: Be sure to read this chapter referring to the front diagrams of chapter “2. CONTROLS” on page 5 (unfold). Names of the Buttons and Their Functions [RELEASE] button Press the [RELEASE] button to unlock the detachable panel. [A] button Deutsch Press the button to switch to the ADJ mode. Press and hold the button for 1 second or longer to enter RDS ADJ mode. [ , ] buttons Italiano Select a station while in the Radio mode or select a track when listening to a CD/USB.
Contents 1. PRECAUTIONS ..............................................................................................................................3 Handling Compact Discs .................................................................................................................4 2. CONTROLS ....................................................................................................................................5 3. NOMENCLATURE ............................................................
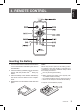
English 4. REMOTE CONTROL Inserting the Battery 1. Turn over the remote control unit and slide the cover in the direction indicated by the arrow in the illustration. 2. Insert the battery (CR2025) into the insertion guides, with the printed side (+) facing upwards. 3. Press the battery in the direction indicated by the arrow so that it slides into the compartment. 4. Replace the cover and slide in until it clicks into place.
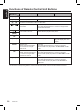
English Functions of Remote Control Unit Buttons Button Mode [SRC] ],[ [ Switch reception band. ] ],[ [ CD MP3/WMA and USB Switch between Radio, CD/MP3/WMA, USB and AUX. [BND] [ Radio (RDS) Increase and decrease volume (in all modes). ] ] [MUTE] [TA] [DISP] [PS/AS] [AF] [PTY] Play the first track. Top play. Move preset channels up and down. Move tracks up and down. Press and hold the button for 1 second or longer: Fastforward/fast-backward. Turn mute on and off.
The control panel can be detached to prevent theft. When detaching the control panel, store it in the DCP (Detachable Control Panel) case to prevent scratches. We recommend taking the DCP with you when leaving the car. Storing the DCP in the DCP case Hold the DCP, in the orientation as shown in the figure below, and put it into the supplied DCP case. (Ensure the DCP is in the correct orientation.) English 5. DCP Removing the DCP 1. Press the [SRC] button for 1 second or longer to switch off the power.
English 6. OPERATIONS Basic Operations Note: Be sure to read this chapter referring to the front diagrams of chapter “2. CONTROLS” on page 5 (unfold). ! CAUTION Be sure to lower the volume before switching off the unit power or the ignition key. The unit remembers its last volume setting. If you switch the power off with the volume up, when you switch the power back on, the sudden loud volume may hurt your hearing and damage the unit.
Setting the Z-Enhancer This unit is provided with 3 types of sound tone effects stored in memory. Select the one you prefer. ∗ The factory default setting is “Z-EHCR OFF”. Each time you press the [Z] button, the tone effect changes in the following order: “Z-EHCR OFF” “Z-EHCR 1” “Z-EHCR 2” “Z-EHCR 3” “Z-EHCR OFF” ... Z-EHCR 1 : bass emphasized Z-EHCR 2 : treble emphasized Z-EHCR 3 : bass and treble emphasized Z-EHCR OFF : no sound effect Adjusting the balance 1.
English Radio Mode Operations Listening to the radio Manual tuning 2. To select a preset band, press the [BND] button, then select one of the preset bands such as FM1, FM2, FM3 or AM (MW/LW). Every time the [BND] button is pressed, the display will change as: When you are in the step Tuning mode, the frequency changes one step at a time. In the quick Tuning mode, you can quickly tune the desired frequency. 1. Press the [SRC] button and select the Radio mode, then the radio will be on.
RDS Operations Auto store RDS (Radio Data System) Auto store is a function for storing up to 6 stations that are automatically tuned in sequentially. If 6 receivable stations cannot be received, a previously stored station remains un-overwritten at the memory position. 1. Press the [BND] button and select the desired band (FM or AM (MW/LW)). 2. Press and hold the [ ] button for 2 seconds or longer. The stations with good reception are stored automatically to the preset channels.
English RDS Operations 4. Press the [A] button to return to the previous mode. ∗ If the reception of the current broadcast station deteriorates, “PI SEARCH” appears in the display and the radio searches for the same programme on another frequency. REG (Regional programme) function When the REG function is ON, the optimum regional station can be received. When this function is OFF, if the regional station area switches as you drive, a regional station for that region is received.
] As “TA” lit in the display, press and hold the [ button for 2 seconds or longer. The TP stations with the good reception sensitivity are stored into preset memory. Selecting PTY ∗ Even if you select FM1 or FM2, a TP station is stored into memory for FM3. 2. Press the [ ”. 3. Press the [ RDS MODE adjustment Press and hold the [A] button for 1 second or longer to select the RDS MODE. The mode switches as follows each time the [ ] button is pressed: , PTY ON REG ON∗2 PTY-S∗1 PTY ON ....
English RDS Operations PTY preset memory 1. Press and hold the [A] button for 1 second or longer to switch to the RDS adjustment selection display. 2. Press the [ ”. , ] button to select “PTY-SEL 3. Press the [ ] button. 4. Turning the [ROTARY] knob to select the desired PTY. The 29 types of PTY below can be selected. 5. If you press and hold any one of the [DIRECT] buttons for 2 seconds or longer, the selected PTY is stored into that preset channel memory.
What is MP3? MP3 is an audio compression method and classified into audio layer 3 of MPEG standards. This audio compression method has penetrated into PC users and become a standard format. This MP3 features the original audio data compression to about 12 percent of its initial size with a high quality sound. This means that about 10 music CDs can be recorded on a CD-R disc or CD-RW disc to allow a long listening time without having to change CDs.
English CD/MP3/WMA Mode Operations Disc-In-Play function As long as the ignition key is turned to the ON or ACC position, this function allows you to turn the power to the unit and start playing the disc automatically when the disc is inserted even if the power is not turned on. ! CAUTION Do not try to put your hand or fingers in the disc insertion slot. Also never insert foreign objects into the slot.
What is USB? USB is the abbreviation of Universal Serial Bus, an external bus standard that supports data transfer rates of 12Mbps. The main unit is USB 2.0 compatible. (It is compliant with Universal Serial Bus Revision 1.1 specification, which is Full Speed supported but not running at High-Speed). This means that the transfer rates only supports until 12Mbps, which is the maximum speed of USB1.1.
English USB Mode Operation Operation Common to CD and USB Drive Pausing play 1. Press the [ ] button to pause play. “PAUSE” appears in the display. 2. To resume track play, press the [ again. ] button Displaying CD titles This unit can display title data for MP3/WMA. Unplug the USB drive Just pull out the USB drive from the port during USB mode, the unit will revert to Radio mode automatically. 1. Press the [D] button to display the title. 2.
Title display mode 1. There are 5 types of display for the Title Display mode. 2. To select the next type, press the [T] button for less than 1 second. The arrangement is shown below. After 2 seconds Fast-forward/fast-backward Fast-forward Press and hold the [ longer. Fast-backward Press and hold the [ longer.
English Operation Common to CD and USB Drive Example of a mediumʼs folder/file hierarchy. ∗ Press the [UP] button while in the final folder to shift to the first folder. ∗ Folder without an MP3/WMA file is not selectable. 2. Press the [ , ] button to select a track. Top function Press the [BND] button, then the CD/USB will start playing from the first song (track number 1 ).
Folder repeat play MP3/WMA : This function allows you to play all tracks in the MP3/WMA folder repeatedly. 1. Press and hold the [RPT] button for 1 second or longer to perform folder repeat play. The indications “ALL...” and “RPT” light in the display. Random play CD-DA : This function allows you to play all tracks recorded on a disc in a random order. MP3/WMA : This function allows you to play all tracks of current folder in a random order. 1. Press the [RDM] button to perform random play.
English Operations Common to Each Mode Cellular phone interrupt setting If you connect this unit and your cellular phone with a separately sold unit, you can listen to your telephone calls on your car speakers. ∗ The factory default setting is “OFF”. 2-1. Select “TEL-SW”. 3-1. Turn the [ROTARY] knob to select the setting. Each time you turn the [ROTARY] knob, the setting changes in the following order: T-SW OFF T-SW ON OFF: This unit continues normal operation even when the cellular phone is used.
Problem Measure Fuse is blown. Replace with a fuse of the same amperage. If the fuse blows again, consult your store of purchase. Incorrect wiring. Consult your store of purchase. No sound output when operating the unit with amplifiers or power antenna attached. Power antenna lead is shorted to ground or excessive current is required for remote-on the amplifiers or power antenna. 1. Turn the unit off. 2. Remove all wires attached to the power antenna lead.
English Troubleshooting Problem Files are not recognized as an MP3/WMA file. Use MP3/WMA files encoded properly. File system is not correct. Use ISO9660 level 1, 2 or JOLIET or Romeo file system. Disc is dirty. Clean the disc with a soft cloth. Disc is heavily scratched or warped. Replace with a disc with no scratches. Sound is cut or skipped. Noise is generated or no ise is mi xed with sound. MP3/WMA files are not encoded properly. Use MP3/WMA files encoded properly.
CD/MP3/WMA DISC Error Display Cause Measure ERROR 2 A DISC is caught inside the CD deck and is not ejected. This is a failure of CD deckʼs mechanism and consult your store of purchase. ERROR 3 A DISC cannot be played due to scratches, loaded upsidedown inside the CD deck etc. Replace with a non-scratched, non-warpeddisc. Eject the disc then reload it properly. NO FILE No audio file is detected in the DISC. Replace with audio contents loaded DISC.
English Specifications CD Common in MP3/WMA Disc and USB drive MP3 Decode Format MPEG 1, 2 and 2.5 - Layer 3 Sampling rate MPEG-1 : 32, 44.1, 48 (kHz) MPEG-2 : 16, 22.05, 24 MPEG-2.5 : 11.025, 44.1 Bit-rate (kbps) MPEG-1 : 32 - 320 MPEG-2 : 8 - 160 MPEG-2.
Ownerʼs manual Mode dʼemploi Bedienungsanleitung Istruzioni per lʼuso Gebruiksaanwijzing Manual de instrucciones Bruksanvisning Manual de instruções CD/USB/MP3/WMA RECEIVER RECEPTEUR CD/USB/MP3/WMA CD/USB/MP3/WMA RECEIVER RICEVITORE CD/USB/MP3/WMA CD/USB/MP3/WMA ONTVANGER RECEPTOR PARA CD/USB/MP3/WMA CD/USB/MP3/WMA MOTTAGARE RECEPTOR PARA CD/USB/MP3/WMA Clarion Co., Ltd. All Rights Reserved. Copyright © 2006: Clarion Co., Ltd.