Owner’s manual Mode d’emploi Bedienungsanleitung Istruzioni per l’uso Gebruiksaanwijzing Manual de instrucciones Bruksanvisning Manual de instruções DXZ388RUSB DXZ389RUSB DXZ389RGUSB CD/USB/MP3/WMA/AAC RECEIVER WITH CeNET CONTROL AUTORADIO CD/USB/MP3/WMA/AAC / AVEC COMMANDE CeNET CD/USB/MP3/WMA/AAC-RECEIVER MIT CeNET-STEUERUNG SINTOLETTORE CD/USB/MP3/WMA/AAC CON CONTROLLO CeNET CD/USB/MP3/WMA/AAC-RADIO-COMBINATIE MET CeNET-BEDIENING RECEPTOR CD/USB/MP3/WMA/AAC CON CONTROL CeNET CD/USB/MP3/WMA/AAC-RADIO ME
English CAUTIONS: This appliance contains a laser system and is classified as a “CLASS 1 LASER PRODUCT”. To use this model properly, read this Owner’s Manual carefully and keep this manual for your future reference. In case of any trouble with this player, please contact your nearest “AUTHORIZED service station”. To prevent direct exposure to the laser beam, do not try to open the enclosure.
English Thank you for purchasing this Clarion product. ∗ Please read this owner’s manual in its entirety before operating this equipment. ∗ After reading this manual, be sure to keep it in a handy place (e.g., glove compartment). ∗ Check the contents of the enclosed warranty card and keep it carefully with this manual. Contents 1. FEATURES ...................................................................................................................................... 4 2. PRECAUTIONS ................
English 1. FEATURES • USB Direct Connection for iPod® & Digital Media • Front-panel auxiliary input & 6ch RCA output • Bluetooth Ready via CeNET ∗ “iPod” is for legal or rightholder-authorized copying only. Don’t steal music. “iPod” is a trademark of Apple Inc., registered in the U.S. and other countries. 2. PRECAUTIONS 1. This unit is applicable for on-road 4 wheel vehicle purpose only.
Handling Compact Discs or English Use only compact discs bearing the Storage Do not play heart-shaped, octagonal, or other specially shaped compact discs. Some CDs recorded in CD-R/CD-RW mode may not be usable. • Do not expose compact discs to direct sunlight or any heat source. • Do not expose compact discs to excess humidity or dust. • Do not expose compact discs to direct heat from heaters.
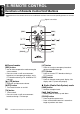
English 3. CONTROLS Names of the Buttons and Their Functions [IR RECEIVER] [ ] [ ], [ ] [CD SLOT] [RELEASE] [ [USB SLOT] ] (EJECT) [AUX] [SRC] [SOUND] [BND] [ROTARY] [DIRECT] [RDM] [DISP] [TA] [RPT] [SCN] [RELEASE] button [SOUND] button • Press the [RELEASE] button to unlock the DCP. • Use the button to switch to the sound adjust mode. • Press and hold the button for 1 second or longer to turn on or off the MAGNA BASS EXTEND mode.
Names of the Buttons and Their Functions English [SCN] button [SRC] button • Perform scan play for 10 seconds of each track while in the CD/MP3/WMA/AAC mode. • Press and hold the button for 1 second or longer to perform folder scan play while in the MP3/WMA/AAC mode. • Press the button to turn on the power. • Press and hold the button for 1 second or longer to turn off the power. • Switch the operation mode among the radio mode, etc.
Display Items English Operation status indication Source, titles, function, setting, clock, etc. are displayed. : MUTE indication : : : : : MANU : AF REG TA TP PTY Alternative frequency indication Regional indication Traffic announcement indication Traffic programme indication Programme type indication Manual indication : Disc No.
The control panel can be detached to prevent theft. When detaching the control panel, store it in the DCP (DETACHABLE CONTROL PANEL) case to prevent scratches. We recommend taking the DCP with you when leaving the car. Removing the DCP Storing the DCP in the DCP Case Hold the DCP, in the orientation as shown in the figure below, and put it into the supplied DCP case. (Ensure the DCP is in the correct orientation.) DCP 1. Press the [SRC] button for 1 second or longer to switch off the power. 2.
English 5. REMOTE CONTROL Functions of Remote Control Unit Buttons ∗ Some buttons on the remote control unit have different functions from the corresponding buttons on the main unit. Signal transmitter [SRC] [BND] [ ] [ ], [ [ ], [ ] [MUTE] [TA] [PS/AS] ] [DISP] [PTY] [AF] ● Shared modes [AF] button [SRC] button • Press to cancel an emergency broadcast during an ALARM interrupt. • Use to alternate operation mode among the various modes.
Functions of Remote Control Unit Buttons English [AF] button ● CD changer mode • AF function on and off. • Press and hold the button for 1 second or longer to perform REG function on and off. [BND] button [PTY] button [x], [v] buttons • PTY mode on and off. • Press to move the tracks up and down. • Press and hold the button for 1 second or longer to perform fast-forward/fast-backward. ● CD/MP3/WMA/AAC and USB/MTP modes [BND] button • Press to play the first track.
Inserting the Battery English 1 Turn over the remote control unit and slide the cover in the direction indicated by the arrow in the illustration. 2 Insert the battery (CR2025) into the insertion guides, with the printed side (+) facing upwards. 3 Press the battery in the direction indicated by the arrow so that it slides into the compartment. 4 Replace the cover and slide in until it clicks into place.
English 6. OPERATIONS Note: • Be sure to read this chapter referring to the front diagrams of chapter “3. CONTROLS” on page 6. Basic Operations CAUTION Be sure to lower the volume before switching off the unit power or the ignition key. The unit remembers its last volume setting. If you switch the power off with the volume up, when you switch the power back on, the sudden loud volume may hurt your hearing and damage the unit.
Basic Operations English Sound Adjustment You can adjust a sound effect or tone quality to your preference. To change sound setting 1. Press the [SOUND] button to switch to the sound adjustment selection display. ∗ The factory default sound setting is “ZEHCR”. 2. Then press the [x] or [v] button to select the sound adjustment mode.
Basic Operations ● Adjusting the subwoofer This adjustment can be performed only when the Z-Enhancer Plus is set to “CUSTOM ”. 2-1. Select “TREBLE”. 3-1. Press the [w] or [z] button to select as following order. “TREB(G)” ↔ “TREB(F)” You can set the low pass filter of subwoofer. 2-1. Select “S-W LPF”. 3-1. Press the [w] or [z] button to select as following order. “THROUGH” ↔ “LPF 50” ↔ “LPF 80” ↔ “LPF 120” ∗ The factory default setting is “TREB(G)”. ∗ The factory default setting is “THROUGH”. 3-2.
Basic Operations English Setting the MAGNA BASS EXTEND CT (Clock Time) function The MAGNA BASS EXTEND does not adjust the low frequencies like the normal sound adjustment function, but emphasizes the deep bass frequencies to provide you with a dynamic sound. The CT function receives CT data sent from an “Radio Data System” station and displays the time. ∗ The factory default setting is “OFF” (off). 1. Press and hold the [SOUND] button for 1 second or longer to turn on the MAGNA BASS EXTEND effect.
Radio Operations 1. Press the [SRC] button and select the radio mode. The frequency or PS and PTY appears in the display. ∗ PS: Programme service name ∗ PTY: Programme type 2. Press the [BND] button and select the radio band. Each time the button is pressed, the radio reception band changes in the following order: F1 (FM1) ➜ F2 (FM2) ➜ F3 (FM3) ➜ AM (MW/LW) ➜ F1 (FM1)... 3. Press the [x] or [v] button to tune in the desired station.
Radio Operations English Recalling a preset station Preset scan A total of 24 preset positions (6-FM1, 6-FM2, 6FM3, 6-AM) exists to store individual radio stations in memory. Press the corresponding [DIRECT] button or the [w] / [z] button to recall the stored radio frequency automatically. 1. Press the [BND] button and select the desired band (FM or AM (MW/LW)). 2. Press the corresponding [DIRECT] button or the [w] / [z] button to recall the stored station.
Radio Data System Operations This unit has a built-in “Radio Data System” decoder system that supports broadcast stations transmitting “Radio Data System” data. This system can display the name of the broadcast station being received (PS) and can automatically switch to the broadcast station with the best reception as you move long distances (AF switching).
Radio Data System Operations English Manually tuning a regional station in the same network 1. This function is valid when the AF function is ON and the REG function is OFF. Note: • This function can be used when a regional broadcast of the same network is received. 2. Press any one of the [DIRECT] buttons to call out the regional station. 3. If the reception condition of the called out station is bad, press the [DIRECT] button of the same number. The unit receives a local station on the same network.
Radio Data System Operations 1. Press and hold the [DISP] button for 1 second or longer to switch to the “Radio Data System” adjustment selection display. 2. Press the [x] or [v] button to select “PTY-SEL”. 3. Press the [ ] button. 4. Press any one of the [DIRECT] buttons. Alternatively, press the [w] or [z] button to select the desired PTY. 5. Press the [DISP] button to return to the previous mode. ∗ Below are the factory default settings stored for the [DIRECT] buttons. Preset number PTY item 4.
Radio Data System Operations English Emergency broadcast If an emergency broadcast is received, all the function mode operations are stopped. “ALARM” appears in the display and the emergency broadcast can be heard. ● Cancelling an emergency broadcast If you press the [TA] button, emergency broadcast reception is cancelled. Switching the PTY display language You can select one of 4 languages (English, German, Swedish or French) for the PTY displayed in the display.
CD/MP3/WMA/AAC Operations What is MP3? MP3 is an audio compression method and classified into audio layer 3 of MPEG standards. This audio compression method has penetrated into PC users and become a standard format. This MP3 features the original audio data compression to about 10 percent of its initial size with a high sound quality. This means that about 10 music CDs can be recorded on a CD-R disc or CD-RW disc to allow a long listening time without having to change CDs.
CD/MP3/WMA/AAC Operations English ● Logical format (File system) 1. When writing MP3/WMA/AAC file on a CD-R disc or CD-RW disc, please select “ISO9660 level 1, 2 or JOLIET or Romeo” or APPLE ISO as the writing software format. Normal play may not be possible if the disc is recorded on another format. 2. The folder name and file name can be displayed as the title during MP3/WMA/AAC play but the title must be within 64 single byte alphabetical letters and numerals (including an extension). 3.
CD/MP3/WMA/AAC Operations Press the [SRC] button to select the CD/MP3/ WMA/AAC mode. When the unit enters the CD/MP3/WMA/AAC mode, play starts automatically. If there is no disc loaded, the indication “NO DISC” appears in the title display. The mode changes each time the [SRC] button is pressed. (Modes are not displayed for equipment that is not connected.) Radio ➜ CD/MP3/WMA/AAC ➜ USB/MTP/ iPod ➜ (TEL) ➜ (CD changer) ➜ AUX ➜ Radio ... Loading a CD 1.
CD/MP3/WMA/AAC Operations English Folder Select ● Folder repeat play This function allows you to select a folder containing MP3/WMA/AAC files and start playing from the first track in the folder. 1. Press the [z] or [w] button. Press the [w] button to move the next folder. Press the [z] button to move the previous folder. 2. To select a track, press the [x] or [v] button. This function allows you to play a track currently being played in the MP3/WMA/AAC folder repeatedly. 1.
Operations Common to Each Mode 1. Press and hold the [DISP] button for 1 second or longer to switch to the adjustment selection display. 2. Press the [x] or [v] button to select the “item name”. “SETTINGS” ↔ “SCRN SVR” ↔ “MSG INP” ↔ “SCROLL” ↔ “DIMMER” ↔ “ACANCEL” ↔ “TEL-SEL” ↔ “TEL-SP” ↔ “TEL-SW” ↔ “S-CHECK” 3. Press the [w] or [z] button to select the “desired setting value”. ∗ In the case of display blinking “ENT”, you can press the [ ] button to adjust the setting value.
Operations Common to Each Mode English ● Setting the dimmer control You can set the dimmer control “ON” or “OFF”. ∗ The factory default setting is “ON”. 2-1. Select “DIMMER”. 3-1. Press the [w] or [z] button to select “ON” or “OFF”. ● Setting the external amplifier ∗ The factory default setting is “OFF”. 2-1. Select “A-CANCEL”. 3-1. Press the [w] or [z] button to select “ON” or “OFF”. • ON: Use with connected AMP. • OFF: Use with inside AMP.
Operations Common to Each Mode Clearing titles This function allows you to perform a system check from the adjust mode when required. 2-1. Select “S-CHECK”. 3-1. Press and hold the [ ] button for 1 second or longer. “S-CHECK” appears in the display, then the unit returns to the previous operation mode. 1. Select and play a CD in the CD changer for which you want to clear the title. 2. Press and hold the [DISP] button for 1 second or longer. 3. Press the [x] or [v] button to select “TITLE IN”. 4.
English 7. ACCESSORIES USB/MTP Operations USB memory/MTP device operation Note: • The following operations are the same as for CD mode: ∗Pause ∗Track selection ∗Fast-forward/fast-backward (Except DRM file) ∗Top function ∗Scan play ∗Repeat play ∗Random play ∗Folder selection See “CD/MP3/WMA/AAC Operations” (page 2326) for details. About USB memory • USB is an acronym for Universal Serial Bus, and refers to an external bus standard supporting data transfer rates of 12 Mbps.
USB/MTP Operations To listen to tracks on a connected USB memory/MTP device 1. Connect the USB memory/MTP device to the USB slot. Playback will begin from the first file recorded on the device. 1. Press the [SRC] button to switch the source. When USB memory/MTP device is selected, playback (except DRM files) will begin from the location at which playback was previously stopped.
iPod Operations English This section describes operations when connected to an Apple iPod via the USB slot. Notes: • See the iPod Owner’s Manual for details regarding operation conditions. • The unit will not operate, or may operate improperly with unsupported versions. • For a list of compatible Apple iPod unit with the this model, please contact your Clarion dealer or www.clarion.com.
iPod Operations Selecting category using preset memory 1. Press and hold the [BND] button for 1 second or longer to select the iPod menu mode. The iPod menu categories will be displayed. 1. Press and hold the [BND] button for 1 second or longer to select the iPod menu mode. The category can be set as follows in the [DIRECT] (1-6) buttons. [1] : PLAYLIST [2] : ARTIST [3] : ALBUM [4] : SONG [5] : GENRE [6] : COMPOSER 2. Press the desired [DIRECT] (1-6) button to select the category.
Bluetooth BB Operations English The CeNET Bluetooth interface adapter (BLT583) allows you to utilize your car’s built-in audio system for wireless mobile phone handsfree communication. The car stereo with BLT583 installed will be able to retrieve phonebook contacts, received call, dialed call, missed call, incoming and outgoing calls. For details, consult the owner’s Manual provided with your CeNET Bluetooth interface adapter.(Hereinafter, CeNET Bluetooth interface adapter is abbreviated as Bluetooth BB.
Bluetooth BB Operations 1. Press and hold the [DISP] button for 1 second or longer to switch to the Bluetooth adjustment selection display. 2. Press the [x] or [v] button to select the “item name”. “PAIRING” ↔ “PAIR SPECIAL” ↔ “SELECT” ↔ “DELETE” ↔ “MIC GAIN” ↔ “RING VOL” ↔ “AUTO ANS” ↔ “REFUSE” ↔ “A-CONECT” ↔ “PIN CODE” ↔ “ADDRESS” ↔ “VERSION” ↔ “PAIRING”… 3. Press the [w] or [z] button to select the “desired setting value”.
Bluetooth BB Operations English ● MIC GAIN ● PIN CODE MIC gain can be set by each paired mobile phone device. Each registered device has unique MIC gain setting. 2-1. Select “MIC GAIN”. 3-1. Press the [w] or [z] button to change the MIC gain setting. This PIN code is used during pairing mode. A maximum of 10 digits can be changed through the car stereo. ● RING VOL This option is used to change the ringing volume. 2-1. Select “RING VOL”. 3-1. Press the [w] or [z] button to change the ringing volume.
CD Changer Operations CD changer functions When an optional CD changer is connected through the CeNET cable, this unit controls all CD changer functions. This unit can control a total of 2 changers. Press the [SRC] button and select the CD changer mode to start play. If 2 CD changers are connected, press the [SRC] button to select the CD changer for play. ∗ If “NO MAG” appears in the display, insert the magazine into the CD changer.
CD Changer Operations English Other various play functions ● Disc random play ● Disc scan play ∗ Disc scan play is useful when you want to select a desired CD. The disc random play selects and plays individual tracks or discs automatically in no particular order. This function continues automatically until it is cancelled. 1. Press and hold the [RDM] button for 1 second or longer. “ALL RDM” appears in the display and disc random play starts. 1. Press and hold the [SCN] button for 1 second or longer.
General Problem Cause Measure Power does not turn on. (No sound is produced.) Fuse is blown. Replace with a fuse of the same amperage. If the fuse blows again, consult your store of purchase. Incorrect wiring. Consult your store of purchase. No sound output when operating the unit with amplifiers or power antenna attached. Power antenna lead is 1. Turn the unit off. shorted to ground or 2. Remove all wires attached to the power antenna excessive current is required lead.
Problem English No sound heard Cause Measure The device contains no MP3/ Record MP3/WMA/AAC files properly to the device. WMA/AAC files. The files are not proper MP3/ Use only properly encoded MP3/WMA/AAC files. WMA/AAC format. USB/MTP/iPod Connectors are loose. The device isn’t recognized. The device is damaged. Connectors are loose. According to the state of operation on the device, the communication fault is caused. Can’t insert the device. Disconnect the device and reconnect.
English 9. ERROR DISPLAYS If an error occurs, one of the following displays is displayed. Take the measures described below to eliminate the problem. USB/MTP/iPod CD changer CD/MP3/WMA/AAC Error Display Cause Measure ERROR 2 A CD is caught inside the CD This is a failure of CD deck’s mechanism and consult deck and is not ejected. your store of purchase. ERROR 3 A CD cannot be played due to scratches, etc. ERROR 6 A CD is loaded upside-down Eject the disc then reload it properly.
English 10.SPECIFICATIONS Radio section General Tuning System: PLL synthesizer tuner Receiving Frequencies: FM : 87.5 to 108 MHz (0.05 MHz steps) MW : 531 to 1602 kHz (9 kHz steps) LW : 153 to 279 kHz (3 kHz steps) Output Power: 19 W ✕ 4 (DIN 45324, +B=14.4V) Power Supply Voltage: 14.4 V DC (10.8 to 15.6 V allowable), negative ground Power Consumption: Less than 15 A Speaker Impedance: 4 Ω (4 to 8 Ω allowable) Weight: Main unit: 1.
TEL :+49-6105-977-0 FAX :+49-6105-977-399 CE DECLARATION o f CONFORMITY We Clarion Europa GmbH (supplier's name) Hessenring 19-21, 64546 Mörfelden-Walldorf, GERMA NY (address) declare under our sole responsibility that the product CAR RADIO with CD PLAYER MODEL: DXZ388RUSB,DXZ389RUSB,DXZ389RGUSB Product code:PE3046 (differ: illumination) TYPE: 1043213 (name, type or model, possibly sources and numbers of items) to which this declaration relates is in conformity with