Owner’s manual / Mode d’emploi Bedienungsanleitung / Istruzioni per l’uso Gebruiksaanwijzing / Manual de instrucciones Bruksanvisning / Manual de instruções DXZ938R HIGH END RDS-EON AM/FM RADIO CD-PLAYER COMBINATION • COMBINE RADIO AM/FM RDS-EON-LECTEUR CD HAUT DE GAMME • VIELSEITIGE RDS-EON AM/UKW-CD-SPIELERKOMBINATION • COMBINAZIONE DI RADIO RDS-EON AM/FM DI ALTO LIVELLO E LETTORE CD • HOOGWAARDIGE RDS-EON AM/FM RADIO CD-SPELER COMBINATIE • COMBINACIÓN DE RADIO DE RDS-EON Y AM/FM Y REPRODUCTOR DE DISCOS
Thank you for purchasing this Clarion product. ∗ Please read this owner’s manual in its entirety before operating this equipment. ∗ After reading this manual, be sure to keep it in a handy place (e.g., glove compartment). ∗ Check the contents of the enclosed warranty card and keep it carefully with this manual. ∗ This manual includes the operating procedures of the CD changer, MD changer, AUX, DAB, DSP, DVD, PHONE MUTE and TV tuner connected via the CeNET cable.
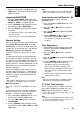
: Stereo indication : Manual indication Function mode indication The names of modes being selected,etc.are displayed. Preset channel indication (1 to 6) Disc number indication (1 to 12) Anti-theft indication :Disc indication :Scan indication : Music mode indication :Repeat indication : Matrix mode indication :Random indication 1. PRECAUTIONS ............................................................................................................................... 3 Dual Action ...................
Note: • Be sure to read this chapter referring to the front diagrams of chapter “2. CONTROLS” on page 5 (unfold). [FNC] [RELEASE] button [P/A] button • Deeply press the button to remove the DCP. • Performs preset scan while in the radio mode. When the button is pressed and held, auto store is performed. • Performs scan play for 10 seconds for each track while in the CD mode. [VSE] button [EQ] • Press to enter VSE mode or the Position mode.
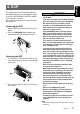
The control panel can be detached to prevent theft. When detaching the control panel, store it in the DCP (DETACHABLE CONTROL PANEL) case to prevent scratches. We recommend taking the DCP with you when leaving the car. Removing the DCP 1. With the DUAL ACTION closed, turn off the power. 2. Press the [RELEASE] button deeply and take and pull the DCP to detach the DCP. Attaching the DCP 1. Insert the DCP so that the A section on the right side of the DCP catches on the hook B on the unit. 2.
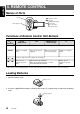
English 5. REMOTE CONTROL Names of Parts Joystick wz Volume control ad Search BND (Band) button Top button BND Disc Up button Program button FNC (function) Functions of Remote Control Unit Buttons Mode Radio (DAB) (RDS) Button CD/MD changer DVD changer CD TV [FUNC] Switches among radio, DAB, CD, DVD deck, CD/MD changer, DVD changer, TV, and AUX. [BAND] Switches reception band. Plays the first track. Top play. Moves the next disc in increasing order.
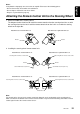
English Notes: Using batteries improperly can cause them to explode. Take note of the following points: • Do not short-circuit, disassemble or heat batteries. • Do not dispose of batteries into fire or flames. • Dispose of spent batteries properly. Attaching the Remote Control Unit to the Steering Wheel 1. Attach the holder to the steering wheel. The diagrams below show how to install the remote control unit on the steering wheel of a car with the steering wheel on the Left.
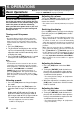
English 6. OPERATIONS Basic Operations Note:Be sure to read this chapter referring to the front diagrams of chapter “2. CONTROLS” on page 5 (unfold). CAUTION Be sure to lower the volume before switching off the unit power or the ignition key. The unit remembers its last volume setting. If you switch the power off with the volume up, when you switch the power back on, the sudden loud volume may hurt your hearing and damage the unit.
Basic Operations Note: • When CTR + SW are chosen, audio output from CTR is not available except in the PL II mode. Operation BASS/TREB Center Speaker and Sub Woofer On / Off 1. Press the “BASS/TREB” mode. Each time the [EQ] button is pressed, the adjusting item “BASS” or “TREB” is changed cyclically. 2. Turn the [ROTARY] knob clockwise or counterclockwise to adjust “BAS/TREB”. 3. Press the [EQ] button to return to the previous mode. Select PLII Mode on and SP setting to “CTR+SW” mode 1.
AC-Processor II Operation English Dolby Pro Logic II Dolby Pro Logic II is a matrix decoding technology in which the updated digital matrix technology is applied and Dolby Pro Logic is further improved. It realizes excellent 5.1 channel reproduction of Dolby surround source as well as stereo sound sources such as CDs, thereby causing a surround channel to be full-ranged (20 Hz to 20 kHz) and become stereo. Therefore, you can enjoy any stereo sources with dynamic sound of 5.1 channel.
AC-Processor II Operation AC-Processor II Operation There are 2 modes “STD” (standard) and “PRO” (professional) in the AC-ProII. 1. Setting the speaker to 4ch+2ch (For details, refer to the subsection “Speaker Setting” in the section “Basic Operations”). 2. Turn off the PLII mode. 3. Press and hold the [TITLE] button for 1 second or longer and enter “ADJ” mode. 4. Press the [a] or [d] button to select the “AC-PII SEL”. 5. Press the [ ] button to select AC-ProII mode from “STD” or “PRO”. 6.
AC-Processor II Operation English 5. Press and hold the [VSE] button for 1 second or longer so that the POSITION effect is turned on or off. Adjusting AC-PII PRO 1. Select “VSE” menu which you want to edit on the basis of. 2. Press and hold the [TITLE] button for 1 second or longer. 3. Press the [a] or [d] button to select item to be adjusted. ∗ There are “TIME ALIGN” and “SP GAIN” available for the items to be adjusted. 4. Press the [ ]. 5.
Radio Operations Manual tuning 1. Press the [FNC] button and select the radio mode. The frequency or PS appears in the display. There are 2 ways available: Quick tuning and step tuning. When you are in the step tuning mode, the frequency changes one step at a time. In the quick tuning mode, you can quickly tune the desired frequency. 1. Press the [BND] button and select the desired band (FM or AM (MW/LW)). ∗ PS: Programme service name 2. Press the [BND] button and select the radio band.
English Radio Operations RDS Operations Auto store RDS (Radio Data System) Auto store is a function for storing up to 6 stations that are automatically tuned in sequentially. If 6 receivable stations cannot be received, a previously stored station remains unoverwritten at the memory position. 1. Press the [BND] button and select the desired band (FM or AM (MW/LW)). 2. Press and hold the [P/A] button for 2 seconds or longer.
RDS Operations REG (Regional programme) function When the REG function is ON, the optimum regional station can be received. When this function is OFF, if the regional station area switches as you drive, a regional station for that region is received. ∗ The factory default setting is “OFF”. Notes: • This function is disabled when a national station such as BBC R2 is being received. • The REG function ON/OFF setting is valid when the AF function is ON.
RDS Operations English PTY This function enables you to listen to a broadcast of the selected programme type when it starts even if the unit is on a function mode other than radio. ∗ Some countries do not yet have PTY broadcast. ∗ In the TA standby mode, a TP station has priority over a PTY broadcast station. ●Setting the PTY standby mode When you press the [PTY] button, “PTY” lights in the display and the PTY standby mode is turned on.
RDS oprations Loading a CD 1. Press the [O] button. The DUAL ACTION opens. . CAUTION Emergency broadcast If an emergency broadcast is received, all the function mode operations are stopped. “ALARM” appears in the display and the emergency broadcast can be heard. ●Cancelling an emergency broadcast If you press the [AF] button, emergency broadcast reception is cancelled.
CD Operations English Ejecting a CD Top function 1. Press the [O] button. The DUAL ACTION opens. Press the [CD EJECT] button to eject a CD. “EJECT” appears in the display. The top function resets the CD player to the first track of the disc. Press the [BND] button to play the first track (track No. 1) on the disc. CAUTION Be careful not to get your fingers caught when opening and closing the DUAL ACTION. 2. Remove the CD and press the [Q] button to close the DUAL ACTION.
Operations Common to Each Mode Titles up to 10 characters long can be stored in memory and displayed for CD, CD changer and TV stations. The number of titles that can be entered for each mode are as follows. Mode CD mode TV mode Number of titles 50 titles 15 titles CD changer mode CDC655z connected CDC655Tz connected CDC1255z connected Number of titles 60 titles 100 titles 50 titles 1. Press the [FNC] button to select the mode you want to enter a title (CD, CD changer or TV). 2.
Operations Common to Each Mode English 3. Turn the [ROTARY] knob clockwise or counterclockwise to adjust Contrast level. 4. Press the [TITLE] button to return to the previous mode. ∗ Adjustment range is LV1 to LV18 ∗ Factory default setting is LV18. Key Illumi 1. Press the [TITLE] button for 1 second or longer to enter ADJ mode. 2. Press the [a] or [d] button to select the “KEY ILLUMI”. 3. Turn the [ROTARY] knob clockwise or counterclockwise to select Key illumi color. 4.
Operations Common to Each Mode Setting the method for Ttitle scroll Set how to scroll in CD-TEXT or MD. ∗ The factory default setting is “ON”. 1. Press and hold the [TITLE] button for 1 second or longer to switch to the adjustment selection display. 2. Press the [a] or [d] button and select “AUTO SCROLL”. 3. Turn the [ROTARY] knob clockwise or counterclockwise and select “ON” or “OFF”. ● ON: To scroll automatically. ● OFF: To scroll just 1 time when the title was changed or the title key was pressed. 4.
Operations Common to Each Mode English OFF ➜ ON ➜ MUTE ➜ OFF... ● OFF: This unit continues normal operation even when the cellular phone is used. Note: • If conncting a hands-free kit, please ensure the setting is ON to receive the telephone audio through the system. ● ON: You can listen to your telephone calls from the speakers connected to this unit. ∗ When listening to your calls on your car speakers, you can adjust the volume by turning the [ROTARY] knob.
English 7. OPERATIONS OF ACCESSORIES CD/MD/DVD Changer Operations CD/MD/DVD changer functions When an optional CD/MD/DVD changer is connected through the CeNET cable, this unit controls all CD/MD/DVD changer functions. This unit can control a total of 2 changers (CD/MD/DVD). Press the [FNC] button and select the CD/MD/ DVD changer mode to start play. If 2 changers are connected, press the [FNC] button to select the CD/MD/DVD changer for play.
CD/MD/DVD Changer Operations English Disc scan play Disc random play Disc scan play locates and plays the first 10 seconds of the first track on each disc in the currently selected CD (MD) changer. This function continues automatically until it is cancelled. The disc random play selects and plays individual tracks or discs automatically in no particular order. This function continues automatically until it is cancelled. 1. Press and hold the [PTY] button for 1 second or longer.
TV Operations When an optional TV tuner is connected through the CeNET cable, this unit controls all TV tuner functions. To watch TV requires a TV tuner and monitor. Watching a TV 1. Press the [FNC] button and select the TV mode. 2. Press the [BND] button to select the desired TV band (TV1 or TV2). Each time the button is pressed, the input selection toggles between TV1 and TV2. 3. Press the [a] or [d] button to tune in the desired TV station.
English TV Operations Digital Radio / DAB Operations 2. Press and hold the [P/A] button for 2 seconds or longer. The stations with good reception are stored automatically to the preset channels. DAB control function When a CeNET cable is used to connect a DAB (DAH913 or DAH9500z) (sold separetely), all functions can be operated. Preset scan Listening to the DAB station Preset scan allows the user to view each preset position before it automatically advances to the next preset.
Digital Radio / DAB Operations Programme scan This function scans through each receivable programme in a DAB station being received for 10 seconds sequentially. This is useful when you want to search for a desired programme. 1. Press the [FNC] button to receive a DAB station. 2. Perform the following operation depending on the connected model. Press the [P/A] button. “SERVICE SCN” lights up and the unit starts scanning each programme for 10 seconds sequentially.
Digital Radio / DAB Operations English INFO (Announcement) In the INFO standby mode, when the selected announcement programme starts, the main unit switches to the selected announcement programme automatically. ●Setting the INFO standby mode If you press and hold the [TA] button for 1 second or longer, “INFO” lights in the display and the main unit is set into the INFO standby mode until the selected announcement is broadcast.
DVD DECK Operations Volume setting of TA, INFO, emergency broadcast (ALARM) and PTY Operation The volume for TA, INFO, ALARM and PTY interrupts can be set during TA, INFO, ALARM and PTY interrupt. Perform the following operation depending on the connected model. ∗ The factory default setting is “15”. During a TA, INFO, ALARM or PTY interrupt, turn the [ROTARY] knob clockwise or counterclockwise to set the volume to a desired level (0 to 33).
Problem General Power does not turn on. (No sound is produced.) Cause Measure Fuse is blown. Replace with a fuse of the same amperage. If the fuse blows again, consult your store of purchase. Incorrect wiring. Consult your store of purchase. No sound output when operating the unit with amplifiers or power antenna attached. Power antenna lead is shor- 1. Turn the unit off. ted to ground or excessive 2. Remove all wires attached to the power antencurrent is required for na lead.
English 9. ERROR DISPLAYS If an error occurs, one of the following displays is displayed. Take the measures described below to eliminate the problem. Error Display Measure ERROR 2 A CD is caught inside the CD deck and is not ejected. This is a failure of CD deck’s mechanism and consult your store of purchase. ERROR 3 A CD cannot be played due to scratches, etc. Replace with a non-scratched, non-warped-disc. A CD cannot be played due to pick up failure. Consult your store of purchase.
English DVD changer Error Display Cause Measure ERROR 2 A DISC inside the DVD changer cannot be played. This is a failure of dvd mechanism and consult your store of purchase. ERROR 3 A DISC cannot be played due to scratches, etc. Retry or replace with a non-scratched, nonwarped-disc. ERROR 6 A DISC inside the DVD changer cannot be played because it is loaded upside-down. Eject the disc then reload it properly ERROR P Parental level error Set the correct Parental level.
English 10. SPECIFICATIONS Français Radio section General Tuning System: PLL synthesizer tuner Receiving Frequencies: FM : 87.5 to 108 MHz (0.05 MHz steps) MW : 531 to 1602 kHz (9 kHz steps) LW : 153 to 279 kHz (3 kHz steps) Output Power: 4 ✕ 31 W (DIN 45324, +B=14.4V) Power Supply Voltage: 14.4 V DC (10.8 to 15.6 V allowable), negative ground Power Consumption: Less than 15 A Speaker Impedance: 4 Ω (4 to 8 Ω allowable) Auto Antenna Rated Current: 500 mA or less Weight: Main unit: 1.