Owner’s manual !" 사용 설명서 DXZ956MC CD/MP3/WMA Receiver / CeNET & Touch Panel Control / Music Catcher • / CeNET !" # / CD/MP3/WMA Music Catcher • CD/MP3/WMA 리시버 / CeNET & 터치패널 컨트롤 / 뮤직 캐처 Clarion Co., Ltd. 2005/2 (Abe·Abe) +DXZ956MC_00-Cover-ECK.p65 All Rights Reserved. Copyright © 2005: Clarion Co., Ltd. Page 1 PE-2747K 280-8213-00 05.2.17, 2:16 PM Adobe PageMaker 6.
English Thank you for purchasing this Clarion product. ∗ Please read this owner’s manual in its entirety before operating this unit. ∗ After reading this manual, be sure to keep it in a handy place (e.g., glove compartment). ∗ This manual includes the operating procedures of the CD changer and TV tuner connected via the CeNET cable. The CD changer and TV tuner have their own manuals, but no explanations for operating them are described. Contents 한국어 1. FEATURES ...........................................
1. When the inside of the car is very cold and the player is used soon after switching on the heater, moisture may form on the disc or the optical parts of the player and proper playback may not be possible. If moisture forms on the disc, wipe it off with a soft cloth. If moisture forms on the optical parts of the player, do not use the player for about 1 hour. The condensation will disappear naturally allowing normal operation. 2.
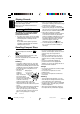
Sloping Console English This unit uses a SLOPING CONSOLE to make large screen displays possible. When you use the SLOPING CONSOLE, be sure to close it. CAUTION BE CAREFUL NOT TO GET YOUR FINGERS CAUGHT WHEN OPENING AND CLOSING THE SLOPING CONSOLE. 1. For safety’s sake, always close the SLOPING CONSOLE before leaving this unit unused for a prolonged period or switching OFF the ignition key. If you switch OFF the ignition key with the SLOPING CONSOLE tilted, the SLOPING CONSOLE does not close. 2.
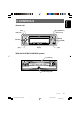
English 3. CONTROLS Source unit [Q] (OPEN/EJECT) [ADJ] Photo Sensor IR-Receiver [MODE] [ROTARY] [ ] (SOUND) [SRC] [ISR] Display With the SLOPING CONSOLE opened [CD SLOT] DCP Detaching Slider DXZ956MC +DXZ956MC_01-02-Eng.
English 4. NOMENCLATURE Names of the Buttons and their Functions IR-Receiver [ROTARY] knob • Receiver for remote control unit. (Operating range: 30° in all directions) • Press the knob to turn the power ON. • Press the knob to turn the power OFF. • Turn the knob to adjust the volume. [ADJ] button • Use this button to set or adjust the various settings in the adjust mode. [CD SLOT] [Q] (OPEN/EJECT) button DCP Detaching Slider • Open/closes the control panel.
Operations when External Equipment is Connected to this Unit English ● When the CD/DVD changer is connected ∗ For details, see the section “CD changer operations” (cf. page 46). For the DVD changer, refer to the Owner’s Manual provided with the DVD changer. ● When the TV is connected ∗ For details, see the section “TV operations” (cf. page 49). DXZ956MC +DXZ956MC_01-02-Eng.
Touch Panel Buttons English ● Standard operation display Left slide button Right slide button ● Simple operation display (To switch to the simple operation display, press and hold the [MODE] button for 2 seconds or longer.) Left button 98.10 FM1 Right button P3 P.CH SEEK PRESET BAND 2:45 pm DISP PS/AS FM1 P.CH SEEK 98.10 Sub buttons PRESET Left slide button BAND PS/AS 2:45 pm DISP P3 Sub buttons • Touch this button for seek up/down or track up/ down operations.
Touch Panel Operations Touch Touch the display with your fingertip and take it away within 1 second. This is the most basic operation when operating the display. Touch Touch the display with your fingertip, and move your finger to the up ( ) or down ( ) with your fingertip still touching the display, and keep your fingertip on the display. The current operation continues for the time your fingertip is held on the display. This operation is used, for example, for fast-forwarding/fast-rewinding tracks.
English 5. DCP The control panel can be detached to prevent theft. When detaching the control panel, store it in the DCP (DETACHABLE CONTROL PANEL) case to prevent scratches. We recommend taking the DCP with you when leaving the car. Attaching the DCP 1. Place the DCP to the SLOPING CONSOLE, adjusting the metal connecters on DCP and the SLOPING CONSOLE. 2. Press the DCP until it clicks into the SLOPING CONSOLE. Removing the DCP 1. Press the [Q] button to open the DCP. 2.
English 6. REMOTE CONTROL Receiver for remote control unit Operating range : 30° in all directions Remote control unit Signal transmitter [SRC] [BND] [ ] [ ], [ ] [a], [d] [MUTE] [DISP] [ISR] [RDM] [SCN] [RPT] Inserting the Battery 1. Turn over the remote control unit and slide the cover in the direction indicated by the arrow in the illustration. 2. Insert the battery (CR2025) into the insertion guides, with the printed side (+) facing upwards. 3.
English Functions of the Remote Control Unit Buttons Mode CD/MP3/WMA/ M.CATCHER Radio Button CD changer DVD changer TV [SRC] Switches among radio, CD/MP3/WMA, MC, CD changer, DVD changer, TV and AUX. [BND] Switches reception band. Returns to the first track. Moves the next disc in increasing order. Switches reception band. [ ],[ ] Increases and decreases volume (in all modes). [ ],[ ] Moves preset channels up and down. Moves tracks up and down.
English 7. OPERATIONS Basic Operations Speaker system CAUTION Be sure to lower the volume before switching the unit off or the ignition key. The unit remembers its last volume setting. If you switch the power OFF with the volume up, when you switch the power back ON, the sudden loud volume may hurt your hearing and damage the unit.
Basic Operations English Selecting a speaker system Turning off When this product is turned on for the first time, it allows you to select a speaker system. Choose your system in “SPEAKER SELECT” screen by following the procedure below. 1. Press the [ROTARY] knob. ∗ The clock will stay displayed after the power is turned OFF. 1. Touch the speaker system best suited to your car. SPEAKER SELECT 3 WAY 2 WAY Dolby PL NORMAL 2. Touch [OK] to confirm your selection.
Basic Operations There are 2 basic operation displays: standard operation display and simple operation display. 1. Press and hold the [MODE] button for 2 seconds or longer to switch the operation display. P.CH 98.10 PRESET BAND 2:45 pm DISP PS/AS 3. Touch [RTN].
Basic Operations English Adjusting the spectrum analyzer 2. Touch [TITLE]. DISPLAY EDIT P 1. Touch [DISP]. 1 05 BGV TITLE HQ 01 Don , 2:45 pm DISP TOP LOW COLOR SENS SPE/ANA RTN ∗ Title edit mode appears. t Stop Be TRACK 01:01 REC D-BLUE 3. Touch on the right of the display to choose the kind of title to show. ∗ Display edit mode appears. DISPLAY EDIT 2. Touch [SP/ANA].
Radio Operations ● Standard operation display The standard operation display appears by pressing the [SRC] button and selecting the radio mode. Preset No. display Title display Reception Frequency band display display 98.10 FM1 P3 PS/AS Touching this starts a preset scan. Touching and holding this for 2 seconds or longer starts an auto store. Touching this during the preset scan/auto scan ends the operation. DISP The display contents can be changed. P.
Radio Operations English Seek tuning Preset memory Seek tuning is a function for automatically tuning stations with good reception. A total of 24 preset positions (6-FM1, 6-FM2, 6FM3, 6-AM) exists to store individual radio stations in memory. 1. Touch and hold [BAND] for 1 second or longer if “MANU” is displayed. Automatic tuning is possible when “SEEK” is displayed. 2. Touch on the frequency display. “SEEK UP”/“SEEK DOWN” is displayed, and tuning starts.
Radio Operations English ■ To cancel preset scan 1. Touch [PS/AS]. “P-SCAN” display disappears and the stations that were being received when [PS/ AS] was touched are received next. Instant station recall (ISR) Instant station recall is a special radio preset that instantly accesses a favorite radio station at a touch of a button. The ISR function even operates with the unit in other modes. • The factory default setting is “FM87.9MHz”. 1. Press the [ISR] button. “ISR” appears on the display.
CD/MP3/WMA Operations English Screen displays in the CD/ MP3 mode Touching this pauses or resumes play. ● Standard operation display The standard operation display appears by pressing the [SRC] button to select the CD/MP3 mode. Track No. display Title display MP3 (WMA) Folder No. display MP3 01 Don , 01 t Stop Be TRACK DISP The display contents can be changed. a/d (only in the simple operation display) Touching these buttons selects the track to play.
CD/MP3/WMA Operations Precautions when creating MP3/WMA disc ● Usable sampling rates and bit rates: 1. MP3: Sampling rate 11.025 kHz-48 kHz, Bit rate: 8 kbps-320 kbps / VBR 2. WMA: Bit rate 48 kbps-192 kbps ● File extensions 1. Always add a file extension “.MP3” or “.WMA” to MP3 or WMA file by using single byte letters. If you add a file extension other than specified or forget to add the file extension, the file cannot be played. 2. Files without MP3/WMA data will not play.
CD/MP3/WMA Operations English • Discs not bearing the or mark and CD-ROMs cannot be played by this unit. • Some CDs recorded in the CD-R/CD-RW mode may not be usable. Loading 8 cm compact discs ∗ No adapter is required to play an 8 cm CD. ∗ Insert the 8 cm CD into the center of the CD SLOT. ∗ Play automatically starts when the mode changes to the CD/MP3 mode. Pausing play 1. Touch [ ]. ■ To resume play 1. Touch [ ] again.
CD/MP3/WMA Operations Top function The top function resets the CD player to the first track of the disc. 1. Touch [TOP]. Play starts from the first track (track No.1). Scan play 1. Press the [MODE] button. This function allows you to locate and play the first 10 seconds of all the tracks recorded on a disc. 2. Touch [Å]/[Î] to go to the next page. 1. Press the [MODE] button. 3. Touch [PLAY LIST]. 2. Touch [TRACK SCAN]. ∗ Scan play starts from the next track after the track currently being played.
CD/MP3/WMA Operations English ■ To cancel folder repeat play 1. Press the [MODE] button. Random play This function allows you to play all tracks on the disc at random. When the disc contains 2 or more folders, all of the tracks in the folder are played at random, followed by all of the tracks in the next folder. This is repeated for all folders. 1. Press the [MODE] button. 2. Touch [TRACK RDM]. ■ To cancel random play 1. Press the [MODE] button.
MUSIC CATCHER Operations HQ 01 Don , t Stop Be TRACK 01:01 REC 2:45 pm DISP TOP • When the memory capacity is used up, “MEMORY FULL” appears on the display and recording is canceled. • Recording cannot be performed during SCN, RPT, and RDM. In such cases, “BUSY” appears on the display. • When recording is canceled, the track that has been recorded incompletely is deleted.
MUSIC CATCHER Operations English Erasing operation (ERASE function) MUSIC CATCHER has 3 different modes for erasing files from memory. “TRACK ERASE” : erase only one track. “FOLDER ERASE” : erase the whole folder. “ALL ERASE” : erase all the contents of the flash memory. 1. Press the [SRC] button to select the M.CATCHER mode. 2. Press the [MODE] button while playing music. 3. Touch [Å]/[Î] to go to the next page. 4. Touch [TRACK ERASE], [FOLDER ERASE], or [ALL ERASE]. FOLDER ERASE ? OK CANCEL AVIL.
Sound Adjustment You can adjust a sound effect or tone quality to your preference. A speaker system is selected in the speaker select procedure (cf. page 14) when this product is turned on for the first time. The adjustment item depends on the speaker system. ● 3 WAY Anti Distortion Filter (ADF) .................... Page 27 SETTING Parametric Equalizer (P.EQ) .............. Page 28 Crossover (X-OVER) ........................ Page 29 Time Alignment (TIME ALIGN) ......... Page 30 Speaker Gain (SP GAIN) ......
Sound Adjustment English 4. To change the details of the ADF setting, press the [ADJ] button. 5. Touch on the left of the display to select the desired item. Each touch of switches the adjustment item display as follows: ●Adjustment item (when USER is selected in step 3) BASS ➜ TREBLE ➜ COMP ➜ BASS... ●Adjustment item (when 1 to 3 is selected in step 3) LEVEL ➜ COMP ➜ LEVEL... 6. Touch on the right of the display to adjust the item. ∗ “BASS” and “TREBLE” can be adjusted within the range 1 to 13.
Sound Adjustment ● Compensation of frequency characteristics The figure below shows the relationship between the center frequency, gain and Q curve. Q curve (Q) Level F (dB) Q= f Q curve : 20 Q curve : 1 SETTING–X-OVER This function allows you to adjust the speaker setting such as cutoff frequencies or slope matched to the speakers you are using. (Crossover) 1. Press the [SOUND] button. 2. Touch [SETTING]. 3. Touch [X-OVER]. X OVER MODE LPF 80Hz REAR SP RTN 4.
Sound Adjustment English ●“HPF” • The adjustment range of “HIGH” is 630Hz to 20 kHz. (The factory default setting is “2kHz”.) • The adjustment range of “MID” is THROUGH, 25Hz to 10 kHz. (The factory default setting is “THROUGH”.) • The adjustment range of “SUB-W” (in the case of 3WAY) or “REAR” (in the case of 2WAY) is THROUGH, 16Hz to 250 Hz. (The factory default setting is “THROUGH”.) ●“LPF SLOPE” and “HPF SLOPE” • The adjustment range is -6dB/OCT, -12dB/OCT, -18dB/OCT.
Sound Adjustment ■ To initialize the adjustments The setting of “TIME ALIGN” and “SP GAIN” temporarily returns to the factory default setting. When the setting that is adjusted for the driver's seat returns to the factory default setting, a sound suitable for all seats is provided. You can initialize the adjustments for SETTING items. 1. Press the [SOUND] button. 3. Touch [ALL SEAT]. You can recall the stored adjustments for SETTING items. SETTING X-OVER TIME ALIGN 2. Touch [INITIAL].
Sound Adjustment English Adjusting bass/treble Selecting the VSE menu The bass/treble mode can be adjusted only when the “SPEAKER SELECT” is set to “3 WAY”, “2 WAY”, or “NORMAL” (cf. page 14) and “EQ SELECT” is set to “BASS/TREB” (cf. page 43). • The factory default setting is “0”. 1. Press the [SOUND] button.
Sound Adjustment Adjustment items ● DIFFUSE Adjusts the deviation in diffused sound pressure. 10. Touch [PRESET] to display the VSE menu list. ● CAR WIDTH Adjusts the deviation in sound pressure along the width of the car. ● CAR LENGTH Adjusts the deviation in sound pressure along the length of the car. 1. Press the [SOUND] button. SOUND 1 2 VSE P.EQ OFF OFF OFF FILTER SW VOLUME BALANCE 0 0 RTN 3. Touch [ON/OFF] to turn ON. The VSE effect is toggled ON/OFF.
Sound Adjustment English P.EQ basic menu Speaker Mounting No. Display name position 1 SEDAN-1 Front: Front door Rear: Rear parcel 2 SEDAN-2 Front: Front door Rear: Rear door 3 MINI VAN-1 Front: Front door Rear: Luggage (side) 4 MINI VAN-2 Front: Front door Rear: Rear door 5 WAGON Front: Front door Rear: Luggage (side) 6 USER User preference 5. Press the [SOUND] button to return to the original mode. Adjusting/storing P.EQ (user memory) 1. Press the [SOUND] button. 2. Touch [P.EQ]. SETTING P.
Sound Adjustment 12. Touch [PRESET] to display the P.EQ menu list. 13. Touch and hold [USER] for 2 seconds or longer. You will hear a long beep, and the values you adjusted up to step 10 are stored to the P.EQ menu. If you hear a short beep, the adjustment values up to step 10 are discarded. Adjust these values again as required. 14. Press the [SOUND] button to return to the original mode. ■ MUSIC (music mode) • This mode is suited for stereo sound sources such as CDs.
Sound Adjustment English ●Adjustment items FRONT-L (Front left) ➜ CENTER*1 ➜ FRONT-R (Front right) ➜ SURROUND-R (Surround right) ➜ SURROUND-L (Surround left) ➜ SUB-WOOFER*2 ➜ FRONT-L... *1 “CENTER” is displayed only when “CENTER-SP” (page 43) is set to “ON”. *2 “SUB-WOOFER” is displayed only when “SUB-WOOFER” (page 43) is set to “ON”. on the right of the display to 4. Touch adjust to the gain level. • “SP-GAIN” can be adjusted within the range -10dB to +10dB.
Sound Adjustment 4. Touching on the right of the display to adjust the delay time. • “SRD-SP” can be adjusted within the range 0ms to 15ms. 5. Press the [SOUND] button to return to the original mode. 1. Press the [SOUND] button. 2. Touch [Å]/[Î] to go to the next page. 3. Touch [Dolby PL II CONT]. • The items to set are “PANORAMA”, “DIMENSION”, and “CTR WIDTH”. 4. Touch on the left of the display to select the item. Dolby PL PANORAMA CONT NO RTN 5.
Common Operations English Screen display in the TITLE INPUT The “TITLE INPUT” screen appears when you enter a title.
Common Operations English 6. Touch on [TEXT] to determine the characters to enter. Changing settings 7. Repeat steps 4 to 6 to enter the title. Selecting setting items 8. Touch [MEMO]. You will hear a long beep, and the title is stored in memory. 1. Press the [ADJ] button. The mode changes to the adjust mode.
Common Operations English ● Setting items Main item APPEARANCE SOUND TUNER SETTING 40 Sub item CLOCK EDIT • Clock setting (cf. page 41) MSG INFO • Setting the message display ON/OFF (cf. page 41) MSG INPUT • Message information input (cf. page 41) DIMMER IN • Auto-dimmer setting (cf. page 42) DMR LEVEL • Setting the dimmer level (cf. page 42) BRIGHT • Adjusting the display brightness (cf. page 42) BLINK LED • Making the LED blink when DCP is removed (cf. page 42) BEEP • Setting beep (cf.
Common Operations When the power is OFF, the clock is displayed. The clock is displayed in 12-hour format. English Setting the clock (CLOCK) 3. Touch on the left of the display to select "MSG INFO". ADJ APPEARANCE MSG INFO OFF 1. Press the [ADJ] button. RTN 2. Touch [APPEARANCE]. on the left slide button to select 3. Touch “CLOCK EDIT” and touch [ENT]. ADJ APPEARANCE CLOCK EDIT [ ENT ] 4. Touch on the right of the display to select “ON” or “OFF”. 5.
Common Operations English Setting the auto-dimmer (DIMMER IN) This function allows you to dim the lighting of the display matched to the illumination or the brightness inside your car. Select either “AUTO” (interlocked to the brightness inside your car) or “ILLUMI” (interlocked to the illumination inside your car) as the auto-dimmer setting. • When the auto-dimmer function is set to “AUTO”, the brightness of the display is dimmed according to the brightness detected by this sensor.
Common Operations 1. Press the [ADJ] button to set to the adjust mode. The short or long high-pitched tone you hear when a button is operated is called a “BEEP”. • The factory default setting is “ON”. 3. Touch on the left of the display to select “SRC ICON”. 1. Press the [ADJ] button to set to the adjust mode. 2. Touch [APPEARANCE]. ADJ APPEARANCE SRC I CON I CON 2. Touch [APPEARANCE]. RTN on the left of the display to 3. Touch select “BEEP”. ADJ APPEARANCE BEEP 4.
Common Operations English 3. Touch on the left of the display to select “CENTER-SP” or “SUB-WOOFER”. ADJ SOUND SUB WOOFER ST RTN Setting the input level (AUX SENS) of portable audio (AUX mode) This function allows you to set the input level of optional external devices connected to this unit. • The factory default setting is “MID”. 4. Touch on the right of the display to select "ON", "ST", "MONO", or "OFF". 1. Press the [ADJ] button to set to the adjust mode. 5.
Common Operations Using the security function (CODEMATIC) This function prevents persons who do not know the touch sequence from easily operating this unit. The Touch Code display appears when DCP is attached and the power is turned ON with “CODEMATIC” set to “ON”. If you touch the display in this screen in the preset order, “SUCCESSFUL” is displayed and the power is turned OFF.
English 8. OPERATIONS OF ACCESSORIES CD Changer Operations CD changer When an optional CD changer is connected through the CeNET cable, this unit can control CD changer operations. This unit can be connected to a total of 2 CeNET-wired CD changers. ■ When 2 CD changers are connected Press the [SRC] button to select the changer connected to this unit. (Each press of the [SRC] button switches the changer.
CD Changer Operations Fast-forward/fast-rewind 1. Press the [SRC] button to select the changer mode. ∗ Each time you press the [SRC] button, the display switches as follows: 1. To fast-forward, touch display. Radio ➜ CD/MP3 ➜ M. CATCHER ➜ (CD changer) ➜ (DVD changer) ➜ (TV) ➜ AUX ➜ Radio... ∗ The mode of equipment that is not connected is not displayed. Play starts automatically when the mode changes to the changer mode. Pausing play 2. To fast-rewind, touch display.
CD Changer Operations English Disc repeat play After all the tracks on the current disc have been played, disc repeat play automatically replays the current disc over from the first track. This function continues automatically until it is canceled. 1. Press the [MODE] button. 2. Touch [DISC RPT]. ■ To cancel disc repeat play 1. Press the [MODE] button. Random play Random play selects and plays individual tracks on the disc in no particular order.
TV Operations When an optional TV tuner is connected through the CeNET cable, this unit controls all TV tuner functions. To watch TV, you need a TV tuner and a monitor. Screen displays in the TV mode ● Standard operation display The standard operation display appears by pressing the [SRC] button to select the TV mode. Reception Channel display band display Preset No. Title display display TV1 3ch MANU 2:45 pm PRESET BAND PS AS DISP DISP PRESET SEEK/MANU indicator P1 P.
TV Operations English Seek tuning Preset memory Seek tuning is a function for automatically tuning stations with good reception. A total of 12 TV stations can be stored (6-TV1 and 6-TV2). This allows you to select your favorite TV stations and store them in memory for later recall. 1. Touch and hold [BAND] for 1 second or longer while “MANU” is displayed. Automatic tuning is possible when “SEEK” is displayed. 2. Touch on the channel display. “SEEK UP/SEEK DOWN” is displayed, and tuning starts.
TV Operations Setting the TV Diver 1. Touch [PS/AS]. “P-SCAN” disappears, and the stations that were being received when [PS/AS] was touched are received next. You can change the reception setting for the TV antenna connected to the TV tuner. • Set this item to “OFF” when a TV diversity antenna is not in use. • The factory default setting is “ON”. Watching a video 1. Press the [ADJ] button to set to the adjust mode. The TV tuner has a VTR input terminal to which 1 external device can be connected.
Problem General English 9. IN CASE OF DIFFICULTY Cause Measure Power does not turn on. (No sound is produced.) Fuse is blown. Replace with a fuse of the same amperage. If the fuse blows again, consult your store of purchase. Incorrect wiring. Consult your store of purchase. No audio when operating the unit with amplifiers. Amplifier turn-on lead is Turn the unit off and check each wire for a possible shorted to ground or short.
CD/MP3/WMA Cause Measure Sound is bad directly after power is turned on. Water droplets may form on the internal lens when the car is parked in a humid place. Let dry for about 1 hour with the power on. Wrong filename File system is not correct. Use ISO9660 level 1, 2 or JOLIET or Romeo file system. File name or extension is not correct. Use alphanumeric/ASCII characters for MP3/WMA file name. Use “.M3U” for the file extension of a play list. Play list play is not performed.
English 10. ERROR DISPLAYS If an error occurs, one of the following displays is displayed. Take the measures described below to eliminate the problem. Cause Measure ERROR 2 A DISC is caught inside the CD deck and is not ejected. This is a failure of CD deck’s mechanism and consult your store of purchase. ERROR 3 A DISC cannot be played due to scratches, etc. Replace with a non-scratched, non-warped-disc. ERROR 6 A DISC is loaded upside-down inside the CD deck and does not play.
FM Tuner Audio Frequency Range: 87.0 MHz to 108.0 MHz Usable Sensitivity: 9 dBf 50dB Quieting Sensitivity: 15 dBf Alternate Channel Selectivity: 70 dB Stereo Separation (1 kHz): 32 dB Frequency Response (±3 dB): 30 Hz to 15 kHz Maximum Power Output: 212 W (53 W × 4 ch) Continuous Average Power Output: 18 W × 4, into 4 Ω, 20 Hz to 20 kHz, 1%THD Bass Control Action (50 Hz): ±12 dB Treble Control Action (12.
Owner’s manual !" 사용 설명서 DXZ956MC CD/MP3/WMA Receiver / CeNET & Touch Panel Control / Music Catcher • / CeNET !" # / CD/MP3/WMA Music Catcher • CD/MP3/WMA 리시버 / CeNET & 터치패널 컨트롤 / 뮤직 캐처 Clarion Co., Ltd. 2005/2 (Abe·Abe) +DXZ956MC_00-Cover-ECK.p65 All Rights Reserved. Copyright © 2005: Clarion Co., Ltd. Page 1 PE-2747K 280-8213-00 05.2.17, 2:16 PM Adobe PageMaker 6.