CLARION PRODUCT REGISTRATION INFORMATION For USA and Canada only Dear Customer: Congratulations on your purchase of a Clarion mobile electronic products. We are confident that you'll enjoy your Clarion experience. There are many benefits to registering your product. We invite you to visit our website at www.clarion.com to register your Clarion product. We have made product registration simple with our easy to use website. The registration form is short and easy to complete.
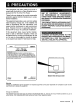
2. PRECAUTIONS This equipment has been tested and found to comply with the limits for a Class B digital device, pursuant to Part 15 of the FCC Rules. These limits are designed to provide reasonable protection against harmful interference in a residential installation. This equipment generates, uses, and can radiate radio frequency energy and, if not installed and used in accordance with the instructions, may cause harmful interference to radio communications.
3. HANDLING MEMORY CARD SD/MMC Memory Card • Do not leave the card in vehicle where there is high temperature or direct sunlight or where electromagnetic waves or electrostatic are easily generated. • When the card is being read, do not remove the card. • After eject operation, always remove the memory card from the slot; otherwise, the flip down panel may not be closed properly. • After usage, store the supplied memory card in the enclosed case. • Do not bend or drop the card.
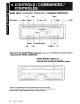
MAIN UNIT / APPAREIL PRINCIPAL / UNlOAD PRINCIPAL [I] [RPT] With the FLIP DOWN PANEL opened I Ouvrez Ie PANNEAU RABATTABLE I Apertura del PANEL ABATIBLE SDIMMC MEMORY CARD SLOT FENTE DE CARTE MEMOIRE SD/MMC RANURA PARA TARJETA DE MEMORIA SDIMMC Note: Be sure to unfold this page and refer to the front diagrams as you read each chapter. Remarque: Veuillez deplier cette page et veils referer aux schlimas Quand veus lisez chaque chapitre.
5. N()MENCLATLJRE Notes: • Be sure to read this chapter referring to the front diagrams of chapter "4. CONTROLS" on page 5. • SO is the abbreviation of Secure Digital Card while MMC is the abbreviation of Multimedia card. Names of the Buttons and Their Functions SD/MMC MEMORY CARD SLOT • SO/MMC memory card insertion slot. [RELEASE] button • Deeply push in the button to unlock the flip down panel. [~/II • ENT] knob • Adjust the volume by turning the knob clockwise or counterclockwise.
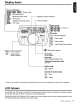
Display Items Source indication IEI!I,(iil§,(iilEI : Radio mode (il[~) : SD mode (MP3) 1m : Bluetooth Audio mode r---- Operation status indication III:!m : AUX mode ".1 : Telephone Interrupt mode ~-I Various display * : ISR mode Radio mode ~~ IID,I];I§I,(~),: Preset no. (~),I];0,I~ SO mode : Normal playback : Track repeat o: Bluetooth indication ENT: Enter indication lSI" : Instant station recall indication 1...
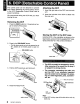
6. DCP (Detachable Control Panel) The control panel can be detached to prevent theft. When detaching the control panel, store it in the DCP (Detachable Control Panel) case to prevent scratches. We recommend taking the DCP with you when leaving the car. Attaching the DCP 1. Insert the right side of the DCP into the main unit. 2. Insert the left side of the DCP to attach into the main unit. Removing the DCP 1. Press the [SRC] button for 1.5 seconds or longer to switch off the power.
7. OPERATIONS Basic Operations Note: Be sure to read this chapter referring to the front diagrams of chapter "4. CONTROLS" on page 5. Be sure to lower the volume before switching off the unit power or the ignition key. The unit remembers its last volume setting. If you switch the power off with the volume up, when you switch the power back on, the sudden loud volume may hurt your hearing and damage the unit. [ l SD Turning on/off the power 1. Press the [SRC] button. 2.
Basic Operations Radio Operations Adjusting the volume Listening to the radio Turning the [ ~/II • ENT ] knob clockwise increases the volume; turning it counterclockwise decreases the volume. 1. Press the [SRC] button and select the Radio mode, then the radio will be on. "VOLUME 0" to "VOLUME 33" will be displayed depends on the volume level.
Radio Operations Manual tuning There are 2 ways available: Quick tuning and step tuning. When you are in the step Tuning mode, the frequency changes one step at a time. In the Quick Tuning mode, you can quickly tune the desired frequency. 1. Press the [BND] button and select the desired FM band. * Press and hold the [BND] button for 1.5 seconds or longer to switch to Manual Seek mode. Make sure "MANUAL TUNE" is displayed briefly.
MP3 Operations What is SD/MMC card? The MultiMediaCard (MMC) and Secure Digital (SD) are flash memory (non-volatile) card format that are used to store large capacity of data in a compact and slim size of media. SD memory cards are based on the older MultiMediaCard (MMC) format with additional features such as write protection switch.
MP3 Operations • Folder structure 1. SO card with a folder having more than 8 hierarchicallevels will be impossible. However, the following hierarchical structure is recommended. • Do not insert memory card other than specify. It may be impossible to extract these cards from the unit and such damage will not be covered by the warranty on this product. If the memory card is not inserted easily, there may be another memory card in the slot or the unit may require service.
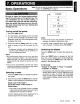
MP3 Operations - ~~-- [RELEASE] button [RELEASE] button Push to insert • Do not remove the memory card when the panel is not fully flipped as this may damage the memory card as well as the unit. Remove the card only when it is fully flipped. • Do not drop the memory card into the space of the flipped down panel. Eject function 1. Press the [RELEASE] button to flip down the panel. 2. Push the memory card slowly to eject and remove it when ejected. 3.
MP3 Operations Pausing play 1. Push the [~/II • ENT] knob to pause play. " .. " appears in the display. 2. To resume track play, push the [~/II • ENT] knob again. " IB-- " appears in the display. Display titles This unit can display title data for the memory card. 1. Press the [DISP] button to display current title type. 2. To select the next type, press the [DISP] button again. The arrangement is shown below. Tf;,~ACK FOLDEf;,~ TITLE • Supports ID3 Tags v2.3 and v2.4.
MP3 Operations . --.--L- FOI~er Folder select This function allows you to select a folder containing MP3 files and start playing from the first track in the folder. 1. Press the [.A.] or [ ......... ] button. 2. Press the [.A.] button to move the next folder. Press the [ ......... ] button to move the previous folder. ~ ( F.~OCI t ) navigation ~l I Fl'::lin'3Pi ck I r-:::~'''--~--''--f-_.''- Track navigation I I•. F.~oo t ... .J l I.- F 1':::1 i rr3P i c k ~ 3.
MP3 Operations Top function Return to the first track of the memory card or the folder currently being played back, and start playing. 1. Press the [BNO] button to play from the first track of the current folder. 2. Press and hold [BNO] button for 1.5 seconds or longer to play the first track of the memory card. Note: • These operations will cancel Track Repeat play and all Random modes. Note: • This function will cancel other previous special playback functions such as track repeat and Random mode.
Introduction to Bluetooth® Wireless Technology MP3 Operations • Card random play This function allows you to play all the tracks of all the folders in a random order. 1. Press the [ROM] button to select "ROM CARD". Notes: • This function will require some amount of time depends on the complexity of folder hierarchy. Always use the folder hierarchy as recommened in chapter "Folder structure" on page 13 for optimal performance. • Any track/folder selection will always perform as next random track/folder.
Introduction to Bluetooth® Wireless Technology What is pairing? With a mobile phone featuring Bluetooth® technology, you must 'pair' the main unit with the phonelBluetooth® audio device before you use it for the first time. Notes: • Please make sure your mobile phone supports the HFP profile. • Always make sure the Bluetooth® Operation mode in the phone is on when using this car handsfree.
Introduction to Bluetooth® Wireless Technology • Please refer chapter "Audio Streaming Operations" on page 23 for music streaming functionality. Please refer "Bluetooth@ adjustment" on page 26 for other Bluetooth® related adjustment. Connecting Bluetooth® device Your device/phone will normally connect automatically to the unit after pairing. However, some phones will not allow automatic connection to the unit after pairing; please use the phone to manually connect to the unit.
Handsfree Operations • Deleting a digit • Ending a call 1. During Telephone Numbers Edit mode, turn the [./11· ENT] knob to select a blank digit. This function allows you to end a call conversation directly from the car stereo. 2. Push the [ ./11 . ENT] knob to delete current digit. 1. Press the [ ~ ] button to end the call. 2. The display returns to previous mode. Note: • Digits on the right side (if there is any) will be shifted to the left.
Handsfree Operations I Notes: • This is dependent on mobile phone. Please make sure your mobile phone supports voice dialing in order to use this feature. Please refer to your mobile phone owner's manual if this function is supported. "CALL FAIL" will be displayed if it is not supported or the call is unsuccessful. Microphone / External Microphone (Included) • Please use an external microphone (optional) for better voice reception if necessary. ~-1 L-....
Audio Streaming Operations Note: • Be sure to read the chapter "Pairing with an external Bluetooth® audio player (A2DP support)" before proceeding. What is audio streaming? Audio streaming is a technique for transferring audio data such that it can be processed as a steady and continuous stream. Users can stream music from their external audio player to their car stereo wirelessly and listen to the tracks through the car's speakers.
Common Operations Adjustment mode • There are 5 categories of Adjusment mode: .-G). Select "TREBLE". • Audio mode (Bass, Treble, Balance, Fader and Loudness) o-G). Turn • Additional Source mode (AU X Input) • Clock* Adjustment mode • Display* Adjustment mode Adjusting the treble [~/II· ENT] knobclockwiseemphasizes the treble; turning it counterclockwise attenuates the treble. Notes: • The factory default setting is "0". • The value range is -7 to +7.
Common Operations o- Select "lOUDNESS". • - Turn the [~/II • ENT] knob to select "ON" or "OFF". • ON • ON : Clock is enabled and manually set by user. • OFF : Clock is disabled. : Loudness effect enabled. • OFF : Loudness effect disabled. Note: • The factory default setting is "OFF". Note: • The factory default setting is "OFF". • Setting AUX function 1. Select "ClK MODE". This option allows user to enable or disable the AUX function.
Common Operations • "SCROLL" t 1. Select "COLOR". "CONTRAST" 2. Turn the [ .-/11 • ENT] knob to select the color, the type changes in the following orders: t "ILLUM" t COL. SCAN ~ OFF ~ BLUE ~ SURF BLUE ~WHITE ~ AQUA ~ GREEN ~ LIME ~ ORANGE ~ RED ~ PINK ~ PALE PINK ~ VIOLET ~ PURPLE~USER COL.~COL. SCAN ... "COLOR" t "USER COL." t "ANIMATION" e-@· Push or turn the [ .-/11 • ENT] knob de- pends on selected item. • Setting the method for title scroll Set how to scroll in MP3 title.
Common Operations • "ADD DEV." t 1. Select "DEL. DEV.". "EDIT DEV." 2. Push the [~/II • ENT] knob. t "DEL. DEV." t "AUTO CONN" 3. Turn the [~/II • ENT] knob to select a device to be deleted. 4. Push the [~/II • ENT] knob. A delete confirmation is prompted. t "MIC" O-®· Push or turn the 5. Turn the [~/II • ENT] knob to select "YES" or "NO". [~/II • ENT] knob de- pends on selected item. • Adding a new device (Pairing mode) 1. Select "ADD DEV.". 2. Push the [~/II • ENT] knob.
Common Operations • Selecting microphone input The clock time reset is done with the following steps. 1. Select "MIC". 2. Turn the [~/II· ENT] knob to select one of the following: -INTERNAL: Built-in microphone will be used. - EXTERNAL: An external microphone will be used. 1. Turn off the power. 2. Press the [RELEASE] button and remove the DCP. 3. Press the reset button with a thin rod. ~Reset button Note: - The factory default setting is "INTERNAL". ) System Menu 1. Press and hold [~] and [ .....
Compatible Devices Supported phones with Bluetooth® wireless technology Make sure your mobile phone supports the following Bluetooth® profile: - HFP (Handsfree for mobile phone) Optional profiles for audio streaming in mobile phone: - A2DP (Stereo music streaming) - AVRCP (Remote control function) Please check your phone's specification for supported profiles. Features supported for each profile vary from product to product.
8. ADDITIONAL INFORMATION Safe and efficient use Installation Note: Please note that only authorized personnel should install the car stereo. Please check with your car dealer for recommendations on professional installation engineers. Check with your car manufacturer's representative to be sure that all equipment for the car stereo, including additional accessories, is placed in a safe location.
Additional Information Electronic equipment Most modern electronic equipment is shielded from RF energy. However, certain electronic equipment is not, therefore: Do not use your car stereo near medical equipment without requesting permission. If you are using any personal medical devices, e.g. a pacemaker or a hearing aid, please read in your mobile phone's User's Guide for further information.
9. TROUBLESHOOTING Power does not turn on. (No sound is produced) Replace with a fuse of the same amperage. If the fuse blows again, consult your store of purchase. Incorrect wiring. Consult your store of purchase. No sound output when operating the unit with amplifiers or power antenna attached. Power antenna lead is shorted to ground or excessive current is required for remote-on the amplifiers or power antenna. 1. Turn the unit off. 2. Remove all wires attached to the power antenna lead.
Troubleshooting o :s Audio streaming is disconnected after telephone interrupt. This is probably happen when audio streaming and telephone function are from the same device (mobile phone). Audio streaming mayor may not resume after interruption as this is highly dependent on the device/phone. Reconnect A2DP/AVRCP (Audio streaming profiles) from the phone again after telephone interrupt. Use Clarion recommends external audio player with Bluetoottf wireless technology.
Troubleshooting After pairing, car stereo is not able to receive and make calls. Bluetootf1® connection is not established yet. Normally it will take several seconds to establish the connection after pairing. Some phones will not automatic connect after pairing. Use your phone to manually connect or enter Telephone mode with Auto connection ON (Car stereo will try to reconnect). Power off and on the car stereo and perform pairing again.
10. ERROR DISPLAYS If an error occurs, one of the following displays is displayed. Take the measures described below to eliminate the problem. NOMP3 SO ERROR CALL FAIL ERROR STREAM ERR No audio file (MP3) is detected in the media. SO memory card format is not supported. Replace with audio contents loaded SO/ MMC card. If the error message persists, please check the SO memory card compatibility or format the memory card as FAT12 or FAT16.
11. SPECIFICATIONS FM tuner General Frequency Range: 87.5 MHz to 107.9 MHz Power Supply Voltage: 14.4 V DC (10.8 V to 15.6 V allowable), negative ground Usable Sensitivity: 11 dBf 50 dB Quieting Sensitivity: 17 dBf Alternate Channel Selectivity: 75 dB Stereo Separation (1 kHz): 35 dB Frequency Response (±3 dB): 30 Hz to 15 kHz SO player Current Consumption: Less than 15 A Speaker Impedance: 4 Q (4 Q to 8 Q allowable) Weight: 1.87 lb. (0.
Clarion Co., Ltd. All Rights Reserved. Copyright © 2007: Clarion Co., Ltd.
Printed in Malaysia /Imprime en Malaisie /Impreso en Malasia _. /8 • • ~ • • ., II 284-1096-00 Installation/Wire Connection Guide Manual d'installation et de connexion Guia de instalaci6n/conexi6n de cables ---1. 2007/07 (eM) BEFORE STARTING J PREPARATIFS J ANTES DE COMENZAR 1. This set is exclusively for use in cars with a negative ground, 12 V power supply. 1. Cet appareil est exclusivement destine a etre utilise dans les voitures avec una alimentation 12 V 2.
• Fixed Mount (TOYOTA, NISSAN and other ISOIDIN equipped vehicles) This unit is designed for fixed installation in the dashboard. If the vehicle is equipped with a factory-installed radio, install the source unit with the parts and screws marked (.). (Figure 7) If the vehicle is not equipped with a factory-installed radio, obtain an installation kit to install the source unit in the following procedure. ~oeu~c~v~n~~~f~~r~,:~ft~I~~=i;O~~~~~O~s~~~Sa~~I~t~e~rSO/g'li~ equipped vehicles. t.
........ -5. WIRE CONNECTIONS I CONNECTIQUE I CONEIION DE CABLES • Rear Layout • Disposition Arriere • Disposlcl6n Trsse,a Red I Rouge I Raja Red Rouge Raja AUX INPUT Right ENTREE AUX Drolle .:J ENTRADA AUXILIAR (AUX INPUT) del Canal Derecho White f Blanc I Blanco AUX INPUT Left \!::====:tJII(J!i!~ ENTREE AUX Gauche ENTRADA AUXILIAR (AUX INPUT) del Canallzqule,do To external amplifier ... To eliminate audio shorl circuits, do nol remove the caps of unused RCA cables.
. . . CDm . . -6. • For VW and Audl Vehicles For other vehicles (Initial position) Pour d'autres vehicules (Position iniliale) Para alms vehfculos (Posici6n inicial) For VW and Audi vehicles, change the position of fuse installation. (Figure 10) o • Pour Les vehicules VW et Audi • 1:Q,1=i=='=='=='=~lgHo-----FU~'~~~ :~~~l Pour Les vehicules VW et Audi, modifier la position de l'installation.
_..... Printed in Malaysia Ilmprime en Malaisie Ilmpreso en Malasia -7. 2007107 (eM) GENERAL CAUTIONS I PRECAUTIONS GENERALES I PRECAUCIONES GENERALES 1. Do not open the case. There are no user serviceable parts inside. If you drop anything into the unit during installation, consult your dealer or an authorized CLARION service center. 2. Use a soft, dry cloth to clean the case. Never use hard cloth, thinner, benzen, a1co~, etc.
.- • CLARION PRODUCT REGISTRATION INFORMATION For USA and Canada only www.clarion.com Dear Customer: Congratulations on your purchase of a Clarion mobile electronic products. We are confident that you'll enjoy your Clarion experience. There are many benefits to registering your product. We invite you to visit our website at www.clarion.com to register your Clarion product. We have made product registration simple with our easy to use website. The registration form is short and easy to complete.
ADDITIONAL REQUEST DEMANDE SUPPLEMENTAIRE PI:DIPO ADICIQNAL 9. TROUBLESHOOTING Refer to the MSD memory card" on page 32 of original manual. The following words were added. '2 rI ~ o MP3 files are unable to . playback, display remains pause or loading. Those MP3 files may be corrupted or do not encoded properly. Use MP3 files encoded properly. IiE Q o Refer to the MBT Audio" on page 33 of original manual. The following words were added. .
9. LOCALIZACION DE AVERIAS Consulte "TarJeta de memoria SD" en la pagina 100 del manual original. Las siguientes palabras fueron ariadidas. Q UJ CG 'C o No puede reproducir archivos MP3. la pantalla permanece en pausa 0 cargando. E Esos archivos MP3 pueden estar falsificados 0 no codificados correctamente. Utilice archivos MP3 codificados correctamente. ~ Consulte "BT Audio" en la pagina 101 del manual original. Las siguientes palabras fueron aJiadidas.
GARANTIE LIMITEE DE CLARION 2007 clarion Pour Ie Canada et les Etats-Unis seulement A moins d'une contre-indication, les produits Clarion achetes chez un revendeur Clarion autorise sont garantis contre tous les defauts de materiaux et de mise en oeuvre pour une periode d'un (1) an compter de la date d'achat originelle.
I:mnMD 281-0632-02 2006/9 clarion CLARION 2007 LIMITED WARRANTY For USA and Canada only Except as noted, Clarion products purchased from an authorized Clarion dealer are warranted against all defects in materials and workmanship for a period of one (1) year from the date of original purchase.