Owner’s manual Mode d’emploi Bedienungsanleitung Istruzioni per l’uso Gebruiksaanwijzing Manual de instrucciones Bruksanvisning Manual de instruções USB/MP3/WMA/AAC RECEIVER RÉCEPTEUR USB/MP3/WMA/AAC USB/MP3/WMA/AAC EMPFÄNGER RICEVITORE USB/MP3/WMA/AAC USB/MP3/WMA/AAC RECEIVER RECEPTOR DE USB/MP3/WMA/AAC USB/MP3/WMA/AAC-RECEIVER RECEPTOR DE USB/MP3/WMA/AAC Clarion Co., Ltd. All Rights Reserved. Copyright © 2009: Clarion Co., Ltd.
English English Français Thank you for purchasing this Clarion product. ∗ Please read this owner’s manual in its entirety before operating this equipment. ∗ After reading this manual, be sure to keep it in a handy place (e.g., glove compartment). ∗ Check the contents of the enclosed warranty card and keep it carefully with this manual. Français Deutsch Italiano Nous vous remercions pour l’achat de ce produit Clarion. ∗ Veuillez lire ce mode d’emploi dans son intégralité avant d’utiliser cet équipement.
Title display OEL Screen The organic electro-luminescence display (OEL Display) of this product is made by high technology basis. However, it is possible that there might be part of the pixels which is always lighting or not lightning. Sometimes unevenness of color and brightness might be occurred depend on the point of view to watch in a characteristic. A descending line across the screen will be displayed regularly to prevent OEL Display burn-in.
Title display OEL Screen The organic electro-luminescence display (OEL Display) of this product is made by high technology basis. However, it is possible that there might be part of the pixels which is always lighting or not lightning. Sometimes unevenness of color and brightness might be occurred depend on the point of view to watch in a characteristic. A descending line across the screen will be displayed regularly to prevent OEL Display burn-in.
Slider’s Key Operation 3. NOMENCLATURE Note: Be sure to read this chapter referring to the front diagrams of chapter “2. CONTROLS” on page 5. English Français Deutsch MAIN UNIT / APPAREIL PRINCIPAL / HAUPTGERÄT / APPARECCHIO PRINCIPALE / HOOFDTOESTEL / UNIDAD PRINCIPAL / HUVUDENHET / UNIDADE PRINCIPAL English English 2.
Slider’s Key Operation 3. NOMENCLATURE Note: Be sure to read this chapter referring to the front diagrams of chapter “2. CONTROLS” on page 5. English Français Deutsch MAIN UNIT / APPAREIL PRINCIPAL / HAUPTGERÄT / APPARECCHIO PRINCIPALE / HOOFDTOESTEL / UNIDAD PRINCIPAL / HUVUDENHET / UNIDADE PRINCIPAL English English 2.
Slider’s Key Operation 3. NOMENCLATURE Note: Be sure to read this chapter referring to the front diagrams of chapter “2. CONTROLS” on page 5. English Français Deutsch MAIN UNIT / APPAREIL PRINCIPAL / HAUPTGERÄT / APPARECCHIO PRINCIPALE / HOOFDTOESTEL / UNIDAD PRINCIPAL / HUVUDENHET / UNIDADE PRINCIPAL English English 2.
Title display OEL Screen The organic electro-luminescence display (OEL Display) of this product is made by high technology basis. However, it is possible that there might be part of the pixels which is always lighting or not lightning. Sometimes unevenness of color and brightness might be occurred depend on the point of view to watch in a characteristic. A descending line across the screen will be displayed regularly to prevent OEL Display burn-in.
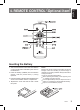
English 4. REMOTE CONTROL (Optional item) Inserting the Battery 1. Turn over the remote control unit and slide the cover in the direction indicated by the arrow in the illustration. 2. Insert the battery (CR2025) into the insertion guides, with the printed side (+) facing upwards. 3. Press the battery in the direction indicated by the arrow so that it slides into the compartment. 4. Replace the cover and slide in until it clicks into place.
English Functions of Remote Control Unit Buttons Mode Button Radio (Radio Data System) USB iPod [SRC] Press the button to power on. Press and hold the button for 1 second or longer: Power off. Switch among radio, Satellite radio receiver, USB, AUX and iPod. [BND] Switch reception band. [ ],[ ] ],[ [ [ [MUTE] [TA] [DISP] [PS/AS] [AF] [PTY] iPod menu Move the next disc in increasing order. Increase and decrease volume (in all modes). ] Move preset channels up ] Play the first track. Top play.
Basic Operations ! CAUTION Be sure to lower the volume before switching off the unit power or the ignition key. The unit remembers its last volume setting. If you switch the power off with the volume up, when you switch the power back on, the sudden loud volume may hurt your hearing and damage the unit. Please operate this unit by the finger. It is not possible to operate it normally with gloves worn.
English Basic Operations Switching the display layout ] key for more than 1 second to 1. Touch the [ switch display layout. ] key for more 2. Each time you touch the [ than 1 second, the display layout switches in the following order: Title mode Indicator mode Example: iPod Clock To change sound setting 1 . Touch the [ ] key to switch to ADJ menu. 2 . Select SOUND in the menu to enter Sound Adjustment mode. ] slider or touch [ ] / 3 .
3-3-1. 3-3-2. Select the item and touch [ ] key to enter detail setting stage. ] slider or touch [ ]/[ ] Slide along [ key to adjust the setting in the range of -3 to +3. ∗ The factory default setting is “0”. 3-3-3. After completing settings, touch the [ENT] key to return to the 1st selected item. 3-5. After completing settings, touch the [ENT] key to return to the 1st selected item.
English Basic Operations Adjusting the treble This adjustment can be performed only when the BEAT EQ is set to “CUSTOM”. 3 - 1 . Select “TREBLE”. 3 - 2 . Touch [ ] key to enter detail setting stage. ∗ This function is effective for the audio files in the USB/iPod mode, but it is ineffective for the video in the USB/iPod mode. Select “BBE MP”. Touch [ ] key to enter detail setting stage. 3 - 3 . Slide along [ ] slider or touch [ ]/[ ] key to select the value in sequence of “OFF” “ON” 3-1. 3-2.
Adjusting the M-BEX Select “M-BEX”. 3 - 2 . Touch [ ] key to enter detail setting stage. 3 - 3 . Slide along [ ] slider or touch [ ]/[ ] key to turn on or turn off the MAGNA BASS EXTEND effect. 3-1. ∗ The factory default setting is “OFF”. (Adjustment range: ON/OFF) 3-4. After completing settings, touch the [ENT] key to return to the 1st selected item. Adjusting the high pass filter Select “HPF”. Touch [ ] key to enter detail setting stage. 3 - 3 .
English Radio Mode Operations Listening to the radio ] key to switch to Source menu. 1. Touch the [ 2. Select “TUNER” to enter Radio mode. The frequency or PS and PTY appears in the display. PS: Programme service name PTY: Programme type 3. To select a preset band, touch the [ ] key and then select one of the preset bands such as FM1, FM2, FM3 or AM1. Every time the [ ] key is touched, the band switches in the following order: FM1 FM2 FM3 AM1 FM1... 4.
TUNER OPTION ] key to 1 . During Tuner mode, touch the [ switch to ADJ menu. 2 . Select OPTION in the menu to enter Tuner Option mode. ] slider or touch [ ]/[ ] 3 . Slide along [ key, the TUNER OPTION mode changed as following order: (“PTY” “P.CH MEMORY” “PTY SELECT” “AF” “REG”) “LANGUAGE” “PRESET SCAN” “AUTO STORE” Notes: Items in bracket (PTY, PTY SELECT, AF, REG) are called Radio Data System Adjustment mode. Please refer to page 19 for Radio Data System Adjustment mode.
English Radio Data System Operations Radio Data System This unit has a built-in Radio Data System decoder system that supports broadcast stations transmitting Radio Data System data. This system can display the name of the broadcast station being received (PS) and can automatically switch to the broadcast station with the best reception as you move long distances (AF switching).
Radio Data System Adjustment mode Cancelling a PTY interrupt broadcast ] key during the PTY interrupt Touch the [ broadcast, the PTY interrupt is cancelled and the unit returns to PTY standby mode. Radio Data System function You need to enter the TUNER OPTION to perform the Radio Data System function. TUNER OPTION ] key to 1 . During Tuner mode, touch the [ switch to ADJ menu. 2 . Select OPTION in the menu to enter TUNER OPTION mode. ] slider or touch [ ]/[ ] 3 .
English Radio Data System Operations PTY seek Touch the [ ] key to search for a PTY broadcast in the direction of ] higher frequencies; touch the [ key to search in the direction of lower frequencies. 3 - 5 . “PTY SEEK” is displayed. 3-4. ∗ If no station with the selected PTY broadcast can be received, the unit returns to the previous selected PTY in the PTY list. ∗ If station is found, PTY name and PS name will be displayed for 7 seconds before back to PTY list.
Switching the PTY display language You can select one of 4 languages (English, Deutsch, Svenska, Francais) for the PTY displayed in the display. ∗ The factory default setting is “English”. Select “LANGUAGE”. Touch [ ] key to enter detail setting stage. 3 - 3 . Slide along [ ] slider or touch [ ]/[ ] key to select desired language. 3 - 4 . After completing settings, touch the [ENT] key to return to the 1st selected item. 3-1. 3-2.
English USB Operations What is MP3? MP3 is an audio compression method and classified into audio layer 3 of MPEG standards. This audio compression method has penetrated into PC users and become a standard format. This MP3 features the original audio data compression to about 10 percent of its initial size with a high sound quality. This means that several music CDs can be recorded on a USB memory device to allow a long listening time∗. ∗ Depends on the USB memory device storage capacity.
Folder structure 1. A USB with a folder having more than 8 hierarchical levels will be impossible. Number of files or folders 1. Up to 255 files per folder can be recognized. Up to 512 folders can be recognized and up to total of 130560 files can played. 2. Tracks are played in the order that they were recorded onto a USB. (Tracks might not always be played in the order displayed on the PC.) 3. Some noise may occur depending on the type of encoder software used while recording.
English USB Operations Track-down 1. Touch the [ ] key to move to the beginning of the current track. 2. Touch the [ ] key twice to move to the beginning of the previous track. Fast-forward/fast-backward Fast-forward Touch and hold the [ ger. ] key for 1 second or lon- Fast-backward Touch and hold the [ ger. ] key for 1 second or lon- Top function Touch the [ ] key for 1 second or longer, then the USB memory device will start playing the first track of current folder.
Random play This function allows you to play all tracks of current folder in a random order. 3 - 1 . Select “RANDOM”. 3 - 2 . Touch [ ] key to enter detail setting stage. 3 - 3 . Slide along [ ] slider or touch [ ]/[ ] key to select “TRACK”. 3 - 4 . Touch the [ENT] key, “TRACK RANDOM” will be displayed for 2 seconds before return to the 1st selected item. 3-5. lights in the display. All random play This function allows you to play all the tracks of all the folders recorded on an USB in a random order.
English iPod Operations Note: The following operations in Play mode operate the same as in USB mode: ∗ Track selection: [ ] , [ ] ∗ Fast-forward/fast-backward: [ ] , [ ] ] ∗ Pause: [ See “USB Operations” (page 21) for details. Other various play functions (in Play mode) Notes: These functions are not supported when in the iPod Menu mode. The Random function set on the iPod remains the same after attachment/detachment of the iPod.
Selecting category from the iPod Music menu 1. Touch and hold the [ ] key for 1 second or longer. 2. Select to switch to Music menu or Video menu. 3. If “MUSIC” is selected from the list, iPod Music menu categories will be displayed. Notes: If the iPod does not support video, the iPod Music menu categories will be displayed directly. Repeat and Random mode operations are not supported in the iPod menu mode.
English iPod Operations About title display This unit supports the display of title information transmitted from a connected iPod. Character code information is UTF-8; displayable characters include English alphanumerics, some symbols, and some umlaut characters. Unsupported characters will be replaced by asterisks (∗). Output form This function is to select digital output or analog output from this unit. This setting is for video playback via iPod 5G.
Security code This unit can deter theft by checking registered security code if security code is registered. The security code is registered in the Adjustment mode “CODE” item. For first time installation, no security code is required. If security code is registered, changing or disconnecting the vehicle battery will cause the security code input to be requested for activation. “INPUT 0000” will be displayed and “0000” is blinking. Adjustment Mode 1. Touch the [ ] key to switch to ADJ menu. 2.
English Common Operations Setting the code Select “CODE”. 3 - 2 . Touch [ ] key to enter detail setting stage. 3-1. When no code is registered 3 - 3 . Slide along [ ] slider or touch [ ]/[ ] key to adjust the value. 3 - 4 . Touch [ ] / [ ] key to set the previous or next digit. 3-5. When code is registered 3 - 3 . Slide along [ ] slider or touch [ ]/[ ] key to input the registered code. 3 - 4 . Touch [ ] / [ ] key to set the previous or next digit. 3-5.
Select “SCREEN SAVER”. Touch [ ] key to enter detail setting stage. 3 - 3 . Slide along [ ] slider or touch [ ]/[ ] key to select “ON” or “OFF”. 3-1. 3-2. Setting the method for title scroll Set how to scroll in MP3/WMA/AAC title. ∗ The factory default setting is “ON”. Select “AUTO SCROLL”. Touch [ ] key to enter detail setting stage. 3 - 3 . Slide along [ ] slider or touch [ ]/[ ] key to select “ON” or “OFF”. 3-1.
English Common Operations Notes: This unit requires hands-free kit that supports [AUX] input as a source of cellular phone audio input. Please consult your local authorized Clarion dealer for more information on the hands free kit offered. If connecting a hands-free kit, please ensure the setting is ON to receive the telephone audio through the system. When listening to your calls on your car speakers, you can adjust the volume. The factory default setting for this volume is “VOL 15”.
Problem Measure Replace with a fuse of the same amperage. If the fuse blows again, consult your nearest service dealers. Incorrect wiring. Consult your nearest service dealers. No sound output when operating the unit with a m p l i fi e r s o r p o w e r antenna attached. Power antenna lead is shorted to ground or excessive current is required for remote-on the amplifiers or power antenna. 1. Turn the unit off. 2. Remove all wires attached to the power antenna lead.
Error Display USB/iPod English 7. ERROR DISPLAYS 34 Cause Measure ERROR 2 The files are not proper MP3/WMA/ AAC format. Use only properly encoded MP3/ WMA/AAC files. ERROR 3 (USB mode) The MP3/WMA/AAC files are improperly encoded. Use only properly encoded MP3/ WMA/AAC files. The iPod contains no audio files. Insert an iPod containing audio files. CUR ERR Over current detection. Disconnect the devices and reconnect. If the devices are still not recognized, try replacing with a different devices.
FM tuner Audio Usable Sensitivity: 11 dBf Power Output: 4 X 18 W (DIN 45324, +B=14.4 V) Bass Control Action (100 Hz): ±14 dB Frequency Range: 87.5 MHz to 108 MHz 50 dB Quieting Sensitivity: 17 dBf Alternate Channel Selectivity: 75 dB Stereo Separation (1 kHz): 35 dB Frequency Response (±3 dB): 30 Hz to 15 kHz AM tuner MW 531 kHz to 1602 kHz LW 153 kHz to 279 kHz Usable Sensitivity: 28µV USB USB 1.1 and 2.0 compatible with a maximum transfer rates of up to 12Mbps.
Owner’s manual Mode d’emploi Bedienungsanleitung Istruzioni per l’uso Gebruiksaanwijzing Manual de instrucciones Bruksanvisning Manual de instruções USB/MP3/WMA/AAC RECEIVER RÉCEPTEUR USB/MP3/WMA/AAC USB/MP3/WMA/AAC EMPFÄNGER RICEVITORE USB/MP3/WMA/AAC USB/MP3/WMA/AAC RECEIVER RECEPTOR DE USB/MP3/WMA/AAC USB/MP3/WMA/AAC-RECEIVER RECEPTOR DE USB/MP3/WMA/AAC Clarion Co., Ltd. All Rights Reserved. Copyright © 2009: Clarion Co., Ltd.