VISUAL/CD/CASSETTE CENTER UNIT WITH DUAL ACTION CENTRE VISUEL/CD/CASSETTE À DOUBLE ACTION UNIDAD CENTRAL VISUAL/DISCOS COMPACTOS/CASETES CON ACCIÓN DOBLE MAX2256 Owner’s Guide & Installation Mode d’emploi et guide d’installation Guía del usuario y de instalación Clarion Co., Ltd. Thank you for purchasing the Clarion MAX2256. Nous vous remercions d’avoir acheté le Clarion MAX2256. Muchas gracias por la adquisición del MAX2256 Clarion. Printed in Japan / Imprimé au Japon / Impreso en Japón 1996/8 (S .
* Please read this Owner’s Guide & Installation * Veuillez lire entièrement le mode d’emploi et le in its entirety before proceeding with wire connection and installation. * After reading this manual, be sure to keep it in a handy place (e.g., glove compartment). If you sell the motor vehicle, please leave the manual in it so that the new owner can use it. * Read the contents of the enclosed warranty card and keep it with this manual.
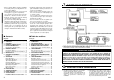
1. PRECAUTIONS SOURCE UNIT APPAREIL PILOTE UNIDAD FUENTE MODEL ■ Índice Español 1. 2. 3. 4. 5. 6. 7. 8. CLARION CO., LTD. 50 KAMITODA, TODA-SHI, SAITAMA-KEN, JAPAN. USE OF CONTROLS, ADJUSTMENTS, OR PERFORMANCE OF PROCEDURES OTHER THAN THOSE SPECIFIED HEREIN, MAY RESULT IN HAZARDOUS RADIATION EXPOSURE. THE COMPACT DISC PLAYER SHOULD NOT BE ADJUSTED OR REPAIRED BY ANYONE EXCEPT PROPERLY QUALIFIED SERVICE PERSONNEL.
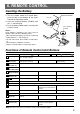
2. CONTROLS / COMMANDES / CONTROLES 3.
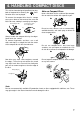
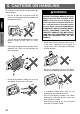
4. HANDLING COMPACT DISCS This unit has been designed specifically for playback of compact discs bearing the mark. No other discs can be played. Never stick labels on the surface of the compact disc or mark the surface with a pencil or pen. No Proper way to hold the compact disc Z Z Z Removing the disc To remove fingermarks and dust, use a soft cloth, and wipe in a straight line from the center of the compact disc to the circumference. New discs may have some roughness around the edges.
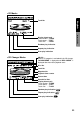
5. BUTTON TERMINOLOGY Note: Be sure to read this chapter referring to the front diagrams of chapter “2. CONTROLS” on page 5 (spread).
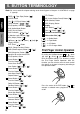
6. REMOTE CONTROL Inserting the Battery Remote Control Unit Rear side English 1) Turn the remote control unit upside down, push the lock in the direction of the arrow, and pull out the battery holder. 2) Insert the enclosed battery (CR2025) with the “+” side facing up. 3) Push the battery holder back in securely until a click is heard. 1) Enclosed battery (CR2025) Lock Notes: C R2025 Owner’s Guide Using batteries improperly can cause them to explode.
7. MODE DISPLAY Station title Band English Preset channel Frequency Stereo/Monaural indication ( ) Current time Owner’s Guide Preset Nos.
Track No. English Owner’s Guide Display about track Track random: “T-RDM” Track repeat : “T-RPT” Track scan : “T-SCN” Random play indication Repeat play indication Scan play indication CD title When a CD magazine is not loaded in the CD changer, “NO MAGAZINE” is displayed and “DISC CHECK” is displayed after that until the playback starts. Disc No. Track No. Magazine No. Playback time counter Current time Stored disc Nos.
8. CAUTIONS ON HANDLING For a longer service life, be sure to read the following cautions. • WARNING THIS PRODUCT IS NOT INTENDED FOR VIEWING TELEVISION BROADCASTS OR VIDEO TAPES OR FOR PLAYING VIDEO GAMES. Such uses of this product may distract the driver or interfere with the driver’s safe operation of the motor vehicle and may violate state law.
• • • • Small black and shiny dots inside the LCD panel are normal for LCD products. The LCD panel may stop temporarily when it is opened or closed when the engine is stopped or when it is cold. This is not a malfunction. If this happens, repeat the operation. • Cleaning the cabinet • Cleaning the LCD panel Use a soft, dry cloth and gently wipe off the dirt. For tough dirt, apply some neutral detergent diluted in water to a soft cloth, wipe off the dirt gently, then wipe again with a dry cloth.
9. OPERATION Basic Operations Note: Be sure to read this chapter referring to the front diagrams of chapter “2. CONTROLS” on page 5 (spread). CAUTION CAUTION English When this unit is turned on, starting and stopping the engine of a car with its volume raised to the maximum level may harm your hearing. Be careful about adjusting the volume. NOTE: Use this unit after starting the engine. : Decreases the volume. * The volume level indicated is in the display in a range from 0 (minimum) to 33 (maximum).
While driving, keep the volume to a level at which external sounds can be heard. Adjust the operation panel to an appropriate angle to watch the display and operate the buttons. SLOPE button 2 CD Insertion slot 31 English Turning on and off the monitor Each time you press the MONI button 25 , the monitor is turned on and off. * While using the rear vision camera, monitor-off Mute Each time you press (center) of the ENT button 11 , mute is turned on and off.
English The operation panel turns upward and downward several times and stops at the stored angle. 5) Press the ADJ button 10 to return to the previous mode. 3) Press (center) of the ENT button 11 to go to clock setting mode. * If you want to change the stored angle, perform the same operation from step 1). Notes: • In step 3) above, the operation panel turns upward Owner’s Guide • • and downward several times to store the set angle.
Radio Mode Operations Listening to the radio FM1 FM2 FM3 AM * Each time you press the Monaural button 20 , the unit toggles between on (stereo) and off (monaural). Seek tuning 1) While MANU appears in the display, press and hold the BND button 13 for about 1 second to switch to the seek tuning. 2) Slide the Up/Down button 11 to (right) or (left) to start the seek tuning. When a station is found, it is automatically tuned in. : Seeks higher frequency stations. : Seeks lower frequency stations.
English 4) When a desirable station is tuned in, press the SHIFT button 22 to cancel PS/AS mode and press the preset button to which the station is to be stored. * The preset scanning is canceled and you can listen to the station. Preset selection Owner’s Guide 1) Press the BND button 13 to select a band. 2) Press one of the Preset buttons 16 to 21 to select the stored station. Note: • In PS/AS mode, do not perform the preset selection (excluding the preset scanning).
Tape Mode Operations Loading and playing a cassette tape * When a cassette tape is already inserted (When * After a cassette tape is inserted, the operation panel closes. Adjust the operation panel angle to an appropriate position. When the operation panel angle is stored, it is set to this angle automatically. Cassette Insertion slot 30 CAUTION Do not put your hand or fingers into the Cassette Insertion slot or CD Insertion slot, as this may cause a breakdown.
Note: Dolby Noise Reduction System • When the Press the Dolby NR button 18 to turn on the Dolby B NR. English (center) of the ENT button 11 is pressed at a location that is less than 15 seconds from the start or end of the track, that track may be skipped and the previous or the next track may be selected instead. Switching to the other side of the tape Owner’s Guide Press the BND button 13 . Playback is switched to the other side of the cassette tape.
CD Mode Operations Note: • CD-ROM discs cannot be played. * When a CD is already inserted (When the DISC indicator 8 lights), press the FUNC button 12 and select CD mode. Playback starts automatically. 1) Press the CD button 3 . The operation panel turns downward and the CD Insertion slot 31 appears. • When the operation panel angle has been adjusted with the SLOPE button 2 (excluding the case when it has been adjusted to the maximum angle), a CD cannot be inserted because the panel may damage it.
Pausing playback Repeat play 1) Press (center) of the ENT button 11 to pause playback. 1) Press the Repeat button 17 to repeat playback of the current track. English * “PAUSE” appears in the display. 2) Press (center) of the ENT button 11 again to resume playback. Fast-forward and fast-backward Owner’s Guide 1) Slide and hold the Up/Down button 11 to (right) and (left). The CD fast-forwards or fast-backwards while the button is being held down.
CD Changer Mode Operations This unit can control a separately sold CD changer to store and play up to 18 CDs. Note: • CD-ROM discs cannot be played. Note: • Slide the Up/Down button 1) Press the FUNC button 12 and select CD changer mode. Playback starts automatically. 2) Press one of the Disc No. buttons 16 to 21 corresponding to each CD to select one. 2) Release the button when you reach the desired track to start playback. * The selected CD No. becomes pink in the display.
RPT becomes pink and T-RPT or D-RPT appears in the display. * To cancel track repeat or disc repeat, press the Repeat button 17 again. Playback resumes. * Locking the magazine English 1) Press and hold the MAG button 13 for about 2 seconds to play tracks on only the current CD. * The selected magazine No. becomes pink in Random play the display. Owner’s Guide This function plays all the tracks on the current CD (track random) or plays the all CDs in the magazine (disc random) in random order.
Operating the Equalizer 4) Press (center) of the ENT button 11 to select the equalizer setting mode. English This unit has a built-in 7-band graphic equalizer to adjust the sound level in each frequency range. You can select one of the four preset patterns (basic equalizer), or can set four patterns by yourself and select one (user equalizer). Note: • In the following operation, when the hand mark ( ) appears in the display, the previous mode is recalled if no operation is made within 5 seconds.
Rear Vision Camera Note: WARNING • Use this camera as an auxiliary means to checking obstacles. English Monitoring the rear vision camera Owner’s Guide The rear vision camera can be connected to this unit. For the power supply of the camera, mount the power box sold separately (CCA-147-501). 1) Press the ADJ button 10 to select the CONFIGURATION display. 2) Slide the Up/Down button 11 to (down) or (up) to move the cursor to “CAMERA.” 3) Slide the Up/Down button 11 to (right) to change “OFF” to “ON.
again to return to “AUDIO.” English AUDIO : Display becomes black. VISUAL: The rear vision camera is monitored on the display. (Applicable only when the rear vision camera is connected. When it has not been connected, display becomes black in radio, CD, or ISR mode.) 4) Press the ADJ button 10 to return to the previous display. Darken. Brighten. BRIGHT is selected. (right) or Owner’s Guide 5) Slide the Up/Down button 11 to (left) to adjust the brightness.
Other Functions Switching the spectrum analyzer display English The spectrum analyzer display pattern can be switched in radio, tape, CD, or CD changer mode. Each time you press the DISP button 26 , the spectrum analyzer display pattern switches in the following order: Normal display Switching the button color Button color can be switched between green and amber. 1) Press the ADJ button 10 to select the CONFIGURATION display.
2) Slide the Up/Down button 11 to (down) or (up) to move the cursor to “BEEP.” * Repeat steps 3) and 4) above to enter the title. * If you entered the wrong letter, press the but- Titling You can title a radio station or CD name (title) and store them. When the titled station is tuned in or the CD is played, its title appears in the display. Entering a title Notes: • Up to 30 FM band and 20 AM band stations can be titled. Also 50 CDs can be titled.
English Selecting the title 1) Select the mode where the title you want to select is stored (radio or CD mode). 2) Press the TITLE button 23 twice to select the TITLE SELECT display. The entered titles appear after the title numbers. Owner’s Guide * In CD mode, the TITLE SELECT display cannot be selected. * In radio mode, slide the Up/Down button (left) or 11 to (right) to select a band. 3) Slide the Up/Down button 11 to (down) or (up) to move the cursor to the title to be selected.
10. FM RECEPTION ® TUNER Signal Actuated Stereo Control (SASC) FM radio waves are transmitted in the very high frequency range (VHF). These waves move in straight lines, much like light. Tall buildings, hills and mountains, or other obstructions may cause “shadows” or loss of signal, noted by a momentary “hissing” noise in the reception. In weak signal conditions, the SASC circuit will provide optimum, low noise reception.
11. TROUBLESHOOTING Symptom Cause Measure English Power does not switch on. The fuse has blown. (There is no sound produced.) Replace the fuse with one of the same rating. If the fuse blows again, contact the store where you purchased the unit. Wiring is incomplete. See “Installation/Wire Connection Guide (especially, Section 6. Wire Connections)” of this manual and connect properly. The head is dirty. Use a cleaning tape, etc. to clean the head. Sound quality is poor.
12. ERROR DISPLAYS ■ If an error occurs, the type of error is displayed. Take the measures described below to eliminate the problem. Display TEMP Error CD changer Displayed when the built-in battery of the CD changer has run down. Check the instruction manual of the CD changer. Cassette tape Displayed when the cassette tape is stuck and cannot be ejected. Eliminate the cause of the sticking. CD Displayed when the disc is stuck and cannot be ejected. Press the CD button 3 .
13. SPECIFICATIONS Frequency range: 87.9 MHz to 107.9 MHz (87.5 MHz to 108 MHz) Usable sensitivity: 12 dBf (new IHF) 50 dB quieting sensitivity: 18 dBf (new IHF) Signal-to-noise ratio: (IHF. A) 70 dB Frequency response: 30 to 15 kHz ±3 dB Stereo separation: 35 dB (1 kHz, 60 dBf) AM Tuner Screen size: Type 5 (4” (101.8 mm) Width × 215/16” (74.