Owner's manual NX702 DVD MULTIMEDIA STATION WITH BUILT-IN NAVIGATION & 7" TOUCH PANEL CONTROL
English 1 NX702
English Contents Thank you for purchasing this Clarion product. • Please fully read this owner’s manual before operating this equipment and store it in a safe place. • Check the contents of the enclosed warranty card and store it in a safe place with this manual. 1. FEATURES......................................................................................................................... 3 Expanding Systems.............................................................................................
• 7” Wide-VGA color LCD TOUCH PANEL • 4V/6ch RCA Output with Digital Time Alignment, 3-way Crossover and 5 Band Parametric Equalizer • SiriusXM-Ready™ and HD Radio™ receiver with iTunes® Tagging • Latest Map Guarantee English 1.
English 2. PRECAUTIONS WARNING For your safety, the driver should not operate the controls while driving. Also, while driving, keep the volume to a level at which external sounds can be heard. 1. W hen the interior of the car is extremely cold and the player is used soon after switching on the heater, moisture may form on the disc or the optical parts of the player and proper playback may not be possible. If moisture forms on the disc, wipe it off with a soft cloth.
English 12-1. T otal Traffic Network, a division of Clear Channel Broadcasting, Inc., holds the rights to the traffic incident data and RDS-TMC network through which it is delivered. You may not modify, copy, scan or use any other method to reproduce, duplicate, republish, transmit or distribute in any way any portion of traffic incident data. You agree to indemnify, defend and hold harmless Inrix, Inc. and Clear Channel Broadcasting, Inc.
English 3. CAUTIONS ON HANDLING Front Panel / Generalities For a longer service life, be sure to read the following cautions. • Do not allow any liquids on the unit from drinks, umbrellas, etc. Doing so may damage the internal circuitry. • Do not disassemble or modify the unit in any way. Doing so may result in damage. • Do not let cigarettes burn the display. Doing so may damage or deform the body. • If a problem should occur, have the unit inspected at your store of purchase.
Handling Discs Cleaning • N ew discs may have some roughness around the edges. If such discs are used, the player may not work or the sound may skip. Use a ball-point pen or the like to remove any roughness from the edge of the disc. • T o remove fingermarks and dust, use a soft cloth and wipe in a straight line from the center of the disc to the circumference. • Do not use any solvents, such as commercially available cleaners, anti-static spray, or thinner to clean discs.
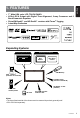
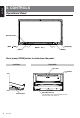
English 4. CONTROLS Operational Panel Remote Sensor [MAP PWR] [-] [MENU ALL ] [+] [OPEN/VR] RESET [MIC] Short press [OPEN] button to slide down the panel. Left Side Front Side Disc Slot [ SD Card Slot 8 NX702 MicroSD card slot ] EJECT Only navigation map card is available and don't remove it when unit is power on.
Names of Buttons [RESET] Button • Press to load original settings. Note: When the [RESET] button is pressed, frequencies of radio stations, titles, etc. stored in memory are cleared. English [MAP PWR] Knob • P ress to power on the system when ignition on. • When power on, press to enter navigation mode. • P ress and hold this key more than 1 second to turn off the system. [OPEN/VR] Button • Short press to slide down and close the panel. • L ong press to VR(Voice Recognition) function.
English Remote Control • [TAG] Button SiriusXM / HD Radio mode – Tagging • [TITLE] Button DVD TITLE MENU • [RPT] Button Repeat playback • [ENT] Button Enter • [RDM] Button Random playback • [ROOT] Button DVD ROOT MENU • • [ ], [ ] Buttons Manual tune Fast backward/forward playback • [SUB.
• • • • • • [ / STOP] Button Play/Pause Stop (long press) [ ], [ ] Buttons RADIO / HD RADIO / DAB mode • Previous / next preset station • Seek down/up (long press) SiriusXM mode • Previous / next position. • Seek down/up (long press) DVD mode Previous/next chapter. CD/BLUETOOTH mode Previous/next track. • [ZOOM] Button ZOOM (DVD) • [AUDIO] Button DVD audio stream change.
English 5. MAIN MENU OPERATION Long press [ MENU ALL ] button on the PANEL to show main source menu. Short press [ MENU Short cut menu. ALL ] button to show Front Zone Source Touch [ - ] on the bottom of screen to show front zone sources. Change page by dragging left or right or touching other [ - ] buttons. Touch the icons on the screen to enter corresponding work mode, such as Disc mode, USB mode, iPod mode, etc. Touch [2ZoneOff] to turn off the rear zone monitor.
At all mode, long press [ MENU ALL ] button to enter main source menu. Touch [Custom] on the bottom left of the screen, then select [Settings] on the screen to enter Setting menu. Touch the icons on the left of screen to select category: General, Time, Sound, Display or Setup. To exit Setting menu, touch [ ] on the bottom left of the screen. Touch [Program Language] button. English 6. SYSTEM SETUP Select desired language. (When select a language, the navigation system will restart.
English Blinking LED Touch [On] or [Off] to turn on/off the blinking LED. At blinking LED [On] mode, when ACC off, the LED on the top left of the panel will blink. Amplifier cancel Touch [On] or [Off] to set the internal amplifier on or off. Close operation bar When select [Auto], the operation bar will close automatically after 10 seconds. When select [Manual], the operation bar will not close unless you touch the blank area on the screen.
Subwoofer phase Touch to select subwoofer phase Normal or Reverse. High pass filter Touch the button to the right of “High pass filter” to show the sub-menu, then select the filter: “Through”, “60Hz”, “90Hz” or “120Hz”. Touch [Cancel] to exit. Low pass filter Touch the button to the right of “Low pass Filter” to show the sub-menu, then select the filter: “Through”, “60Hz”, “90Hz” or “120Hz”. Touch [Cancel] to exit. Time Aligment (Normal Mode) Touch [-] or [+] button to adjust time aligment.
English • Tone Select Touch [Auto] to use ringtones of your mobile phone. Touch [Internal] to use preset ringtone of the unit. • Software Update Update the software. Camera • Camera Interrupt Choose [On], the screen will switch to rear camera menu automatically when backing. DVD • Menu Language Select menu language from list. • Audio Language Select audio language from list. • Subtitle Language Select subtitle language from list.
English 7. Disc Operation DVD System DVD video is a high-quality digital video source that provides crisp and clear images. One 12 cm disc contains either one film or four hours of music. DVD Video Features This unit provides the following functions in addition to the high image quality and sound quality of DVD video. Notes: • T he functions described in this section, for example, the recorded language, subtitles, angles, etc. differ depending on the DVD video disc.
English sessions recorded cannot be played on this DVD video player. Note: • W hen you have a CD Extra disc, only the first session will be recognized. About playing a CD-R/CD-RW disc (MP3, WMA) This player can play CD-R/CD-RW discs previously recorded in music CD format (MP3, WMA) About playing a DVD-R/RW or DVD+R/ RW disc This player cannot play DVD-R/RW and DVD+R/RW discs previously recorded in video CD format. However, MP3/WMA files recorded on DVD-R/RW and DVD+R/RW discs can be played.
English Accessing a Disc CAUTION For your safety, the driver should not insert or eject a disc while driving. Eject function Press [OPEN] button to slide down the panel, then press the [ ] button to eject the disc even if the power to the unit was not turned on. Notes: • I f you force a disc into before auto reloading, this can damage the disc. • To avoid damaging, remove the disc from the unit after it pops up.
English DVD Player Operation Playback menu Touch the bottom half of screen to show operation bar. 14. 15. 16. 17. 18. 19. Show previous page Turn on Widescreen mode Direct search Adjust picture effect Show playback information Mute indicator Pausing play 1. Touch the [ ] button on the screen to pause play. 2. Touch [ ] button to resume play. Selecting a chapter 1. Play/Pause/Stop(long press) 2. Show cursor keys in DVD title menu 3. Previous chapter Fast-backward (long press) 4. Progress bar 5.
DVD subtitle select English During playback, touch [ ], [Subtitle] buttons to select the subtitle language if the DVD has multiple language subtitles. Playback information During playback, touch [ ], [ Information ] buttons to view playback information. Adjust picture During playback, touch [ ], [ Adjust Picture ] button, then use [-], [+] buttons to adjust Dimmer/Brightness/Contrast/Color.
English CD Player Operation Playback menu Touch the bottom half of screen to show operation bar. 2. Touch the [ ] button twice to move back to the beginning of the previous track. Fast forward/Fast reverse Fast forward ] button . Touch and hold the [ Fast reverse Touch and hold the [ ] button . * F or MP3/WMA discs, it takes some time until the start of searching and between tracks. In addition, some error may occur in the play time. Search Function 1. 2. 3. 4. 5. 6. 7. 8. 9.
This unit is an ID3 Tag compatible model. This unit supports the ID3 TAGs of the Version 2.4, 2.3, 1.1 and 1.0. In displaying, this unit gives priority to the Version 2.3 and 2.4 TAGs. What is MP3/WMA MP3 is an audio compression method and classified into audio layer 3 of MPEG standards. WMA is an audio compression method developed by Microsoft Corporation. These audio compression methods have penetrated into PC users and become a standard format.
0 ( ) English 1 2 3 5 6 7 ♪① ♪② ♪③ ♪④ ♪⑤ 4 ♪⑥ ♪⑦ ♪⑧ ♪⑨ 10. Scan play 11. Rotate the album image 12. Back to main operation bar ○ Root Folder Folder ♪ File Layer1 Layer 2 Layer 3 Layer 4 Layer5 The player will only recognize three folder levels and does not display folders containing other folders. In the example above, the unit will display folders 2, 3, 5 and 7, but 1 and 6 since they do not contain others.
Playback menu When playing, touch the bottom half of screen to show operation bar. Selecting a file File-up ] button to move to the T ouch the [ beginning of the next file. English MP4 Playback File-down Touch the [ ] button to move back to the beginning of the current or previous file. Fast forward/Fast reverse Fast forward Hold the [ ] button . 1. Play/Pause 2. Repeat playback 3. Previous file Fast reverse (long press) 4. Progress bar 5. Next file Fast forward (long press) 6.
English 8. SD/USB OPERATION Accessing an USB 1. Insert an USB device into the USB cable. When connecting an USB device, the unit will read the files automatically. 2. To remove the USB device, you should first select another source or turn off the power, in order to avoid damaging the USB device. Then take off the USB device. 3. T o a c c e s s a n U S B d e v i c e a l r e a d y connected to the unit, long press [ MENU ALL ] button to enter main source menu, then select [USB] to enter USB mode.
This system can play audio files ( MP3/WMA) stored in a SD card or USB memory. You can use it as an audio device by simply copying desired audio files into it. Notes: • T his system will not operate or may operate improperly with some card or USB. • Files protected with any DRM cannot be played. Select SD/USB Audio mode Touch top left corner of the screen until SD Audio or USB Audio appears. English SD/USB Audio Operation Operation about SD/USB audio is same as MP3/WMA playback mode.
English 9. BLUETOOTH OPERATION The Bluetooth allows you to utilize your car’s built-in audio system for wireless mobile phone or music handsfree communication. Some Bluetooth mobile phones have the audio features, and some portable audio players support Bluetooth feature. This system can play audio data stored in a Bluetooth audio device. The car stereo with Bluetooth will be able to retrieve phonebook contacts, received call, dialled call, missed call, incoming calls, outgoing call and listen to music.
1. 2. 3. 4. 5. Show history categories Backspace Paired device information Number pad Call/Hang up 6. Turn on/off Auto Connect function 7. Turn on/off Auto Answer function 8. Set PIN code 9. Select internal or external microphone 10. Show next page 11. Back to main operation bar English • Dialed/Received/Missed Call History You can search any Dialled/Missed/Received Call History. 1. Touch [ ] button to show following history categories: Dialed, Received, Missed and Contacts.
English Bluetooth Audio Operation Audio Streaming Operation What is audio streaming? 2. To resume audio playback, touch the [ button. Audio streaming is a technique for transferring audio data such that it can be processed as a steady and continuous stream. Users can stream music from their external audio player to their car stereo wirelessly and listen to the tracks through the car’s speakers.
Everything worth listening to is on SiriusXM, getting over 130 channels, including the most commercial-free music, plus the best sports, news, talk and entertainment. A SiriusXM Vehicle Tuner (sold separately) and Subscription are required. For more information, visit www.siriusxm.com. English 10. SiriusXM Satellite Radio OPERATION Accessing satellite radio mode Long press [ ALL ] button to enter main source menu, then select [SiriusXM] to enter SiriusXM mode.
English Activate the SiriusXM Vehicle Tuner using one of the two methods below: • Online: Go to “www.siriusxm.com/ activatenow” and choose ACTIVATE RADIO. • Phone: Call 1-800-XM-RADIO (1-800-9672346). Select a band Touch the top left corner of the screen to change between three SiriusXM bands (SiriusXM1, SiriusXM2 and SiriusXM3). Each band stores up to 10 preset stations. Select a station Category and Channel search 1. Touch [ ] button on the upper left of the screen to show list menu.
Replay The Replay feature allows you to pause, rewind, and replay up to 30 minutes of live SiriusXM Satellite Radio. To enter replay mode, touch [ ] and [ ]. or Song. To remove it from the list, touch [Delete]. 3. W hen the memorized song/artist is broadcasted on another Channels. Alert dialog box is displayed. Select [OK] on the dialogue box to broadcast desired artist or song. Touch [Cancel] on the dialogue box to return to previous screen.
English 11. HD Radio OPERATION About HD Radio™ Technology HD Radio Technology allows CD-quality digital broadcasting of your local AM and FM radio stations. HD Radio broadcasts can include multiple channels on the same frequency, which is called multicasting. With multicasting, you can receive up to eight additional multicast channels: HD1~HD8. With an HD Radio tuner connected, you will receive HD Radio digital broadcasts automatically when tuned to a station that offers HD Radio Technology.
Preset stations NOTE: Multicast stations can be stored as presets, but the unit must be in Digital or Auto reception mode to receive them. Preset scan Preset scan receives the stations stored in preset memory in order. This function is useful when searching for a desired station in memory. ] button on the operation 1. Touch the [ bar. 2. When a desired station is tuned in, press the [ ] button to continue receiving that station.
English 12. itunes Tagging The NX702 offers iTunes Tagging, which allows the user to “Tag” songs playing on HD Radio™ and SiriusXM stations for purchase later through iTunes. When touch [Tag] button, the unit stores the title and artist song information that can then be transferred to your iPod when connected to the unit. A list titled “Tagged” will appear in iTunes, allowing you the option to purchase your tagged songs.
English 13. iPod & iPhone Operation Connect an iPod or iPhone to the USB connector via CCA-750 cable. When connecting a device, the unit will read the files automatically. The track information display on the screen once playback start. CCA-750 Accessing iPod mode Long press [ MENU ALL ] button to enter main source menu, then select [iPod] to enter iPod mode. If [iPod] is not on the current source menu, hold the center of screen and drag left/right to show more icons.
English Fast reverse Touch and hold the [ ] button . Repeat play This function allows you to play the track repeatedly. Touch the [ ] button to select Repeat one or Repeat all. 1. Play/Pause 2. Repeat play 3. Previous file Fast reverse (long press) 4. Progress bar 5. Next file Fast forward (long press) 6. Show iPod list menu 7. Show other options Random play This function allows you to play all tracks in a random order. Touch the [ ] button to perform random play.
PANDORA, the leading internet radio service, gives people music they love anytime, anywhere, through personalized radio stations available on a wide variety of connected devices. To listen to PANDORA internet radio, you can do as follows: 1. Connect a compatible iPhone to the unit. (refer to “Wiring and Connections”). 2. Touch PANDORA icon from Main Source Menu and open PANDORA mode. 3. PANDORA will automatically start to play streaming.
English 15. Navigation Operation Access navigation mode Control buttons 1. P ress [OPEN] button to slide down the panel. Insert a MicroSD card into the mini card slot located on the bottom of the panel. 2. To remove the card, you should first select another source or turn off the power, in order to avoid damaging the card. Press to pop it out, then take off the card. Close the panel. 3. P ress [MAP] button on panel to visit Navigation mode.
English 17. TROUBLE SHOOTING GENERAL Problem Unit can not power on. Cause Replace with new fuse of correct rating. Car battery fuse blown. Replace with new fuse of correct rating. ACC power is turn off Turn on the ACC Turn off the power and press the [RESET] button with a thin rod. Unit can not power on. Nothing happens The microprocessor has when buttons are malfunctioned due to noise, etc. pressed. Note: When the [RESET] button is pressed, turn off the power.
DISC Player English Problem Disc cannot be loaded. Sound skips or is noisy. Cause Measure Another disc is already loaded. Eject the disc before loading the new one. There is an object installed inside the unit. Remove the object inside the unit. Disc is dirty. Clean the compact disc with a soft cloth. Disc is heavily scratched or warped. Replace with a compact disc with no scratches.
SiriusXM Advisory Messages Description Check Tuner Check the SiriusXM tuner connection on the back of the unit to ensure that its correctly connected. Check Antenna Ensure the SiriusXM antenna cable is connected to the SiriusXM tuner correctly. Check the SiriusXM antenna wire for breaks or sharp bends. Replace the antenna if necessary. Load “Factory default” settings on Setting menu. If the message remains, the antenna may have been damaged.
English 18. ERROR DISPLAYS If an error occurs, one of the following displays is displayed. Take the measures described below to solve the problem. Display Disc loading No Disc Unsupported Disc Cause Measure Disc is being read Please wait, it may take several minutes for some disc or storage device.
English 19. SPECIFICATIONS FM Tuner Bluetooth Frequency range: 87.9-107.9MHz Usable sensitivity: 13dBf Frequency response: 30Hz-15kHz Stereo separation: 30dB(1kHz) Signal/noise ratio: >55dB AM Tuner Specification: Bluetooth Ver. 2.
6.4" 163mm 1" 27.5mm English 7" 178mm Note: 4" 100mm • Specifications and design are subject to change without notice for fur ther improvement.
20. Wiring and Connections English NX702 GPS Antenna GPS Antenna (Black) (Black) (Black) (Black) Black (Black) ExternalMicrophone Microphone External Connection Connection • Be sure to connect SiriusXM cable properly. Mistakenly connect to SiriusXM cable may cause damage to your unit or the connected device. (Black) (Black) Radio Antenna Antenna Refer nextright. page.
English 18-Pin Connector Extension Lead (attached to the source unit) Gray Front Right /MID-R Gray/Black White Front Left /MID-L White/Black Purple Rear Right /HIGH-R Brown wire (Phone mute lead) Connect to cellular phone mute lead.
Clarion Co., Ltd. All Rights Reserved. Copyright © 2012: Clarion Co., Ltd.