Warning! The Clarion OHM102/OHM153 overhead monitor systems are designed for strictly for rear seat entertainment. Viewing the monitor while operating a motor vehicle can result in serious injury and/or property damage. Clarion is not responsible for any injury and/or property damage as a result of the improper use or viewing of the monitor. Welcome! Thank you for purchasing the Clarion OHM102/OHM153 overhead monitor system.
Introduction The Clarion OHM102/OHM153 are exclusively designed for the ultimate in rear seat mobile video entertainment. With the built-in A/V switcher, any Clarion video source or game station can be enjoyed on these monitors. The built-in A/V switcher also incorporates PIP (picture in picture) and split screen operation. For added convenience, the front panel controls allows for menu, picture, source, and FM modulator selections.
Table of contents Opening the Overhead Monitor . . . . . . . . . 4 Precautions . . . . . . . . . . . . . . . . . . . . . . . . 5 Care And Maintenance . . . . . . . . . . . . . . . 5 Operating OHM102/153 Monitor . . . . . . . . 6-9 Operating the Remote Control . . . . . . . . . .10-11 Operating the Headphones . . . . . . . . . . . . 12 Installation Instructions . . . . . . . . . . . . . . . 13-15 Complete System Diagram . . . . . . . . . . . . 16-17 Package Contents . . . . . . . . . . . . . . . . . . .
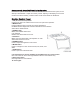
Opening the Overhead Monitor Press the “OPEN” button to release the overhead monitor. Gently push down on the bottom of the monitor until it reaches the desired position. The monitor will turn on automatically when it is fully open. Note: The vehicle’s ignition key must be “ON” or Accessory (ACC) position for the monitor to have power.
Precautions • These overhead monitor systems are designed for use in 12V DC negative ground vehicles. • Do not operate the overhead monitor system in ways other than described in this manual. Doing so may result in damage to the monitor system and/or vehicle, along with voiding the warranty. • SAFETYFIRST! These overhead monitor systems are designed for rear seat entertainment only. Do not install in/on dashboard or anywhere else that would allow the operator of the vehicle to view the monitor.
OPERATING OHM102/OHM153 MONITOR In the event a problem arises with the OHM102/OHM153 overhead monitor system, do not attempt to disassemble or repair the monitor yourself. Opening or attempting to service the monitor will void the warranty; instead contact a local Clarion dealer for assistance. Monitor Control Panel 1. PIP (Picture In Picture) button Press the PIP button to enable Picture In Picture or split screen operation. 2. MENU button Press the MENU button to access the monitor adjustments.
Closing the Overhead Monitor Gently push the backside of the monitor until it clicks into the overhead monitor housing. The monitor will turn off automatically when it is returned to the closed position. Note: Do not place any objects between the monitor and the monitor housing, this can result in serious damage to the monitor. Adjusting the Tilt and Swivel (OHM102 only) The monitor can be opened to a maximum of 110 degrees. Exceeding this point can cause serious damage to the monitor and monitor housing.
Note: The screen mode will set after 5 seconds, pending that the MODE button is not pressed. The display image may appear coarse or grainy when viewed in Zoom mode. Changing the Display Settings (Picture In Picture/Split Screen) The display setting can be adjusted by pressing the PIP (Picture In Picture) button on the control panel or remote control. This button selects between PIP and split screen viewing mode.
Selecting the AV Sources for Main and Sub Screen MAIN SCREEN Press the (DOWN Button) to select the desired AV source. The sources will be changed in following sequence: SUB SCREEN Press the (UP button) to select the desired AV source. The sources will be changed in following sequence: NOTE: Same video input cannot be viewed simultaneously. Dimmer Button: Press the DIMMER button to adjust the brightness of the screen.
OPERATING THE REMOTE CONTROL 1. Power button Press the Power button to turn ON/OFF the monitor. 2. FM button Press to turn ON/OFF the FM modulator (FM200 not included) 3. DIMMER button Press to adjust the brightness of the screen. 4. MENU button Press the MENU button to access the monitor adjustments. FM MOD ON/OFF>Brightness>Contrast>Saturation>Hue>Sub Size>Sub Position> Default Reset (Down button) MENU, then DOWN selects item to be adjusted. DOWN: Selects Main AV source.
SUB POS button Press to select the location of the PIP (Picture In Picture) image. SIZE button Press to select the size of the PIP (Picture In Picture) image. INPUT button Press to select AV source for Sub Screen. Mode button Press to change the screen format: Normal, Full, Zoom, and Wide. Battery Installation 1. Slide the battery-retaining clip in, while sliding the battery tray out. 2. Insert the CR2025 lithium battery into the tray with the “+” facing upwards. 3.
OPERATING THE HEADPHONES 1. Power switch Press to activate the headphones. The power on the headphones will turn off automatically, if an audio signal is not detected for over a minute. 2. Source selector switch Switches between the audio sources. 3. Volume adjustment switch Adjusts the volume of the sound in the headphones Note: • Headphones are not to be worn by the operator of the vehicle when driving. • Do not leave the headphones in a place subject to direct sunlight or extreme temperatures.
INSTALLATION INSTRUCTIONS About the Installation The installation of the OHM102/OHM153 overhead monitor system requires experience in both mechanical and electrical procedures. If you do not posses the necessary experience or tools to attempt this installation, contact a local Clarion dealer for assistance. Improper installation can result in damage to the monitor and/or the vehicle.
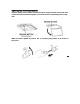
4. Lower the vehicle’s headliner down to see if a roof support beam is available to screw the mounting bracket onto. If a support beam is not available to screw into, use a ¾” piece of plywood cut to the appropriate size. Attach the plywood to the roof of the vehicle using silicone allowing adequate drying time. 5. Screw the mounting bracket in the vehicle. DOUBLE CHECK THE LENGTH OF THE SCREWS PRIOR TO MOUNTING THE BRACKET. 6.
Roof Beam Headliner Screws (Not Provided) Metal Bracket (Included) Screws (Not Provided)
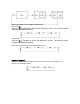
COMPLETE SYSTEM DIAGRAM A IR Transmitter DOME Light Control B AV4 FM Module Video Out AV3 AV2 Power Plug AV1 OEM Head Unit Antenna FM M O D Av4 V/O UT Av3 Av2 Av1 G ND + 1 2V Audio Output FM200 +12V +12V AV Input 4 AV Input 1 Ground AV Input 2 Ground Video Out DVD(VS735) VCR(VDH910) N e ga tive Positive DVD(VS735) VMA7191 AV4 Audio-L Audio-R Video Audio R L Video IR Audio R L Video IR Audio R L Video IR AV Input 3
Connection Diagram Please refer the to the connection diagram on Page 16 for the proper wiring conditions for the OHM102/OHM153 overhead monitor. If you are uncertain as to what the proper connections are please contact a qualified Clarion technician for further installation assistance.
PACKAGE CONTENTS 1 OHM102 Or 1 OHM153 2 Audio Video RCA Accessories 2 Audio Video Din Cables 1 Convenient External Game Port 1 Audio Output Din Cable 1 Two-Pin Power Harness 1 Metal Mounting Bracket 4 Screws For Metal Mounting Bracket 1 Soft Black Rubber Gasket 1 Remote Control (RCL 123) TROUBLESHOOTING No Picture Press the POWER and SOURCE buttons to make sure the monitor is on and the proper input is selected. If there is still no picture press the PICTURE button.
SPECIFICATIONS Supply: 12V DC (10V-16V) Test Voltage: 12V, negative ground Current Consumption: (OHM102) 1 Amp, (OHM153) 1.9 Amps Max Current Consumption: (OHM102) 1.1 Amps, (OHM153) 2 Amps Operating Temperature: (OHM102) 0 ~ 60 C, (OHM153) 0~50 C Storage Temperature: (OHM102) -30 C ~ 85 C (OHM153) -20 C ~ 60 C Video System: Auto NTSC and PAL Screen: (OHM102) 10.2” Diagonal (OHM153) 15.3” Diagonal Resolution: (OHM102) 800 X 480 (OHM153) 1280 X 768 Weight: (OHM102) 2.6lbs, (OHM153) 5.
WARRANTY INFORMATION This product is warranted against all defects in material workmanship for a period of one year from the date of original purchase. Clarion Pro Audio products, except for speakers, are covered by a two year limited warranty when installed by an authorized Clarion dealer. The conditions of this limited warranty and the extent of responsibility of Clarion Corporation of America (“Clarion”) under this limited warranty are as follows: 1.
7. ALL IMPLIED WARRANTIES EXCEPT TO THE EXTENT PROHIBITED BY APPLICABLE LAW SHALL HAVE NO GREATER DURATION THAN THE WARRANTY PERIOD SET FORTH ABOVE. UNDER NO CIRCUMSTANCES SHALL CLARION BE LIABLE FOR ANY LOSS OR DAMAGE, DIRECT OR CONSEQUENTIAL, ARISING OUT OF THE USE OR INABILITY TO USE THE PRODUCT. BECAUSE SOME STATES DO NOT ALLOW LIMITATIONS ON HOW LONG AN IMPLIED WARRANTY LASTS OR EXCLUSIONS OR LIMITATIONS OF INCIDENTAL OR CONSEQUENTIAL DAMAGES, THE ABOVE LIMITATIONS OR EXCLUSIONS MAY NOT APPLY TO YOU.