Owner’s manual Bedienungsanleitung Руководство пользователя Manual del Usuario Manuale d'uso Manuel de l'utilisateur OHM888VD OHM1088VD OHM1588VD OVERHEAD MONITOR SYSTEM DVD PLAYER DECKENMONITOR MIT DVD PLAYER DVD-ПРОИГРЫВАТЕЛЬ С ОТКИДНЫМ МОНИТОРОМ SISTEMA REPRODUCTOR DE DVD CON MONITOR DE TECHO LETTORE DVD PER SISTEMA MONITOR RIBALTABILE LECTEUR DVD À MONITEUR SUSPENDU
Thank you for purchasing this Clarion product. y Please read this owner’s manual in its entirety before operating this equipment. y After reading this manual, keep it handy, such as in your glove compartment. y Save your sales receipt. Your sales receipt is essential for warranty service. Content 1. FEATURES .....................................................................................................................3 Image features ...................................................................
1. FEATURES WARNING The Clarion OHM888VD / OHM1088VD / OHM1588VD overhead monitor players are designed strictly for rear-seat entertainment. Viewing the monitor while operating a motor vehicle can result in serious injury and/or property damage. Clarion is not responsible for any injury and/or property damage as a result of the improper use or viewing of the monitor.
y y y Manual display angle adjustment: vertically adjustable up and down with a maximum angle of 150 degrees Adjustable color, contrast brightness, and hue (PAL) or tint (NTSC) On-screen display (OSD) of configuration options DVD video features DVD drive that supports the following formats: y y y y y y DVDs 12cm Video CDs 12cm Audio CDs 12cm MP3 CDs 12cm Playback of CDs with two recorded sessions (one audio and one data). Multi-sound ( ): DVD audio that supports up to eight languages per film.
2. PRECAUTIONS Failure to observe these precautions may damage your car, the monitor, or the video source, and may void the warranty. For questions or problems not covered in this manual, contact your local Clarion Dealer. Operating y y y y y y y Do not operate this product in ways other than those described in this manual. Failure to follow instructions may void the warranty. Do not use the unit with the ignition off. This could drain the car’s battery.
Installation Installation of mobile audio and video components requires experience with a variety of mechanical and electrical procedures. Although this manual provides general installation and operation instructions, it does not show the exact installation methods for your particular vehicle. If you do not have the required knowledge, experience, and/or tools to successfully complete the installation, consult an authorized Clarion Dealer about professional installation options.
3.
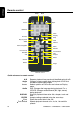
Note: The dome light switch works only when the green dome light wire is connected to the door sensor and the polarity switch is set correctly. See the vehicle’s wiring manual for connection details. Eject button (EJECT) Increase button (+) IR window Menu button (MENU) Fast Forward button (FF) Play/pause button (PLAY) Power button (POWER) Rewind (fast reverse) button (REW) Release button Stop button (STOP) Ejects the disc. Increase a value in a menu, such as the volume.
Monitor open Screw hole Screw hole Reset Button LCD off switch Screw hole Screw hole Looking up from directly below at the player with the LCD panel open Quick reference to controls with monitor open LCD off switch Reset button Screw holes Turns off the LCD screen. Press with a pencil or other narrow-tipped tool to return all setup options to their factory default values. Used to attach the player to the mounting plate.
Remote control Setup POWER SETUP Mute MUTE Power Eject 1 2 3 4 5 6 7 8 9 0 DISPLAY GOTO Numbers Display Previous Play or pause Goto Stop VOL AUDIO Next > Audio Volume MENU > Menu navigation ENTER > Menu SUBTITLE > Fast reverse Random A-B RANDOM A-B REPEAT TITLE SRC RETURN ANGLE ZOOM Subtitle Fast forward Title Repeat Zoom Source Return Angle Remote control Quick reference to remote control A-B Angle Arrows Audio DISPLAY ENTER Eject Fast forward 10 Repeats pla
Goto Menu Mute Next Numbers Play or pause Power Previous Random Repeat Return Rewind (fast reverse) Setup Source Stop Subtitle Title Volume) Zoom Starts playback at the selected chapter, track or time. Displays the DVD’s main menu. Press and hold to view the Display menu. Disables and enables sound. Jumps to next chapter on a DVD or to next track on a CD. Used to directly enter track numbers and to configure some options. Starts and stops playback of a DVD or CD. Turns the player on and off.
4. OPERATIONS The monitor and DVD player provide the video; headphones provide the audio. The unit receives power from the power connector used for the car’s dome light, which the unit replaces. Opening the monitor 1. Press the release button to open the overhead monitor screen. Release button ON OFF DOOR Looking up at the monitor from directly below 2. Gently swing the LCD down and adjust the angle for viewing.
Note: When closing the LCD panel, do not let cords or other items get caught between the LCD and the overhead housing. Doing so can seriously damage the TFT screen. For safety, close the LCD panel when you are not using it. Handling discs y y y y y To keep a disc clean, do not touch the play side (non-label side). Do not attach sticky notes to or put tape on a disc. Keep discs away from direct sunlight and heat. Store discs in a protective disc case.
3. The player displays “Loading.” Aim the remote control directly at the IR receiver on the player and press the play/pause button ( ) or press ENTER (on the remote). Using the remote control y Use the remote control only inside the vehicle. y Use the remote control no further than five feet (three meters) from the sensor. y Direct sunlight (or a very bright light) reduces sensitivity to remote signals. Do not use the player in direct sunlight.
Installing batteries in the headphones If this is the first time you’re using the system, install batteries in the headphones. Change the batteries when you begin to hear distorted audio that cuts in and out. 1. 2. 3. 4. 5. Rotate the left earpiece so the battery cover is accessible. Slide the battery cover down. If replacing the batteries, remove the discharged batteries. Insert the new AAA batteries according to the polarity marked inside the battery compartment. Slide the battery cover back into place.
Status information To view status information about the current viewing session, press the DISPLAY button continuously to cycle through the following information. Status information Changing languages Note: All audible languages must be pre-recorded on the DVD. Some DVDs only allow language access through the DVD menu. y To change the audible language, press the AUDIO button on the remote. The player displays the current language number and name, and the total number of languages available.
Using subtitles Language subtitles are normally off. Note: Subtitles must be on the DVD. Some DVDs only allow subtitle access through the DVD menu. y To turn subtitles on, press the SUBTITLE button. The player displays the current language number and name, and the total number of languages for which subtitles are available. Sample subtitle option y y If the DVD provides subtitles in multiple languages, continue pressing the SUBTITLE button to change the subtitle language.
Repeating favorite sections To repeat a favorite section you must first mark where it begins and ends. 1. Play back the DVD. 2. To identify the beginning of your favorite section (point A), press the A-B button when the section starts playing back. 3. To identify the end of your favorite section (point B), press the A-B button again when play back reaches the end of the section. To repeat this section, press the A-B button on the remote.
The player displays the “Operation Menu.” Setup options 2. Press the MENU button again to alternate among the available options: Contrast Brightness Color Wide Screen Adjusts the differences between the light and dark areas of the image. Makes the whole image lighter or darker. Adjusts color based on the color spectrum. Selects the aspect ratio (width vs. height) of the image. Options are Wide (16:9) and Normal (4:3) for the OHM888VD and OHM1088VD.
y Off resumes normal playback. Repeating favorite sections To repeat a favorite section you must first mark where it begins and ends. 1. Play back the CD. 2. To identify the beginning of your favorite section (point A), press the A-B button on the remote when the section starts playing back. 3. To identify the end of your favorite section (point B), press the A-B button again when play back reaches the end of the section. To repeat this section, press the A-B button on the remote.
Folder contents 5. 6. To select the MP3 file, press the up and down buttons on the remote. To play the file, press the ENTER button on the remote. MP3 controls y y To play back to the next MP3 file, press the next button ( ). To play back the previous MP3 file, press the previous button ( ) Repeating MP3s To repeat a single MP3 file, press the REPEAT button on the remote. To cycle through all the following settings, continue to press REPEAT. y Repeat single repeats the current file.
Changing the battery in the remote control The battery needs changing when the buttons on the remote stop working or when you have to move closer and closer to the player for the remote to work Precautions y Dispose of used batteries properly. y Do not dispose of used batteries throwing them into fire. If you do so, they may explode. y Do not short the positive (+) and negative (-) terminals. y Keep the battery and its holder away from young children.
5. INSTALLATION AND WIRING Do not attempt to install or service your player yourself. Installation and servicing require experience in electronic equipment and automotive accessories. If you do not have the knowledge or experience this installation may be dangerous and could expose you to the risk of electric shock or other hazards. Read these instructions and precautions carefully. Improper installation can damage the monitor and the vehicle.
CAUTION Do not open the case. There are no serviceable parts inside. If you drop anything into the unit during installation, consult with your Clarion Dealer or an authorized Clarion service center. Mounting and wiring precautions The OHM888VD / OHM1088VD / OHM1588VD should be mounted in the ceiling of the vehicle. The front panel controls should be easily accessible from the rear seat. In addition: y This unit is exclusively for vehicles with a negative ground, 12V power supply.
9 Polarity switch Please slide to "-" at the left position if your vehicle's power supply system is negative. Please slide to "+" at the right position if your vehicle's power sypply system is positive Notes: 1 Please slide it to a side fully. 2. Do not slide this swith after Place it at a position. Otherwise, it'll be damage Back of the player 3. If the vehicle’s power supply requires negative polarity, slide this switch to the negative (-) position.
5. 6. dome light wire on the overhead monitor system. Plug in any audio/video source cables. Plug in the power harness into the overhead monitor system in the following order: ground wire, battery wire, ACC wire and door wire. Note: Do not forget to connect the red ACC wire to the ignition switch. If you do not connect this wire, the battery charge may drain off prematurely.
Install the monitor 1. Carefully hold the overhead monitor up to the metal mounting plate. 2. Screw in the four CM 4 x 8 screws making sure the wires are not in the way. Mounting the player 3. 4. Reconnect the battery. Check the car’s brake lights, blinkers, wiper, etc. to ensure they are working properly.
6. SETTING PREFERENCES Accessing the on-screen display menus 1. Press SETUP on the remote to access the OSD menus. The main Display menu appears. General setup page 2. Press (left arrow) and (right arrow) to alternate among three option pages: GENERAL SETUP PAGE, SPEAKER SETUP PAGE and PREFERENCE PAGE. Note: To access the PREFERENCE PAGE the DVD slot must be empty. Eject any DVD or CD in the drive. 4. 5. 6. Press ENTER to select the option you wish to change. Press ENTER to confirm your selection.
6. password. Press SETUP to exit the on-screen display menus. General setup page This page controls standard DVD options. General setup page Setting ANGLE MARK OSD LANG CAPTIONS SCREEN SAVER Value and Description Turns multiple-angle feature on and off. Multiple angles must be pre-recorded on the DVD. To determine if the DVD supports multiple angles, look for the multiple-angle symbol on the disc jacket ( ). ON Enables the use the ANGLE button to select a different angle for the current scene.
Preference page This page controls system-wide preferences. Preference page TV TYPE AUDIO SUBTITLE DISC MENU PARENTAL Selects the TV system. Changing this option also changes the RCA AV output. PAL For Europe and Asia AUTO NTSC For the United States Selects the audible language for the DVD audio track. ENGLISH, FRENCH, SPANISH, GERMAN, RUSSIAN Selects the language for subtitles. ENGLISH, FRENCH, SPANISH, GERMAN, RUSSIAN OFF Turns subtitles off.
7. TROUBLESHOOTING If operations freeze, the screen goes blank, or the player otherwise does not function properly, try turning it off and back on again. If it still does not respond, press the reset switch on the front panel. Reset button Player with the monitor open Player does not turn on y The car’s ignition may be off. Turn on the ignition to the ACC (Accessory) position. y The player may not be on. Turn the player’s power on. y There may be condensation in the player.
The picture occasionally skips y The disc is dirty or scratched. Clean or replace the disc. The picture is blurred y You may be passing near a high voltage wire, transformer, aircraft or other source of electrical interference. The picture will improve when you move away from the source interference. The picture is very dark y The temperature in the car is very low. At low temperatures LCD screen display dark pictures. The picture will improve as the temperature rises. y The brightness is set too high.
8. GLOSSARY Active matrix: A flat panel display technology that produces a brighter and sharper display and a broader viewing angle than passive matrix panels. Each pixel has its own thin film transistor (TFT) and is sometimes called a “TFT screen.” Aspect ratio: The comparison of the width to the height of an object. Audio/video (A/V) source: Any additional audio and/or video device that has a composite RCA output, such as a game player, VCR, digital camera, etc. CD: Compact Disc.
9. SPECIFICATIONS OHM888VD Power supply (car battery) Test voltage Operating current Current consumption Max current consumption Mechanism Video system Screen Resolution Display angle Viewing angle (up/down/left/right) Weight Video signal Operating temperature Storage temperature Dome light OHM1088VD OHM1588VD 12V DC (10V-16V) 14V, negative ground <1.3A <1.5A <6mA <1.8A <2A Manual open and close Auto, NTSC and PAL 8” diagonal 10.2” diagonal 15.
Clarion Europa GmbH Hessenring 19-21, D-64546 Moerfelden-Walldorf All Rights Reserved. Copyright © 2008: Clarion Co.