Owner’s manual Mode d’emploi Manual de instrucciones DXZ555MP CD/MP3/WMA Receiver / CeNET Control • Récepteur CD/MP3/WMA / Commande CeNET • Reproductor de discos CD/MP3/WMA con receptor y control CeNET Clarion Co., Ltd. 2004/12 All Rights Reserved. Copyright © 2004: Clarion Co., Ltd.
English Thank you for purchasing this Clarion product. ∗ Please read this owner’s manual in its entirety before operating this equipment. ∗ After reading this manual, be sure to keep it in a handy place (e.g., glove compartment). ∗ Check the contents of the enclosed warranty card and keep it carefully with this manual. ∗ This manual includes the operating procedures of the CD changer and TV tuner connected via the CeNET cable.
Display Items Flip Down Panel 1. When the inside of the car is very cold and the player is used soon after switching on the heater moisture may form on the disc or the optical parts of the player and proper playback may not be possible. If moisture forms on the disc, wipe it off with a soft cloth. If moisture forms on the optical parts of the player, do not use the player for about one hour. The condensation will disappear naturally allowing normal operation.
Major button operations when external equipment is connected to this unit 4. NOMENCLATURE Note: • Be sure to read this chapter referring to the front diagrams of chapter “3. CONTROLS” on page 5 (unfold). ● When the CD/DVD changer is connected Français Español ∗ For details, see the section “CD changer operations”. For the DVD changer, refer to the Owner’s Manual provided with the DVD changer. Names of the Buttons and their Functions [ ] [ROTARY] [OPEN] [SENSOR] [ISR] [OPEN] button [P.
Major button operations when external equipment is connected to this unit 4. NOMENCLATURE Note: • Be sure to read this chapter referring to the front diagrams of chapter “3. CONTROLS” on page 5 (unfold). ● When the CD/DVD changer is connected Français Español ∗ For details, see the section “CD changer operations”. For the DVD changer, refer to the Owner’s Manual provided with the DVD changer. Names of the Buttons and their Functions [ ] [ROTARY] [OPEN] [SENSOR] [ISR] [OPEN] button [P.
Display Items Flip Down Panel 1. When the inside of the car is very cold and the player is used soon after switching on the heater moisture may form on the disc or the optical parts of the player and proper playback may not be possible. If moisture forms on the disc, wipe it off with a soft cloth. If moisture forms on the optical parts of the player, do not use the player for about one hour. The condensation will disappear naturally allowing normal operation.
English 5. DCP The control panel can be detached to prevent theft. When detaching the control panel, store it in the DCP (DETACHABLE CONTROL PANEL) case to prevent scratches. We recommend taking the DCP with you when leaving the car. Be sure to close the HOLD FLAP for safety when removing the DCP. Removing the DCP 1. Insert the right side of the DCP into the main unit. 2. Insert the left side of the DCP into the main unit. 1. Press the [SRC] button for 1 second or longer to turn off the power. 2.
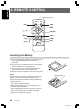
English 6. REMOTE CONTROL Signal transmitter [SRC] [BND] [ ] [ ], [ ] [a], [d] [MUTE] [DISP] [ISR] [RDM] [SCN] [RPT] Inserting the Battery 1 Turn over the remote control unit and slide the cover in the direction indicated by the arrow in the illustration. 2 Insert the battery (CR2025) into the insertion guides, with the printed side (+) facing upwards. 3 Press the battery in the direction indicated by the arrow so that it slides into the compartment.
Mode Radio/SIRIUS CD changer DVD changer CD/MP3/WMA Button TV [SRC] Switches among radio, SIRIUS tuner, CD/MP3/WMA, CD changer, DVD changer, TV and AUX. [BND] Switches reception band. Plays the first track. Top play. Moves the next disc in increasing order. Switches reception band. [ ],[ ] Increases and decreases volume (in all modes). [ ],[ ] Moves preset channels up and down. Moves tracks up and down. When pressed and held for 1 second: Fast-forward/fast-backward.
English 7. OPERATIONS Basic Operations Note:Be sure to read this chapter referring to the front diagrams of chapter “3. CONTROLS” on page 5 (unfold). CAUTION Be sure to lower the volume before switching off the unit power or the ignition key. The unit remembers its last volume setting. If you switch the power off with the volume up, when you switch the power back on, the sudden loud volume may hurt your hearing and damage the unit.
Basic Operations 1. Press the [Z+] button and select the ZEnhancer Plus mode to adjust. 2. Press the [A-M] button and turning the [ROTARY] knob clockwise adjusts in the + direction; turning it counterclockwise adjusts in the – direction. ●When “B-BOOST 0” selected, you can adjust the bass in the range of –3 to 3. ●When “IMPACT 0” selected, you can adjust the bass and treble in the range of –3 to 3. ●When “EXCITE 0” selected, you can adjust the bass and treble in the range of –3 to 3.
English Basic Operations Radio Operations Adjusting the fader Listening to the radio 1. Press the [A-M] button and select “FAD 0”. 2. Turning the [ROTARY] knob clockwise emphasizes the sound from the front speakers; turning it counterclockwise emphasizes the sound from the rear speakers. 1. Press the [SRC] button and select the radio mode. The frequency appears in the display. 2. Press the [BND] button and select the radio band.
Radio Operations Instant station recall (ISR) Instant station recall is a special radio preset that instantly accesses a favorite radio station at a touch of a button. The ISR function even operates with the unit in other modes. ●ISR memory 1. Select the station that you wish to store in ISR memory. 2. Press and hold the [ISR] button for 2 seconds or longer. ●Recalling a station with ISR In any mode, press the [ISR] button to turn on the radio function and tune the selected radio station.
CD/MP3/WMA Operations English MP3/WMA What is MP3? MP3 is an audio compression method and classified into audio layer 3 of MPEG standards. This audio compression method has penetrated into PC users and become a standard format. This MP3 features the original audio data compression to about 10 percent of its initial size with a high sound quality. This means that about 10 music CDs can be recorded on a CDR disc or CD-RW disc to allow a long listening time without having to change CDs.
CD/MP3/WMA Operations Setting Set to CD Set to MP3/WMA Mixed with CD and Play CD Play MP3/WMA MP3/WMA type tracks CD type track only Play CD Play CD MP3/WMA type track only Play MP3/WMA Play MP3/WMA 2. After making these settings, remove the disc and then reinsert it. 3. When a mixed mode CD is loaded and CD is set, the track to be played first is MP3/WMA file data and no sound is heard. Note: • When playing a CCCD (Copy Control CD), set the setting to CD type.
CD/MP3/WMA Operations English Displaying CD titles Folder Select This unit can display title data for CD-text/MP3/ WMA disc and user titles input with this unit. 1. Press the [D] button to display the title. 2. Each time you press the [T] button, the title display changes in the following order: ●CD-TEXT disc User title (disc) ➜ CD-text title (disc) ➜ Artist name ➜ CD-text title (track) ➜ User title (disc)... ●MP3/WMA disc Folder ➜ Track ➜ Album TAG ➜ Artist TAG ➜ Title TAG ➜ Folder...
CD/MP3/WMA Operations ∗ Folder scan play starts from the next track after the track currently being played. ● Repeat play This function allows you to play the current track repeatedly. 1. Press the [RPT] button to perform repeat play. The indication “RPT” lights in the display. 3. Press the [DN] button to move to the previous play list. Press the [UP] button to move to the next play list. Notes: • The SCN/RPT/RDM functions cannot be used while in the play list mode.
Operations Common to Each Mode English To change display setting 1. Press and hold the [D] button for 1 second or longer to switch to the adjustment selection display. 2. Press the [a, d] lever upward or downward to select the “item name”. “CLOCK” ↔ “SCREEN SVR” ↔ “MSG INP” ↔ “AUTO SCROL” ↔ “DIMMER” ↔ “CONTRAST” 3. Turn the [ROTARY] knob to select the “desired setting value”.
Operations Common to Each Mode ● Performing a system check You can adjust the display contrast to match the angle of installation of the unit. This function allows you to perform a system check from the adjust mode when required. 2-1. Select “SYS CHK “. ∗ The factory default setting is “5”. 2-1. Select “CONTRAST”. 3-1. Turn the [ROTARY] knob to select from 1-8. To change other settings 1. Press the [ADJ] button to switch to the adjustment selection display. 2.
Operations Common to Each Mode English Clearing titles 1. Select and play a CD in the CD changer or tune in to a TV station or TUNER for which you want to clear the title. 2. Press the [D] button and display the title display. 3. Press and hold the [T] button for 1 second or longer. The display switches to the title input display. 4. Press and hold the [BND] button for 1 second or longer. All characters in the title disappear. 5.
TV Operations Procedure to scroll a title Note: • The following operations are performed the same as for radio mode: ∗ Channel selection ∗ Storing channels in memory ∗ Calling channels from memory ∗ Auto store ∗ Preset scan See “Radio Operations” (page 14-15) for details. Set “SCROLL” to “ON” or “OFF”. (The factory default setting is “ON”. Refer to the subsection “Turning the screen saver function on or off” in section “Operation common to each mode”.
General Problem Cause Fuse is blown. Replace with a fuse of the same amperage. If the fuse blows again, consult your store of purchase. Incorrect wiring. Consult your store of purchase. No sound output when operating the unit with amplifiers or power antenna attached. Power antenna lead is shorted to ground or excessive current is required for remote-on the amplifiers or power antenna. 1. Turn the unit off. 2. Remove all wires attached to the power antenna lead.
English 10. ERROR DISPLAYS If an error occurs, one of the following displays is displayed. Take the measures described below to eliminate the problem. DVD changer CD changer CD/MP3/WMA Error Display Cause Measure ERROR 2 A CD is caught inside the CD deck and is not ejected. This is a failure of CD deck’s mechanism and consult your store of purchase. ERROR 3 A CD cannot be played due to scratches, etc. Replace with a non-scratched, non-warped-disc.
English 11. SPECIFICATIONS FM Tuner Audio Frequency Range: 87.9 MHz to 107.9 MHz Usable Sensitivity: 9 dBf 50dB Quieting Sensitivity: 15 dBf Alternate Channel Selectivity: 70 dB Stereo Separation (1 kHz): 35 dB Frequency Response (±3 dB): 30 Hz to 15 kHz Maximum Power Output: 212 W (53 W ✕ 4 ch) Continuous Average Power Output: 18 W ✕ 4, into 4 Ω, 20 Hz to 20 kHz, 1%THD Bass Control Action (50 Hz/80 Hz/120 Hz): +16 dB, -12dB Treble Control Action (8 kHz/12 kHz): ±12 dB Line Output Level (CD 1 kHz): 1.
Owner’s manual Mode d’emploi Manual de instrucciones DXZ555MP CD/MP3/WMA Receiver / CeNET Control • Récepteur CD/MP3/WMA / Commande CeNET • Reproductor de discos CD/MP3/WMA con receptor y control CeNET Clarion Co., Ltd. 2004/12 All Rights Reserved. Copyright © 2004: Clarion Co., Ltd.