Thank you for purchasing Mitsubishi Multi Entertainment System (MMES). • Please read this owner’s manual thoroughly before operating MMES. • After reading this manual, be sure to keep it handy for future reference. Contents Audio ................................................................................................................................................... 3 Playable Discs ....................................................................................................................
Contents 4. SOURCE OPERATIONS.....................................................................................................................................................................20 Radio Operations ................................................................................................................................................................................20 Audio CD Operations....................................................................................................
Audio 3
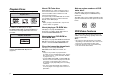
About CD Extra discs Playable Discs This DVD player can play the following discs: Playable discs DVD video discs Audio CDs CD TEXT In addition, the DVD player can play CD-R/RW, DVD-R/RW, and DVD+R/RW discs on which the following media files have been recorded: Playable media files MP3/WMA/AAC A CD Extra disc is a disc in which a total of two sessions have been recorded. The first session is Audio session and the second session is Data session.
Multi-sound function Multi-story function DVD video can store up to 8 languages for one film; select the language of your preference. • The languages stored on the disc are indicated by the icon shown below. When a DVD video contains more than one story for a film, you can select the story you wish to enjoy. The operation procedures vary with the disc; observe the instructions for selecting a story provided during playback.
1. PRECAUTIONS WARNING For your safety, the driver should not watch the DVD video/movie data or operate the controls while driving. Please note that watching and operating the DVD video/movie data while driving are prohibited by law in some countries. Also, while driving, keep the volume to a level at which external sounds can be heard. 1.
• Do not push the case surrounding the touchkey panel with much force. This may cause malfunctioning of the touchkeys. Cleaning • Cleaning the cabinet Use a soft and dry cloth and gently wipe off the dirt. For tough dirt, apply some neutral detergent diluted in water to a soft cloth, wipe off the dirt gently, then wipe again with a dry cloth. Do not use benzene, thinner, car cleaner, etc., as these substances may damage the cabinet or cause the paint to peel.
This device complies with Part 15 of the FCC Rules and with RSS-210 of Industry Canada. Operation is subject to the following two conditions: (1) This device may not cause harmful interference, and (2) this device must accept any interference received, including interference that may cause undesired operation. Le présent appareil est conforme aux CNR d'Industrie Canada applicables aux appareils radio exempts de licence.
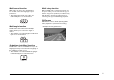
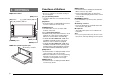
Functions of Buttons 2. CONTROLS Note: • Be sure to read this section while referring to the front diagram. l Operation Panel [MAP] button [∧], [∨](Tune/Track) buttons [{], [}] (Volume) buttons [AV] button Microphone [POWER] button [OPEN/nTILT] button [DEST] button [MENU] button l With the operation panel open SD memory card slot 8 [{], [}] (Volume) buttons • Use these buttons to increase/decrease the volume.
Outline of Button and Touchkey Operation Turning the power on Note: *1 These images indicate the buttons to press or keys to touch. Engine ON position Note: • Start the engine before using this unit. • Be careful about using this unit for a long time without running the engine. If you drain the car’s battery too far, you may not be able to start the engine and this can reduce the service life of the battery. System check The format utilized on this unit is provided with a system check function.
Tuner mode operation (Source screen) Preset ch. Switches the radio band. • Select desired station after selecting radio band.
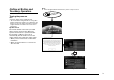
DVD Video mode operation (Source screen) (DVD Video mode screen) (DVD top menu) (Settings screen) (Default screen) 11
Adjusting the General settings (Audio screen) (Display Adj.
3. BASIC OPERATIONS When the following caution screen is displayed Note: • Be sure to read this chapter while referring to “2. Controls” (page 8). Turning the Power On/Off Note: • Start the engine before using this unit. • Be careful about using this unit for a long time without running the engine. If you drain the car’s battery too far, you may not be able to start the engine and this can reduce the service life of the battery. q Turning the power on 1. Start the engine.
3. Touch the [Panel Open/Close] key when the operation panel is open. The operation panel closes. Switching the Operation Mode Turning the Monitor Display Off Adjusting the angle of the operation panel To switch to the Source menu screen from the Navigation screen, press the [AV] button twice. To switch to the Navigation screen from the Source menu screen, press the [MAP] button. You can turn off the monitor display, and change it to a black screen. 1.
Adjusting the Volume 1. Press the [{], [}] (Volume) buttons to adjust the volume. [{] button: Increases the volume. [}] button: Decreases the volume. • The volume level has a range of 0 (min.) to 31 (max.). CAUTION While driving, keep the volume at a level at which external sounds can be heard. Setting/Ejecting a Disc A CD Extra disc is a disc in which a total of two sessions have been recorded. The first session is an Audio session and the second session is a Data session.
Storage After setting a disc • Do not expose discs to direct sunlight or any heat source. • Do not expose discs to excess humidity or dust. • Do not expose discs to direct heat from heaters. The system automatically switches to the relevant source mode according to the disc, and starts playing back the disc. When a DVD video disc is set: The system is switched to the DVD Video mode. See “DVD video Operations” (page 26). When an Audio CD is set: The system is switched to the Audio CD mode.
q Inserting an SD memory card CAUTION • For your safety, the driver should not insert or remove an SD memory card. • Do not start the vehicle’s engine while the SD memory card is inserted, since it may result in loss or damage to data on the SD memory card. Insert the SD memory card to this unit after starting the engine. About MP3/WMA/AAC playback This unit can play back SD memory cards on which MP3/WMA/AAC music data have been stored. É “MP3/WMA/AAC Operations” (page 24).
q Connecting a USB media device CAUTION • For your safety, the driver should not connect or disconnect a USB media device. • Do not start the vehicle’s engine while the USB media device is connected, since it may result in loss or damage to data on the USB media device. Connect the USB media device to this unit after starting the engine. 1. Turn on the power of your USB media device, if required. 2.
*2 The source mode differs depending on the device connected. When no device is connected, “No USB memory.” is displayed. Selecting the Telephone mode Touching the [Phone] key after pressing the [MENU] button calls the Telephone mode. Even in the Telephone mode, the previous Source mode is kept operating. É “Telephone Operations” (page 37) Steering Remote Control Operations You can use the Steering Remote Control to perform various audio operations.
4. SOURCE OPERATIONS q Tuner mode screen Information pane Preset keys Radio Operations This unit supports FM and AM radio reception. This unit also has a built-in “Radio Data System” (RDS) decoder system that supports broadcast stations transmitting RDS data. RDS functions are only available for the FM band. Note: • When you store a station without broadcasting RDS data to the preset memory, store the station after receiving it for more than 10 seconds.
Manual memory 1. Touch the [Band] key to select the desired band. 2. Select the desired station with the manual tuning or preset tuning. 3. Touch and hold one of the Preset key for more than 1.5 seconds to store the current station into the preset memory. Displaying the Station List You can display a list of stations that are currently receivable. 1. Touch the [FM/AM] key to select the desired band. 2. Touch the [Station] key to display the Station List screen.
q PTY (Program Type) function Note: • This function is only available when using Radio Data System functions. This function enables you to listen to a broadcast of the specified programme type when the broadcast starts, even if the system operates in a mode other than Tuner mode. Some countries do not yet have PTY broadcasts. In TA standby mode, a TA broadcast has priority over a PTY broadcast. The default setting is OFF. Setting the PTY function 1. Touch the [Settings] key to display the Settings screen.
Audio CD Operations q Audio CD mode screen This system is a CD TEXT compatible model, and supports the display of DISC TITLE, TRACK TITLE, and TRACK ARTIST information from CD TEXT. Note: • This unit supports CD TEXT in English, French, and German. Some characters may not be reproduced properly on the display. q Selecting Audio CD mode 1. Insert an audio CD into the unit. The system will automatically read the disc data, change to Audio CD mode, and start playback after a short time.
[Shuffle Folder] key: Plays back tracks in a single folder on a disc in random order. [Shuffle Folder] is displayed on the information pane. Note: • The play mode cannot be cancelled. Normally, it should be set to [Repeat All]. MP3/WMA/AAC Operations This system can play MP3/WMA/AAC data recorded on a disc. q About the MP3/WMA/AAC files What is MP3/WMA/AAC? MP3, WMA, and AAC are audio compression methods which have become standard formats.
• Playable AAC specifications Item Specification Format Advanced Audio Coding High-Efficiency Advanced Audio Coding Sampling frequency (kHz) 11.025/16/22.05/24/32/44.1/48 Bit rate (kbps) 8/16/20 (for 11.025 kHz) 24/28 (for 16 kHz) 16/32 (for 22.05 kHz) 20/40 (for 24 kHz) 24/28/32/48/56 (for 32 kHz) 40/48*1/56/64*1/80*1/96*1/112/ 128*1/160*1/192*1/224/256*1/ 320 (44.1 kHz) 56/64*1/80*1/96*1/112/128*1/ 160*1/192*1/224/256*1/320 (48 kHz) *1 VBR playback is supported.
q MP3/WMA/AAC mode screen Information pane Folder name • These functions are performed in the current folder only. Fast forward and fast backward 1. Keep pressing the [∧] or [∨] (TUNE/ TRACK) button during playback. The playback speed becomes 30-times faster. Release the button to resume playback at normal speed. File type Folder list pane q MP3/WMA/AAC operations Selecting a track to play 1. Touch the desired Folder key on the Folder list pane to display the Track list screen.
2. Touch the [Top Menu] or [Title Menu] key during playback. The DVD menu appears. • The displayed contents for each key differ depending on the DVD software. • An example shown below is the DVD menu display: Switching the cursor/keypad panel position If the menu items are being obscured by some of the keys, you can move the cursor and keypad panels to the opposite side of the screen. [Left] Pausing playback 1. Showing the DVD Video mode screen, touch the [p] key during playback. Playback pauses. 2.
Skipping chapters (searching) “Chapter” means a small segment to divide the “Title” (film) which is recorded on the disc. 1. Showing the DVD Video mode screen, press the [∧ (TUNE TRACK)] or [∨ (TUNE TRACK)] button during playback. Chapters are skipped as many as the times touching the key, and playback starts. ∨ Chapter Current location Chapter down q Changing the DVD System Settings Note: • If a Setup operation is performed during DVD video playback, playback will restart from beginning.
3-2. Touch the key for the item you want to adjust. • To adjust the brightness, touch the [Brightness] key. • To adjust the colour, touch the [Colour] key. • To adjust the black level, touch the [Black Level] key. 3-3. To increase the setting, touch the [+] key. To decrease the setting, touch the [–] key. Selecting the screen size be cut off in this mode. Setting up the screen size Set up the screen size to match the rear monitor connected to this unit (if you are using an optional rear monitor).
3-3. Select your preferred audio language. See the following table. 3-3. Select your preferred subtitle language. See the following table. Language Language English English French French German German Nederland Nederland Italian Italian Português Português Spanish Spanish Swedish Swedish Chinese Chinese Japanese Japanese Korean Korean Switching subtitles On a DVD in which two or more subtitle languages have been included, you can designate which language to preferentially display.
3-3. Enter the country code for the parental level country. See the following table.
Setting up the parental level You can change the parental lock level (audio/ video restriction level). This function allows cutting scenes that are unfavorable for children or replacing them automatically with other scenes prepared in advance. The factory default setting is [OFF]. 3-1. Touch the [Default] key to display the Default screen. 3-2. Touch the [Parental Level] key to display the Default screen. 3-3. Enter the 4-digit password using the number keys, and touch the [OK] key. 3-4.
Note: • This system will not operate or may operate improperly with some USB memory devices. • Files protected with any DRM cannot be played. Tag information such as track title, artist name, and album title can be displayed for an MP3/WMA/AAC file containing tag information. 2. Touch the [SD Memory CARD] key to select SD Memory CARD mode. The system changes to SD Memory CARD mode, and starts playback from the previous position.
Folder representation in the folder list q USB mode screen Information pane Folder name The limitations on folder representation are the same as those in MP3/WMA/AAC (CD) mode. See “Folder representation in the Folder list” (page 25). q Selecting the USB mode 1. Connect your USB memory to the USB connector. The system changes to USB mode, and starts playback after a short time. WARNING • Some tracks may be recorded at a higher volume level than desired.
iPod mode screen [Menu] key [Mode] key 1. Press the [AV] button to display the Source screen. 2. Touch the [USB/iPod] key to select iPod mode. The system changes to USB mode (iPod mode), and starts playback from the previous position. q Controlling the iPod Operation keys Track keys (on the Track list pane) • Use to select the track you wish to play back. You can scroll the list by touching the { [{], [}], [ } } ] or [ { ] key.
[Albums] key: Lists all the Albums stored in the iPod or under the specified Artist or Composer. [Songs] key: Lists all the Tracks stored in the iPod. [Podcasts] key: You can narrow the Tracks to be listed by specifying the Podcast name. [Genres] key: Lists the available Genres to narrow the Artists to be listed. [Composers] key: Lists all the Composers stored in the iPod. Selecting tracks to be played from the Menu screen 1. Touch the [Menu] key to display the Menu screen. 2.
Type), the [TA] and [PTY] keys for these functions may appear on the screen. Touch the keys to display the corresponding screens. For details, see “RDS” (page 21). q Registering your Bluetooth audio player (Pairing) You can register up to 5 Bluetooth audio players. Registering operation is performed from the Bluetooth menu screen under the Settings menu. For the operation details, see “Bluetooth Settings” (page 42). To register your Bluetooth audio player, perform the following operation: 1.
• Making a call using the keypad screen, using the phonebook data downloaded from your mobile phone, using the Call History (incoming/outgoing call records), or using the Handset Memory (speed dial). q Telephone settings Note: • This system supports the profiles HFP, OPP, A2DP, AVRCP, and PBAP. However, this system will not operate or may operate improperly with some Bluetooth mobile phones according to their performance or specification.
• Touch the [Private] key to talk using the mobile phone, cancelling the hands-free function. To return to hands-free mode, connect your mobile phone again from the Phone screen. • Touch the [Mute] key to mute the microphone. To resume using the microphone, touch the [Cancel Mute] key. 4. When the call is finished, touch the [Hang up] key to hang up. Note: • Depending on the mobile phone, the connection with this system may be disconnected when entering Handset mode.
Using the Call History The system automatically records outgoing/ incoming call history data. You can confirm calls and use the records to make a call from this unit. • Up to 5 outgoing calls and 5 incoming calls can be recorded for each registered mobile phone. Note: • When using multiple registered mobile phones, the outgoing/incoming call records of one mobile phone do not display records made on other mobile phones. 1. Touch the [Call History] key. 2.
q Adjusting the balance/fader 1. Touch the [Balance/Fader] key. 2. Touch the [Volume Balance Control] key or the [Vocal Image Control] key. [Volume Balance Control] key: Adjusts the volume balance for the left, right, front, and rear speakers. [Vocal Image Control] key: Adjusts the volume balance of the vocals for the left, right, front, and rear speakers. 3. Touch the [Front] or [Rear] key to adjust the fader level. • The default setting is 0. • Adjustment range: front 5 to rear 5.
Note: • The brightness level adjustment operates upon the current Screen Colour mode. 1. Touch the [+] or [–] key to adjust the brightness level. [+] key: Makes the image brighter. [–] key: Makes the image dimmer.
Setting the Clock You can set various settings related to the clock. 1. Touch the [Clock] key. The Clock screen is displayed. 2. Touch the desired menu item to set. [On-screen Clock] key: Set whether to display the clock on the screen. [Clock Format (24h)] key: Set to [ON] to change the clock to 24-hour format. Turn off to change the clock to 12-hour format. Other Settings When you touch the [Others] key from the Settings menu, you can check system details and adjust various system settings.
7. TROUBLESHOOTING If you have a problem with this system, check the following items to resolve it. Consult your Mitsubishi Motors dealer for additional information. General Problem Power does not turn on. (No sound is produced.) The display is dark. There are red, green and blue points in the display. 44 Cause Measure Fuse is blown. Replace with a fuse of the same amperage. If the fuse blows again, consult your store of purchase. Incorrect wiring. Consult the nearest Mitsubishi Motors dealer.
DVD Player Problem Disc cannot be loaded. Sound skips or is noisy. Cause Measure Another disc is already loaded. Eject the disc before loading the new one. There is a foreign matter already in place. Eject the foreign matter forcibly. Disc is dirty. Clean the disc with a soft cloth. Disc is heavily scratched or warped. Replace with a disc with no scratches. MP3/WMA/AAC files are not encoded properly. Use MP3/WMA/AAC files encoded properly. Sound is bad directly after power is turned on.
USB Devices Problem USB device cannot be inserted. Cause The USB device has been inserted with wrong direction. Measure Reversing the connection direction of the USB device, try it again. The USB connector is broken. Replace with a new USB device. USB device is not recognized. The USB device is damaged. Disconnect the USB device and reconnect. If the device is still not recognized, try replacing with a different USB device. No sound heard with the display “No audio file.” shown.