Owner’s manual Mode d’emploi Manual de instrucciones DSC920S SIRIUS SATELLITE RADIO RECEIVER CONTROLLER CONTRÔLEUR DE RÉCEPTEUR RADIO SATELLITE SIRIUS CONTROLADOR DEL SINTONIZADOR SIRIUS DE RECEPCIÓN RADIO VÍA SATÉLITE
English Thank you for purchasing this Clarion DSC920S. ∗ Please read this owner’s manual in its entirety before operating this equipment. ∗ After reading this manual, be sure to keep it in a handy place (e.g., glove compartment). ∗ Check the contents of the enclosed warranty card and keep it carefully with this manual. Contents 1. PRECAUTIONS ............................................................................................................................... 2. SUMMARY OF THE DSC920S ...........
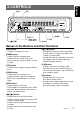
[P-M] English 3.CONTROLS [SS] [BAND] [DISP] [SAT] [CAT] [SCAN] Names of the Buttons and their Functions [SAT] button [w], [z] button • Used to turn the power on or off. • Used to move the preset channel up or down. • Used to move the category up or down in the Category selection mode. • Used to switch the item adjustment or the item in the Adjust mode. (Contrast adjustment, SIRIUS ID display switching) [BAND] button • Used to switch the reception band.
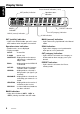
Display Items English Preset channel indication (1 to 6) SAT(satellite) indication Operation status indication PRESET indication BAND indication CAT(category) indication MANU (manual) indication SCAN indication SAT (satellite) indication: MANU (manual) indication: • Lights in the SIRIUS mode, goes off in some other mode or when the power is turned off. • Lights when tuning is performed in the Manual mode. Operation status indication: SCAN indication: • Station names, etc. are displayed.
Turning the power on/off 1. Press the [SAT] button to turn the power on/ off. When the power is turned on, “SAT” is displayed in the Operation status indication and then the display is changed to the channel being received. Verifying your Sirius ID 1. Press and hold the [SS] button for 1 second or longer to enter the Adjust mode. 2. Press the [a] or [d] to select the “ESN >>”.
Operations English ● Manual memory 1. Select a channel to be memorized. 2. Press the [P-M] button to enter the Preset memory mode. ∗ The reception channel number (“CH 051”) in the Operation status indication blinks and the PRESET indication light. 3. Press the [w] or [z] button to select a preset number to be memorized. ∗ The selected preset number is displayed in the Preset channel indication. 4. Press and hold the [P-M] button for 2 seconds or longer to store the channel being received in memory.
Operations English Switching the screen saver 1. Press the [SS] button to switch the screen saver. Each time the button is pressed, the screen saver is switched in the order of OFF ➜ SS1 ➜ SS2 ➜ OFF. ∗ If the screen saver is turned on and the button operation is performed, the screen saver mode is released. After information corresponding to the button operation is displayed for 30 seconds, the screen saver displayed is returned. When “OFF” is selected, the display is not lit.
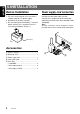
English 5.INSTALLATION Before Installation Power supply cord connection 1. This set is exclusively for use in cars with a negative ground, 12 V power supply. 2. Read these instructions carefully. 3. Be sure to disconnect the battery “–” terminal before starting. This is to prevent short circuits during installation. (Figure 1) Connect the connection cable securely. Connect the L-shaped side of the connection cable to the terminal of the Sirius Satellite Radio (DSH920S).
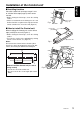
Installation of the Control unit English ■ Installing location Dashboard Place the Control unit on the passenger’s seat or stick the Velcro tape (large A) to the center console. ∗ Before sticking the Velcro tape, clean the sticking surface. ∗ Choose a location where the driving of a car is not hindered and the reception of the signals from the remote control unit is ensured as well (Figure 2).
English 10 DSC920S