ongratulations on your purchase of this Ungo System. Please read this manual thoroughly to familiarize yourself with your system’s components and operation. Discuss any questions you might have with your installing dealer. C Record the serial number of your Ungo system and keep all dealer records and receipts. Be sure to discuss the installation with the dealer so that you understand the specifics of the installation in your vehicle.
Table of Contents 1. About Your Ungo Security System . . . . . . . . . . . . . . . . . . . . . . . . . . . . . . . . . . . . . . . . . . . Page 1 2. Remote Transmitters Remote Transmitter Layout . . . . . . . . . . . . . . . . . . . . . . . . . . . . . . . . . . . . . . . . . . . .Page 2 Optional Driver Door Priority Feature . . . . . . . . . . . . . . . . . . . . . . . . . . . . . . . . . . . .Page 2 Battery Replacement . . . . . . . . . . . . . . . . . . . . . . . . . . . . . . . . . . . . . . . . . .
About Your Ungo Security System Ungo Security Systems are state-of-the-art vehicle protection systems equipped with features designed to: p Deter potential intrusions to the vehicle by continually flashing the system LED status indicator while the system is Armed, giving a visual indication to any passer-by that the vehicle is equipped with a security system. p Detect intrusions to the vehicle, including impacts to the vehicle’s body, and opening of the doors, trunk and hood.
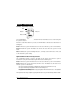
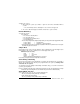
Remote Transmitters Remote Transmitter Layout LED Button 1 Button 2 Button 3 The Ungo MS2000 comes with 2 multi-function Remote Transmitters used to control nearly all of the system’s features. Each time a transmitter button is pressed, the LED will flash to indicate that a transmission is taking place. Button 1 Arms the system. This Button also locks the doors when the system is in Valet Mode. Button 2 Disarms the system. This Button also unlocks the doors when the system is in Valet Mode.
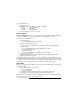
Battery Replacement Your Ungo Remote Transmitter uses a 12 volt alkaline battery, which will need to be replaced from time to time. Under normal conditions, the battery may last for up to a year before it needs replacement. When your Remote Transmitter’s battery is in need of replacement, you will notice a decrease in your system’s operating range or a decrease in the brightness of the Transmitter’s LED indicator.
Basic Features Remote Arming When Armed, the system monitors and protects 3 independent areas, or zones, including the doors, hood/trunk, and shock sensor. To Arm the System: 1. Turn off the ignition. 2. Press Button 1. • • • • The siren/horn will chirp once.* The doors will lock. The parking lights will flash once. The LED will turn on red, indicating the doors, hood and trunk inputs are activated.
To Bypass the sensors: 1. After arming the system, press Button 1 again on the Remote Transmitter within 5 seconds. • The siren will chirp 5 times, indicating the sensors have been bypassed. 2. The sensors will remain bypassed until the next time the system is armed. Remote Disarming To Disarm the System: Press Button 2. • The siren/horn will chirp twice.* • The doors will unlock. • The parking lights will flash twice.** • The LED will turn off.
To set the Arming Mode: 1. Turn the ignition on. 2. Within 4 seconds, press Button 3 to change the setting. one chirp two chirps three chirps = = = Passive Arming with chirp Active Arming Passive without chirp 3. Turn the ignition off to save your selection. Passive Arming When the Arming Mode has been set for Passive Arming, the system arms itself automatically, each time the ignition is turned off and all of the doors, hood and trunk are closed. To start the Passive Arming Process: 1.
Emergency Override In case your Remote Transmitter becomes inoperable, or it is lost or stolen, you can still enter and drive your car by using the following procedure. Be sure that you have your ignition keys ready and that you know the location of the Override switch before you perform this procedure. To override the system: 1. Unlock the door using the key. 2. Enter the vehicle. • Because the system is armed, the system will trigger and the siren will be sounding. 3. Turn ignition key on. 4.
Other Features Valet Mode Allows you to temporarily disable the security system when the car is being service or turned over to a parking attendant. To turn Valet Mode on or off: 1. Turn on the ignition. 2. Press and hold the override switch. 3. While holding the override switch, turn off the ignition. • The siren will chirp once to indicate you have turned Valet Mode on. • The siren will chirp twice to indicate you have turned Valet Mode off. 4. Release the override switch.
To operate the Auxiliary Function with the system Disarmed, press Button 3 for three seconds. • This function will stay active for as long as Button 3 is held. Trunk Disarm If the Auxiliary Function is being used to remotely open your car’s trunk, your installer can program the system to automatically disarm the alarm when the auxiliary function is pressed while the system is armed. This will allow you to load or retrieve packages from the trunk without having to first disarm the alarm.
Technical Data FCC ID: Specifications Main Unit Voltage: 12v, negative ground Current Consumption: <15mA Temperature Range: -40oF to +257 oF Auxiliary Output Capability: 500mA Internal Relays: (1) 30A, (1) 15A Transmitter Current Consumption: <.00mA, standby Battery Type: miniature 12v, type 23A MP62ZUUNGO701-702 HP92VUUNGO7000-2 THIS DEVICE COMPLIES WITH FCC RULES PART 15.
Warranty Information 1. Ungo Security Corporation of Gardena, California ("Ungo Security") warrants this Ungo system to be free from defects in materials and workmanship and to comply with Ungo Security’s applicable printed specifications. 2. Ungo Security systems carry a limited lifetime warranty on the Main unit (system brain) and transmitters.
Ungo Security Corporation A Clarion Company 661 West Redondo Beach Blvd. Gardena, CA 90247 800-Go-Clarion www.clarion-usa.com © Ungo Security Corporation, Gardena, CA 97-MS2000-10 Rev.